Wednesday, March 31, 2010

Create on Demand

Some of us like the thrill of a little healthy competition to get the creative juices flowing.  Others just like the chance to win awesome prizes. And some need a deadline to get things done.  Here is a list of upcoming and soon due challenges to get that muse off her rear and at the worktable!

ABS March Monthly Challenge - today by midnight!

ABS Color Challenge Contest - April 1st - tomorrow

Bead Dreams - April 5th

Vintaj April Challenge - Spring Riverbed - April 9th


BeadStar - April 30th


If you know of any others, please leave a comment and I will add them to the list.  Happy Creating!

(Deadlines button from Allegrae)

Look for the ABS Carnival Button!

The Art Bead Scene has some wonderful bloggers participating in our monthly Carnival Blog. The next one is April 14th. Can't wait? Wondering who the ABS Carnival Bloggers are? Just look for the ABS Carnival button on their blogs to find them.


We're always happy to welcome another dedicated Art Bead Scene reader to our Carnival Blogger Group! Interested in joining? Please send an email to Cindy saying you'd like to join.

Tuesday, March 30, 2010

Give Back to Haiti


I have teamed up with Andrew Thornton, to collaborate on a piece of jewelry that we wanted to auction off for charity to help in the efforts to rebuild Haiti after the devastating earthquakes. 

Go over to my blog post, and leave your bids in the comments. The auction started yesterday and continues through til Midnight on Monday, April 5th.

A donation will be made to The American Red Cross/ Haiti Relief Fund.

Monday, March 29, 2010

Designer of the Week: Jill Palumbo

Each Monday we feature the Designer of the Week. One of our editors pick their favorite from the Monthly Challenge entries. This week's featured designer is Jill Palumbo.


ABS Editor, Cindy Gimbrone had this to say about Jill's submission:

What a lovely entry into the ABS March Challenge! It's such a beautiful interpretation of Van Gogh's painting. Jill has really captured the painting's spirit and created a true statement piece. I look to seeing more from her!

If you'd like to see more of Jill's work, you can visit her Etsy Shop.

Sunday, March 28, 2010

Sundays with Cindy


Good morning, Beady Readers! Wondering what's going on in the bead and jewelry world? Take a peek at our links and see.....

About.com Jewelry Making
Tammy has been showing off some of her favorite jewelry pieces on her blog this week like this pretty earring and necklace set.

Art Bead Scene
It's the Art Bead Scene Monthly Carnival Blog. This month's theme is "passion."

Beading Arts
Does the beginning of spring lift your spirits? Cyndi has made a spring bracelet sponsored by Artbeads to celebrate this most wonderful of all seasons.

Carmi's Art/Life World
A vintage TUMs container becomes a necklace centerpiece in Carmi's project this week.

Cindy Gimbrone aka Lampwork Diva
Rewind: Is your bronze metal clay warping? Then Cindy's got the tool for you - Rawhide!

Earthenwood Studio Chronicles
Whoo- whoo! New porcelain owl pendants inspired by internet sensation Molly the Owl

Saturday, March 27, 2010

Studio Saturday: Cindy wants to know what you think!

Welcome to Studio Saturday! Each week one of our contributors gives you a sneak peek into their studio, creative process or inspirations. We ask a related question of our readers and hope you'll leave comments! As an incentive we offer a free prize each week to bribe you to use that keyboard. The following week we choose a random winner.

Last week's winner is Mikki! Congratulations! You have won one of Heather's grab bags! Send Heather an email and she will get it right out to you.

Stepping in for Lynn Davis this week, is ABS Editor, Cindy Gimbrone.


Welcome to Studio Saturday! Over the past few years, I challenged myself to come up with interesting designs in beads and findings that could be made for production. I spent the last few years creating a line of beads that I could make a production level for wholesale orders. So I created modern, clean designs such as the Frost Links...


...and versatile findings like the double dips....

Although I love these and will keep making them, the wholesale hasn't taken off, so it's time to switch gears. I miss making painted beads like Thoughtful.


I know I want to freshen up my line of beads and make something in my style yet I'm not quite sure what. So, I'm asking your opinion. After reviewing the style of beads I make, what do you think is the next logical step in style? Do I pursue the modern, clean lines and create graphic style beads or pursue the painted beads or maybe something completely different from those choices?

I look forward to your suggestions! Leave a comment and you'll be entered to win the Red Art Modern bronze pendant.

Friday, March 26, 2010

Fit to Print Book Review: Totally Twisted

The subtitle of Kerry Bogert's new book is "Innovative Wirewire & Art Glass Jewelry." And that is exactly what you'll find in this colorful and fun book. 

I love that Kerry wrote in a conversational tone, you feel like you've stopped by her studio for the afternoon where she shares all her best tips and tricks for working with wire.

The book includes great step by step photos and clear instructions on the techniques.  The projects vary from using sterling silver wire to Kerry's signature mix of sterling and brightly colored artistic wire.  You'll learn how to make findings, your own chain, wire beads and how to use wire as a design element.

I love that the author shows 'tools' from common objects found in the studio like shaping a bracelet around a glass or links around tube of beads.  The idea that working with wire is easy and accessible is a common theme in the book.  I also enjoyed seeing the alternative views of the projects in different colors to show the versatility of the design and to spark the readers own variations.

Now let's talk art beads! Kerry is a glass beadmaker and every project in this book features a juicy collection of lampwork beads.  The projects could easily be adapted to showcase art beads of any medium.  I gave one of the projects a test run last weekend and worked up Kerry's Scrolliriffic bracelet using some of my disk beads, aquamarine stones and recycled glass, shown below.

I have wanted to make a chain using those s-links forever but just couldn't work them up successfully on my own.  After reading Kerry's directions I was whipping them out like a pro. 

You can find out more about Kerry on her blog and website, where sells her lampworked beads at http://www.kabconcepts.com/

Order a copy of Kerry's book today, I highly recommend it!
Totally Twisted: Innovative Wirework & Art Glass Jewelry

Reviewed by Art Bead Scene founder and editor, Heather Powers.

Thursday, March 25, 2010

Beads In Space

For the glass beadmakers who read our blog, there is a fun call for entries from the Beads of Courage group.  They are looking for space-theme beads to send to outer space on a NASA space shuttle!  Once the beads return to planet earth they will be gifted to kids who are battling serious illnesses.  Check out the Beads of Courage blog post for all the details.

If you haven't heard of Beads of Courage, visit their website.  This is a great organization that deserves lots of support.  Beads of Courage accepts donations of all sorts of beads.  What a great way to use our beady powers!

Wednesday, March 24, 2010

Bead Cap Tutorial

I've created a video tutorial showing how to make your own bead caps.  They are so easy, you can whip up tons of them in no time flat! 

Check out Ornamentea for the 1/2" brass disks, earwires and chain used in the earrings. Earrings shown with polymer clay branch disks from Humblebeads.

Tools you'll need: bench block, ball peen hammer, 2-hole punch, doming block & punches. 
Optional: brass texturing plates, Phillip's head screwdriver, silver/black solution, steel wood.


Here is the direct link to the video.  Feel free to share it!

Tuesday, March 23, 2010

Findings Worth Finding - Vintaj Fastenables & Arte Metal

Have you seen the new pieces from Vintaj?  Jess sent me a little sample pack and I haven't had time to create with them, but they are on my to-do list.  I LOVE them!!!

First, the Arte Metal is blackened brass like a gunmetal finish.  It's so very elegant and beautiful.  I'm loving this ribbon slider, it's going to make a great pendant.

Check out the tiny key:
Fastenables are a new line that cross over into the altered art and craft market, although they make awesome findings too.

I want these ferns for earrings!
Vintaj sells wholesale, but here is a link of their online retailers.

Monday, March 22, 2010

Designer of the Week - Sandra York

Each Monday we feature the Designer of the Week. One of our editors pick their favorite from the Monthly Challenge entries. This week's featured designer is Sandra York.

ABS editor Heather Powers of Humblebeads says of Elizabeth's Almond Branch necklace:
"I am amazed at the design, it's so creative and unusual.  I love how the art beads capture the painting perfectly.  I hope to see more of Sandra's work online soon!"

A detail of the ceramic art beads.

You can see more of Elizabeth's work on her facebook profile.

Sunday, March 21, 2010

Sundays with Cindy


Good morning, Beady Readers! Wondering what's going on in the bead and jewelry world? Take a peek at our links and see.....


A Bead A Day
After a treasure hunting trip through a bucket of fun spirited plastic beads, Lisa creates a "charm" bracelet to remind her of the experience!

About.com Jewelry Making
Carpel Tunnel Sydrome is not a new issue for jewelry designers, but here are some resources that may help.

Art Bead Scene
Art Bead Scene Editor Heather Powers shows how she organized her studio for $45!

Beading Arts
Cyndi worked out a pattern for a simple but pretty floral seed bead chain!

Carmi's Art/Life World
A few word charms by the cash register are the inspiration for a new brooch.

Cindy Gimbrone aka Lampwork Diva
A seed catalog keeps Cindy's inspiration alive. The result is a Victorian Garden Bee Skep bead.

Earthenwood Studio Chronicles
Melanie reviews a delighful new multi-media book by Sherri Haab

Snap Out of It, Jean! There's Beading to be Done!
Spring really arrived here, FINALLY, and Jean was inspired to create some colorful, sparkly CZ jewelry with the beautiful components she found at Artbeads!

The Art and Writing of Andrew Thornton
Just back from a whirlwind adventure in Hawaii, Andrew shares his experience in paradise and spotlights some bead-making talents.

Saturday, March 20, 2010

Studio Saturday - Humblebeads

Welcome to Studio Saturday! Each week one of our contributors gives you a sneak peek into their studio, creative process or inspirations. We ask a related question of our readers and hope you'll leave comments! As an incentive we offer a free prize each week to bribe you to use that keyboard. The following week we choose a random winner.

This week's winner is Blanche and Guy! Congratulations! You have won a pair of wood and ceramic earrings from Lorelei Eurto.  Send Lorelei your address and she will get your prize right out to you.
 
I actually get to show off my studio today!  We are having a resin play day in my studio.  This is one of the many rewards of taking the time to actually clean up a bead cave - you can have friends over without dying of embarrassment.

So what made me snap and decide to clean up my bead mess, that looked like this just two weeks ago?
You are seeing the picture right?  Is there really any question as to why?  I am one of those create-in-the-clutter kind of gals.  But it wasn't working for me any longer.  I was losing things, buying things over that I already had and for crying out loud there are only so many places one can pile things. 

I had to have incentives:
1. I wanted to create a more inspiring space.
2. I had company coming to stay and this doubles as the guest room.
3. I promised myself to submit my photos to Studios magazine when it was done.

How did I do it?
1. Cried and complained.
2. Worked one corner at a time.
3. Threw away, gave away and packed away the clutter.
4. Cried and complained.
5. Told people what I was doing so I couldn't just stop.
6. Stopped crying and complaining and just plowed through until the room was done.  It took about a week to organize 5 years of clutter and beady mess.

What is the most important part of my studio makeover? It was organizing my room so that I can work more productively. 
1. Everything I need and use on a daily basis is within arms reach. 
2. Everything is clearly labeled and has a place.
3. It's super easy to pick things up as soon as I'm done.
4. I have many trays that can stack up to hold projects that are in progress.

Is it working?  Yep, a week later and I'm still picking up as soon as I finish a project.  The table is clear and ready for the next round.  I've made jewelry and beads all week and had company.  What do you know - old dogs can learn new tricks or is it that wild beads can be tamed?

What is one thing in your creative space that you can not live without? Leave a comment for a chance to win a grab bag from my Etsy shop

Written by Heather Powers, www.humblebeads.com.

Friday, March 19, 2010

The Trendy Bead - Turquoise Color Challenge

Need a little inspiration for the Turquoise Color Challenge?  Here is a Trendy Bead Report featuring this year's hottest color and the custom color palette that Margie Deeb created for our challenge.  The deadline is April 1st, so get those beads out this weekend and enter!

Teal dogwood bead by Humblebeads, Knurled Round Chain from Ornamentea and Watercolor Swirl lampwork beads by BlueSeraphim.

Ocean Blue Chain by MissFickleMedia, Yellow Circles by Jangles and Lavender Sparklies glass beads by Erica Beads.

A water lily brass toggle from Vintaj via Bello Modo, Aqua Azure Leaf Square Tile by Lynn Davis and Pink and Violet Double Dips by Cindy Gimbrone.

Czech firepolished glass from MountainShadowDesigns, large flower button by Creative Impressions in Clay and Kiss in the Garden disk bead from Humblebeads.

Click on the links above to go directly to the items shown.
Want more inspiration?  Check out Lorelei's blog with her picks for this color scheme.

Thursday, March 18, 2010

Findings Worth Finding: Bead Cap Flowers

Turn a petal bead cap into a blooming flower with just a few quick steps. 

You'll need: a bead cap, a 6mm round bead, a 3mm bead and a 1" headpin.
Tools: bench block, hammer, round nose pliers, wire cutters.
Step 1. Push the 6mm bead into the bead cap to spread out the petals a little.  Remove the bead.

Step 2. Place petal side down on a bench block, hammer gently to spread out the petals more.

Step 3. Attach the 3mm bead to the center of the bead cap with a headpin. Trim wire and form a loop.

Necklace featuring a Jade Scott pendant and lime branch disk beads from Humblebeads.

Wednesday, March 17, 2010

Happy Saint Patrick's Carnival Bloggers' Day!

Happy Saint Patrick's Carnival Bloggers' Day! Well, ok, that's not the official name for today's celebration but we are celebrating the green and today IS the monthly ABS Carnival Bloggers' post!

Mary Lou opens this month's Carnival Blog by asking a few of her bead and jewelry making pals a question, "What fuels your passion?" - a question that our ABS Carnival Bloggers answer very eloquently for us this month. Let's take a look at what our bloggers have to say.....

Cindy Wimmer shares her passion for wire and how it all started. Cindy's earlier efforts include the lovely spinner pendants below.

Like Cindy, Sharon found her passion in a spool of wire and a set of tools.

Mary Ellen experience is free spirited and she has written a fun post this month explaining how play lead her to discover her passion.

Mary Jo and Erin approach their art in a different way. They write thoughtful blogs - deep reflection and quotes are characteristic of each post. This month, Erin tell us how beads quickly became a passion for her. While Mary Jo weaves quotes and pictures of her inspired jewelry to define passion.

Some artists explore by jumping in and making things. Janel Dudley gets to the torch and has many misfires but it doesn't discourage her. It fuels her passion. Anyone can see that when they see her lovely "Raw Experience" necklace (below).

The same is true of our own Island Girl who quizzes her husband and then realizes she is passionate about her flower garden beads (below).


Passion is defined by who you are - what you do or what you create. So let's ask Mary Lou question to our dear ABS readers, "What fuels YOUR passion?"

(Thank you to all the wonderful ABS Carnival Bloggers for their posts and inspiration!) written by Cindy Gimbrone.

Tuesday, March 16, 2010

Monday, March 15, 2010

Designer of the Week: Mary Jane Dodd

Each week we feature the Designer of the Week. One of our editors pick their favorite from the Monthly Challenge entries.


This week's featured design is from Mary Jane Dodd!

You can read about the creation of Mary Jane's designs on her blog here and visit her website to see more of her organic and earthy jewelry designs.

Lorelei notes, "I picked  Mary Jane's earrings because of they complicated, yet beautiful design. The small white pearls mimic the almond blossoms of the painting, and I love how the soft blue green silk peeks through the wire. Mary Jane's use of fiber in her designs adds a phenomenal softness to anything she creates. I can imagine these lightweight earrings would be comfortable to wear. I think they emulate the Van Gogh painting perfectly."

If you'd like to see your work featured here next week be sure to enter our monthly challenge inspired by Vincent van Gogh Stichting's Almond Blossoms painting.

Sunday, March 14, 2010

Sundays with Cindy


Good morning, Beady Readers! Wondering who won the new Sherri Haab book? Drum roll please.......

Elizabeth!

Congratulations, Elizabeth and happy reading!

Speaking of reading, let's take a look around the bead blogging world and see what's going on....

A Bead A Day
Similar to the excuse, "my dog ate my homework", Lisa revises her weekly project due to an incident with a furry friend!

About.com Jewelry Making
Jump rings seem like small items when it comes to jewelry making, but they can cause big problems!

Art Bead Scene
ABS unveils the March Challenge painting - Van Gogh's Almond Blossoms.

Beading Arts
Cyndi has a fabulous Zulugrass bracelet to giveaway this week!

Carmi's Art/Life World
Button making turns into jewelry making for Carmi this week!

Cindy Gimbrone aka Lampwork Diva
When is more, more? When you've got shell pearls and lampwork glass!

Earthenwood Studio Chronicles
Another favorite song inspires Melanie to make new Heart Window pendants

Lorelei's Blog: Inside the Studio
Thinking of selling on Etsy? Read this post, Lorelei has shared some tips from what she's learned along the way.

Snap Out of It, Jean! There's Beading to be Done!
An inveterate wirer, Jean approaches new things which other designers do with ease verrrry cautiously...as if they might be wild animals! Grrrr! Should she run away? Decide for yourself!

Strands of Beads
Melissa is giving away one of her floating box pendants this week in honor of her son.

Saturday, March 13, 2010

Studio Saturday with Lorelei Eurto

This week we visit the studio of jewelry designer, Lorelei Eurto.

Welcome to Studio Saturday! Each week one of our contributors gives you a sneak peek into their studio, creative process or inspirations. We ask a related question of our readers and hope you'll leave comments! As an incentive we offer a free prize each week to bribe you to use that keyboard. The following week we choose a random winner.This weeks winner is QuiltingJewel39! Congratulations!
                                                                                      
You have won a set of handmade buttons from the studio of Tari SasserTari at Claybuttons.
Send Tari your address and she will get your prize right out to you.


Welcome to my Studio Saturday!! 
After a long week of busy schedules and a stressful day job, I haven't spent much time in the studio making things.  But sometimes it's not always just about what happens in the studio. Sometimes the online stuff is just as important. With a long and snowy cold winter slowly happening right now, I always feel a little antsy to spice things up and give my Etsy shop a new look.  Some of you probably know how to create your own Etsy store banners, but for those of you who have never tried it, I thought I'd give a little tutorial here to help you! 
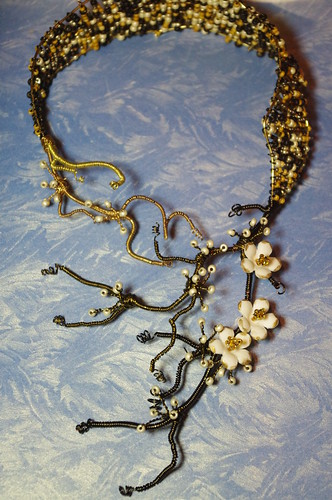
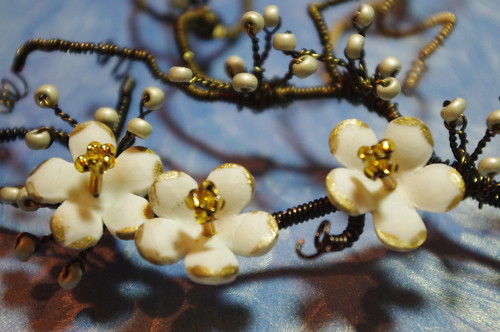
Trust me, I'm no graphics genius, but I do enjoy changing my look, and the banner is the easiest place to start. This is what a shopper sees the minute they land in your store, so you want something eye-catching that will draw them in. You also want your banner to reflect your "store brand". A photo with a piece of jewelry or your handmade beads, is the easiest thing to work from.

Step one:  you must find an image that you want to use. This may be the hardest part of this whole process.
Open the image in Adobe Photo Shop. I use Photo Elements, but you can do this in the full version of the software as well.

Step 2: Crop your image. Click the Cropping tool from the left vertical toolbar (it looks like a box). Make sure to crop the image as wide as possible.

an e-mail 

Step 3: You need to resize the width of the picture. At the top horizontal menu bar, click IMAGE> Image Size> and set the image width to 760 pixels.


Step 4: Now you must set the correct height. You must now adjust the the Canvas size. Click IMAGE> Canvas Size> and adjust the height to 100 pixels.  In the canvas size window you can adjust the anchor if you want the pic to be cropped from the top, bottom, center, etc. 

Here is what you should at this point:


Step 5: Add text! At the left tool bar, you'll see the letter T. Click that T once, and your cursor will turn into a typing tool. Place it where you want on the image, and type your shop name whereever you'd like it. You can change the Font and Type size at the horizontal tool bar at the top of your screen. 


Once you get the type the way you want it, you must save the image to your computer. At the top, Click FILE > Save As> Save the picture as Banner, and make sure to save the image as a JPEG instead of a .PSD, which is what it saves it as, automatically.


Make sure you save the file to a spot you can easily find it in, like your desktop.


Final Step: At this point you can upload it to your shop. Log into Your Etsy, in the menu at the Left, click APPEARANCE.

Click BROWSE to find your banner. Click the file and then click OPEN.


Now click SAVE CHANGES at the bottom of the screen and VOILA! You've uploaded a brand new banner for your shop!

I hope this little banner tutorial was helpful for you. I am curious, bringing us to this week's questions, 

Do you normally create your own Shop banners or do you purchase pre-made banners on Etsy?

Answer this question in the comments and next week, a random comment will be picked to win this lovely pair of earrings from my Etsy store!


wood rondelles, ceramic slice beads from Jubilee
Vintaj Brass Co. earring wires