Sunday, September 30, 2012

Show Me Sunday

This week, as the last post showing off bead school types of links, I have some images from the Fusion Beads website, which has a whole section for beading and jewelry crafting techniques.  I particularly love the more advanced metalworking and crafting technique links.  They really have some great ideas and tips on how to personalize your jewelry to make it different and unique, which is great for people who make and use unique art beads in their jewelry!
 
Thank you to the commenters who left links so we could find these treasures to show off!
 
Show Me SPOOKY Things!
 
For October, to celebrate the spookiest month of the year, please show me some links to handmade beads, pendants, and jewelry components that are scary, spooky, and in the Halloween spirit! Post your links in the comments here and I will select some of your ideas you leave on this post to highlight in another Show Me Sunday post.

Here is what some of our beady friends have to show off this week:

A Bead A Day
Need a bead or finding at midnight? You might find what you need in a pinch at a 24 hour superstore! 

About.com Jewelry Making
There is still plenty of time to make some Halloween jewelry.  

Art Bead Scene
Heather shares some tips of the trade for jewelry designers who are interested in wholesaling. 

Beading Arts
Cyndi believes that you can never have too many ideas for how to use your lampwork beads...  

Earthenwood Studio Chronicles
Melanie shows the results of the liquid clay slip application experiments she recently made. 

Resin Crafts!
This week Carmi shows you how to glaze a feather with resin!  

Snap out of it, Jean! There's beading to be done!
Bead Soup, the great book by Lori Anderson, has arrived! Enjoy this review about Lori's delicious concoction by jean! 

The Writing and Art of Andrew Thornton
Andrew shares his latest win! Check out "Night of the Shaman" that top honors in Nina Design's most recent design challenge.  

Melanie Brooks is the ceramic beadmaker behind Earthenwood Studio, who blogs from her Metro Detroit, Michigan home.

Saturday, September 29, 2012

Studio Saturday with Creative Impressions In Clay


Welcome to Studio Saturday! Each week one of our contributors gives you a sneak peek into their studio, creative process or inspirations. We ask a related question of our readers and hope you'll leave comments! As an incentive we offer a free prize each week to bribe you to use that keyboard. The following week we choose a random winner.
This weeks winner is sandy mCongratulations! You have won a pair of the new Toile Charms from Skye Jewels! Marie will even let you pick your color!
Send Marie an e-mail with your address and she will get it right out to you.
This week we visit the studio of Tari Sasser at 
Creative Impressions In Clay.
I had a show a few weeks ago in Yellow Springs, Ohio. I have the best spot every year, outside on the end. I love this show, A Wool Gathering, because it is low key, family friendly and just a lot of fun!
It was an absolutely beautiful weekeend, sunshine and in the 70's.
Foot traffic was great but sales were down. The economy has really been hitting everyone hard.
This is my set-up for my 10' ez-up tent.
It was very bright out and difficult to stand back and get a shot of the entire tent.
Something new I decided to try this year was to set up a table for jewelry and jewelry components. 
Behind the table and gridwall is where I take transactions and wrap up sales. Showing off my new round business card that doubles as a display card.
On the left side was the wall o'buttons with shelves above. My yellow and purple theme, and thanks to my mom for sewing all the panels for me. The floor is the panel foam type that I bought in my specified colors. Very helpful when items are dropped, which happens a lot. Now you can find them. Without it, it was difficult to find buttons, earrings, etc. in the grass.

The back left corner, front right corner and the front left corner. 
My banners were printed by Vistaprint. Very affordable plus they did a great job!
This booth set-up is the third version since I have been making buttons. It's interesting how things morph as you try to make the flow easier in a 10' x 10' space.

The week of the show, of course I had been staying up late glazing and making last minute items.
I think there are times the gremlins of the universe know you are stressed preparing for a show.
 My guess is I hadn't pay enough homage to the kiln gods. I had a total meltdown in my big kiln.
My husband got to see the horror on my face when I opened the lid. I lost three shelves and two bead racks, not to mention all the items that were being (over) fired.
The shelf is on its side to show you, nothing on it is going anywhere!
I can't tell you what these were going to be, but I know they are melted to the shelf. I also lost many of the little star stilts. 
I believe what happened was the top shelf prevented the kiln sitter (see arrow) from dropping after it had reached firing temperature of cone 06. I think the kiln fired to cone 10 or close to it, for the clay to become vitreous and fuse to the shelves. 
Having a mush brain in the wee hours of the morning, I forgot to check everything and also forgot how long a takes my kiln to fire off at cone 06 so I could set the limit timer to the correct time. The limit timer was the fail safe after I had gone to bed.
Sh*t happens. Roll with it, not in it. 
I had not choice but to try and forget about it continue prepping for the show.
So onward and upward we go!!

My question today is:
What recent studio disaster have you experienced?

Leave a comment answering the question and you could win a pair of my recycled earrings. 
Made from aluminum cans!

Feeling Sassy as usual!
Tari Sasser
Creative Impressions In Clay

Friday, September 28, 2012

September Monthly Blog Tour


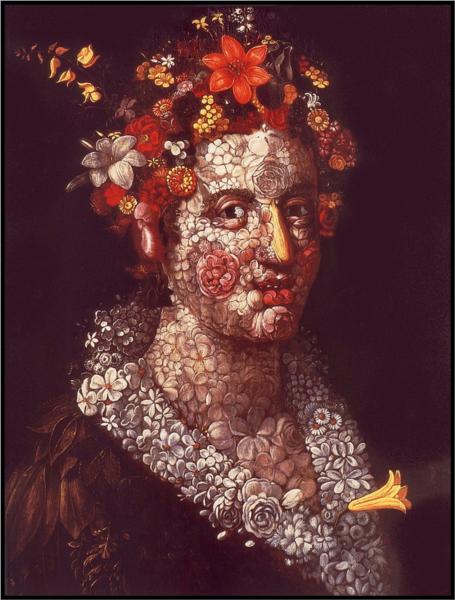
 Every flower is a soul blossoming in nature. 
~Gerard de Nerval


I stumbled upon this painting when I was asked to select some for future months. I was struck by the whimsy of Arcimboldo's style and the vision and forethought he must have had to not only nail each petal of each separate flower, but also to form them in such a way that your eye is fooled into looking at a real person. That is sheer brilliance! I think the hardest part was deciding which of Arcimboldo's paintings to feature as each one is more glorious than the last!

I am truly blown away by the magnificence of your floral offerings this month. Arcimboldo would be proud.

~~~~~~~~~~~~~~~~~~~~~~~~~~~~~~~~~~~~~~~~~~

Ghie of Trinket Tales  (above) brings us this most ingenious cuff bracelet. Her polymer clay work is just outstanding. I love the layered techniques and the mix of materials and especially the rich colors.

Angela Lund-Logan made a beautiful necklace using sumptuous satin ribbon and a special rose pendant. I really want to reach out and touch the soft ribbon and I love the bail that she made to hang the pendant. Very clever!

Versatile jewelry is my favorite thing. I love everything about this multi-faceted piece of jewelry from Cece Cormier of The Beading Yogini. The intricate weaving of beads and fibers, the cascade of flowers, the fact that this can be either a bracelet or a necklace. Perfect!


More sculpted polymer clay, from Kimi of Kimi's Jewelry & Gifts (above) this time. The hand made beads on the side with the fully dimensional and true to life flowers are just stunning. Kimi was so inspired that she didn't feel the need to sketch her design but just launched right in. That is inspired!

The feeling of fall is evident in the handmade leaves and beads from Vera of Designed by Vera. The colors remind me of walks in the woods and getting cozy by the fire. I can see this long swingy necklace with a pretty sweater dress and tall boots, how about you?


Wow. The colors in this necklace from Melissa Trudinger of Bead Recipes  (above) are so lush, so rich. I can see wearing this on a walk in the woods as I take in the fall bounty. This is just a lovely modern interpretation of the painting.

Our friend from Finland, Miss Kirsi, created a necklace that calls to mind the golden tones that envelope everything when the sun rises in the fall. The way the light passes through those sugar lampworked beads reminds me of the way that everything is ringed in a warm glow at this time of year. 


I love it when our challenges inspire you to make something yourself. Creative Atelier did just that with this special pendant. I thought that it was a real flower under resin... but no! She painted this orange lily and then sealed it. The happy accident came when the sealer left cracks in the paint, so that it really looked like it leapt off the painting from 400 years ago!

Wrist corsages may not be that popular anymore (but note to M.E., I wore them, too, and we are NOT old!) but I could see that they could be brought back with this stunning lacy bouquet of posies. Bee Tree by M.E. was inspired by the bit of lace in her stash to create this incredible bracelet. And yes, I think you should wear this out to a special occasion, and if you don't have one, then invent one! ;-)
~~~~~~~~~~~~~~~~~~~~~~~~~~~~~~~~~~~~~~~~~~
Just a quick note.... there were so many others that I would have loved to feature in our monthly blog tour. But there were no blog posts to go along with the pretty pictures. If you would like your piece considered for this monthly tour, please be sure to post the exact link to your blog post in your description. Keep the energy and enthusiasm flowing! And please go and check out the Flickr stream for even more incredible entries for this month!

Thursday, September 27, 2012

Winner of the FREE Class from CraftArtEdu


Congratulations to Holly of Holly's Folly

The Random Number Generator Gods selected her comment as the winner of the free class from CraftArtEdu

We can't wait to see what class you select and how that will inspire and influence your art!


Wednesday, September 26, 2012

Wholesale Tips

Have you thought about selling your jewelry to shops or galleries?  I am working on a wholesale line and have been doing lots of research.  Here are some of my favorite resources.
  • Flourish and Thrive Academy - lots of great tips and a series to download if you subscribe to their mailing list. 
  • Indie Retail Academy - a good resource if you are just starting out or not sure how to approach shops.
  • If you have your jewelry line designed but aren't sure what to do next, check out this great list of policies and line sheet information.  This was so helpful as I prepare to debut my line.
A simple wholesale checklist:
1. Identify your perfect customer/niche market.
2. Create your collection samples - you'll want signature pieces, a cohesive body of work, and designs that are easy to reproduce.
3. Photograph your work: crisp, clear photos on white backgrounds and 'glamour' shots on models and with props to brand your work.
4. Source supplies.
5. Work out your pricing and financing.
6. Create your policies and terms.
7. Create a line sheet. 
8. Create a website to showcase your line.
9. Create your list of dream clients.
10. Contact buyers/shops to set up appointments or to send your sales packet.

Tuesday, September 25, 2012

Monday, September 24, 2012

Designer of the Week! "BEE TREE BY ME"


Each week the Art Bead Scene features a Designer of the Week. One of our editors picks her favorite from the Monthly Challenge entries.

The Art Bead Scene Designer of the Week is "Bee tree by me" Mary Ellen Parker says on her Blog about this ABS Challenge... "There are months when I have to think long and hard for an idea.
But, when I saw this month's painting, a zillion ideas popped into  my head!
 Flowers ,flowers and more flowers...WOW !!!!"

Thanks for sharing this piece with us! It certainly inspired me! I love how you incorporated the flowers with all the lace and ribbon. It certainly grabbed my eye! Please visit Mary Ellen's BLOG and Flickr Photostream to see her wonderful creations!
Check out the details on our monthly challenge - you could be the next featured designer!


Sunday, September 23, 2012

Show Me Sunday

  Did you know that popular online bead store Lima Beads not only carries a full range of beading supplies, including many art beads, but they also have many great tutorials for beading techniques?  They have links to videos and step by step lessons on their Tips and Techniques page where you can find everything from basic beading techniques to more advanced tips for using art beads and other more involved materials.
 
Thank you to the commenters who left links so we could find these treasures to show off!
 
Show Me Bead School! 
 
For September, to celebrate the start of back-to-school, we are looking for classes, tutorials, and workshops that focus on bringing your art beads and beading to a new level of art. Post your links in the comments here and I will select some of your ideas you leave on this post to highlight in another Show Me Sunday post. 
 
Here is what some of our beady friends have to show off this week:

A Bead A Day
What do you think? Can jewelry change your outlook and how you present yourself to the world? Check in with Lisa to share your opinion! 

About.com Jewelry Making
Tammy says "yes" to wire hangers, especially when they become part of a pair of earrings. 

Art Bead Scene
Rebecca shares her Turning Leaves bracelet tutorial, a beautiful free project that speaks of the change of seasons 

Beading Arts
Fabric art and beads? Of course! 

Snap out of it, Jean! There's beading to be done!
Jean falls for Erin Siegel's tutorial which she designed for Ornamentea and decides to challenge herself by trying it! It is irresistibly cool!  

Melanie Brooks is the ceramic beadmaker behind Earthenwood Studio, who blogs from her Metro Detroit, Michigan home.
 

Saturday, September 22, 2012

Studio Saturday With Marie of Skye Jewels

Welcome to Studio Saturday! Each week one of our contributors gives you a sneak peek into their studio, creative process or inspirations. We ask a related question of our readers and hope you'll leave comments! As an incentive we offer a free prize each week to bribe you to use that keyboard. The following week we choose a random winner.


This week's winner is Kiwiken! Congratulations, Kiwiken! You've won a Fused Glass Donut!
 Send an email to Cindy Gimbrone and she'll send your prize right over to you!

Welcome to Marie's Studio!


I have been working all week on this post. Taking pictures and getting something interesting together to share with you. It's not often we get to look into a specific artists process and see how they work or how they create. I will be sharing some of my process, but not all. If I give it all away you won't have a reason to come shop with me ;)

My studio has somewhat changed since the last time I posted. There have been a lot of changes in my life in general! I gave up the Den so my oldest daughter could have her own room. That was where my studio was and I had a lot of light even in  such a modest space. Emma has been a huge help to me since I was diagnosed with Inflammatory Breast cancer in May. She deserved a space of her own. So my studio is now in the dining room, a much smaller and darker space. Can't take too many good pics in there, you would not see much for the darkness! Working on figuring something new out, but in the meantime, I work where I can and that includes the kitchen table where these pictures were taken...
I am working on something that has been a customer request for awhile now. Earring pairs tags! I am starting with these in a new shabby chic style! I have a few customers that love the shabby chic style and I have not had much to offer them so I have been trying to come up with something new to satisfy this need. 
The pattern is called Toile. It is from the original style of Printing a story onto fabric that was started by the Irish and adopted and made popular by the french in a place called Jouy, France. Hence the actual name of Toile "Toile de Jouy" These Toile images normally came in complex pastoral scenes and floral arrangements. The long sheets of fabric would be printed and laid out in fields to dry. Imagine the beauty!

These are the charms, all ready for a top coat!
Here they are drying. You can tell from these last two pictures that once I add the top coat they become more vibrant and the colour stands out more. 

Here they are along with the Raven charms I posted the other day. All done and some still drying! You know what that means, I should be taking pics and listing right away! It has taken a little longer than normal to get them completely finished, but that has a lot to do with this week being "meet the teacher" at school! That and my anniversary. Life goes on even in the studio! 

Here is a closeup of the finished Raven tiles! Looking forward to getting these listed and in my shop for you! The Shabby Chic/Toile earring pairs will also be listed...just have to decide how many pairs I will list to start.

So that is what has been going on in my studio this week and a lot of the rest of the time. Creating these takes 3-5 days with proper drying times. I don't want to send you anything that might not have had enough time to cure. They should not stick together if given the proper curing time. No sticky or tacky top coat and especially no streaks! These have a very smooth finish.

I hope you enjoyed learning a bit more about what I do. Please feel free to ask me any questions you might have and I will do the best I can to answer them!

Leave a comment and you win a pair of my new Toile Charms! I'll even let you pick your color!

Hugs,
Marie
Etsy Ephemera Shop
Etsy Jewelry Shop
Blog
Facebook 

Thursday, September 20, 2012

Win a Dream Jewelry Studio + a FREE Class Giveaway!

You all know that I am a class junkie. I love the experience of getting together with a group of like-minded individuals and exploring the limits of my creativity learning new tricks and soaking up the knowledge from a talented Master artist. If I could, I would travel all around the country seeking out those opportunities. But more often than not, my imagination is greater than my wallet and sometimes I forget how vast this country really is, so traveling great distances and footing the bill for all the expense that that entails is not reality for me, and it likely isn't for most of you.

But that doesn't mean the quest for knowledge has to end! Of course there are some wonderful books out there, and I have shelves of them, but it just isn't the same as seeing someone with your own eyes showing you the way. The internet has become my best friend if I want to learn something.

There are a lot of videos floating around out there. But not all videos are created equal. That is why I am excited to share with you a new (to me) service that taps into my need for creative play at a price, location and time that works for anyone on any budget, anywhere and at anytime.


I was just introduced to CraftArtEdu.com, an online portal and e-learning community filled with over 300 classes from renowned instructors that are hand selected for their high quality and commitment to excellence. The subjects range from jewelry, polymer clay and fiber to wood, mixed media and even fine art. Each class offered comes with step by step instructions, handouts and even feedback from the instructors. You can even watch a little teaser of the class which is helpful to know if you would like to invest your time and money into it.

I like that there is such a wide variety of subjects. I am not a one-note creative, and I am sure that most of you dabble in other inspiring pursuits. Obviously, I could learn a lot from the Jewelry section, but I am most intrigued by the Polymer Clay section. And I have my eye on the Carve Your Own Rubber Stamp class. You see, I work in polymer clay every day, but I am completely self-taught. And I have so many ideas for things I would like to do with my Simple Truths, if only I could carve it myself. It would be good to have some Polymer Clay classes under my belt if only to understand the wide ranges of this medium. And it would be awesome to come up with my own designs!

The website is very clean and easy to use. Each section has sub-sections that make it easy to find something you want to learn. I like that I can take the class at my leisure, and watch it again any time I want. The prices are reasonable as well. The average cost of a class is $28 but I found more intensive classes that were in the $70-125 range or as little as $10 or even FREE. Yes, I said FREE. They offer beginning level sample classes for free in all their sections. A great way to test out their service and get a taste of something new.

The generous folks at CraftArtEdu.com shared two things with me that I think you are going to love:

1::They would like to gift a class to one of our readers.
and
2::They are hosting a Dream Jewelry Studio sweepstakes with up to $4500 in prizes.

The grand prize is a custom CraftOptics Rx telescope valued at $475 (a must for my aging beader eyes!), a $150 gift certificate to RioGrande.com (sweet!) and $125 in CraftArtEdu.com classes (let the learning begin!). But that is not all! An additional nine winners will receive $150 Rio Grand give certiciates and $50 in classes at CraftArtEdu.com. Plus, twenty more winners will each receive a free class from CraftArtEdu.com. A total of 30 chances to win... Amazing!

Don't wait! The sweepstakes is open until September 30th! Follow this link to sign up:


Okay! Now how about the FREE class from CraftArtEdu.com for one lucky random winner? Just answer the following question in the comments (must have an email to contact, please!):

If you could take a class in any subject other than jewelry, what would it be? Fine art like drawing or painting? Are you nuts about ceramics? Would you like to be able to knit or crochet? Or would you love to learn to sculpt? Just leave your answer in the comments.  

(It doesn't need to be something on the CraftArtEdu.com website, but what the heck! Go and check it out and let us know!)

Check back in one week from today for the random winner of the FREE class from CraftArtEdu.com. And don't forget to sign up for to win the My Dream Jewelry Studio sweepstakes!


Wednesday, September 19, 2012

Ravens

Over the last few months I have had more and more request for Ravens! So finally here we are! I have created a series of Ephemera pendants for you to use in your jewelry creations that include these fabulous Ravens! These are in an unfinished stage, I have a lot left to do on these to make them listing ready, but this week is magic week! The week where things happen!

I could not resist these awesome images! I worked with Ella of Calico Collage to get this idea together. She makes about 75% of the images I use to create my charms and pendants. These of course I wanted to have in time for Halloween! I will be listing them in the next couple of days.

I want to remind you of all the wonderful ways you can use these. To start, I sell them un-drilled. This allows you to use your creative imagination to it's full potential! Some of you will choose to use them as they are and just add a magnet to the back or even add them to your scrapbooking pages! Very versatile!

My favorite way to use them is with Vintaj filigree! This adds a certain "je ne sais quois" to the pieces of jewelry I create. It gives a touch of romance and mystery! Perfect for these Ravens! The dark laciness of it...I love it! 

I have even seen some of you wrap them in wire! What a creative use of these small pieces! 

At anytime of course you can have them custom drilled at no extra cost to you. There is the simple top drill. Just look at the image to see if that is where you want the hole. You can also top and bottom drill to add dangles! What about each corner for a bracelet maybe? Or a little lower on the sides... I can even do three strand bracelet drill for some of these! 

One of the most used drilling options is the two top corners and bottom center. This makes the piece a focal with the possibility of endless dangles!

So many ways to use these! So look for them in the Skye Jewels Supply shop this week...

Thanks so much for another fun visit!

Marie

**Speaking of Vintaj, October's challenge just happens to be "Radiant Raven" what a coincidence! Maybe some of you will want to use these in your design?** 

Tuesday, September 18, 2012

Free project - Turning Leaves

It's no secret that I am a spring and summer girl. I love the warmer seasons, and although I love the holiday season, I always feel sad when it starts to get colder, the days get shorter and the winter coats come out. The city I live in - Manchester in the UK - is a rainy one, and that takes all the fun out of any season for me.

However, when the sun does come out during Autumn, what a glorious season it is. I always enjoy seeing photos in particular of New England in the Fall; the wonderful turning leaves, the stunning array of colours. I imagine jumping in a pile of crunching, burnished gold leaves, the sun low in the sky and a fresh crispness to the air. The best type of Autumn day. Inspired by this, I have created a new project for you to make, 'Turning Leaves'.

 Ingredients:
Czech glass flowers, teardrops and frosted matte faceted rounds
20g antique copper wire
A few seed beads or crystals for the swallows to clutch

1. Cut 30cm of waxed linen cord and knot onto one side of the bracelet bar, leaving a 4cm tail. Knot on a selection of faceted rounds and orange flowers, finishing with the leaf of the toggle clasp, until you have the full length of your bracelet, minus 1cm

2. Pass an etched jump ring through the empty side of the bracelet connector. Link the loop of the toggle clasp to this. Add a selection of charms to the etched jump rings.

3. Using small etched jump rings, add a series of beads and charms at various points around the bracelet. Add a seed bead or crystal to the beaks of the swallows, and use copper wire to wrap the teardrops as briolettes. 

A happy bracelet, perfect for Autumn, or Fall, full of colour and movement.
You can find the original bracelet here.


Rebecca is a Scottish jewellery designer and singer, currently living in Manchester, England. You can read more about beads and singing at her blog, songbeads.blogspot.com and see more of her jewellery at songbead.etsy.com.


Monday, September 17, 2012

Designer of the Week: The Bead Therapist

SEPTABS


The Art Bead Scene Designer of the Week is The Bead Therapist. The Bead Therapist posts in her photos that... "I absolutely adore this month's inspiration painting! I love the flowers in autumn colors. I remember posting last year about how much I like the fall because I never experienced that season while growing up in the Dominican Republic."

We're glad you've been able to experience fall because it has certainly inspired a beautiful piece! You can see more of the Bead Therapist's work on her blog and her flickr photostream.

Sunday, September 16, 2012

Show Me Sunday


Thank you to the commenters who left links so we could find these treasures to show off!
 
Show Me Bead School! 
 
For September, to celebrate the start of back-to-school, we are looking for classes, tutorials, and workshops that focus on bringing your art beads and beading to a new level of art. Post your links in the comments here and I will select some of your ideas you leave on this post to highlight in another Show Me Sunday post. 
 
Here is what some of our beady friends have to show off this week: 
 
A Bead A Day
Do you like to put a little craftiness into your jewelry making? Lisa's altering a filligree component with a paint pen.  

About.com Jewelry Making
Tammy takes a look at a bea-u-tiful bead weaving book. 
 
Art Bead Scene
Rebecca's breezy necklace commemorating the end of summer and featuring fun artisan materials is available as a free project!  

Beading Arts
Did you know that you can bead a bezel for...get this...a large BEAD? Yup! And it's really easy! 
 
Carmi's Art/Life World
My t-shirt yarn flowers have been turned into a fab necklace!  

Resin Crafts!
This is a week dedicated to working in molds on Resin Crafts Blog! 
 
Snap out of it, Jean! There's Beading to be done!
A wonderful book deserves a good review! Jean reviews the fascinating and terrific jewelry design book, The Spirit of Bead Embroidery by Heidi Kummli! 
Melanie Brooks is the ceramic beadmaker behind Earthenwood Studio, who blogs from her Metro Detroit, Michigan home.

Saturday, September 15, 2012

Studio Saturday with Cindy Gimbrone


Welcome to Studio Saturday! Each week one of our contributors gives you a sneak peek into their studio, creative process or inspirations. We ask a related question of our readers and hope you'll leave comments! As an incentive we offer a free prize each week to bribe you to use that keyboard. The following week we choose a random winner.

This week's winner is Mary Jane Dodd! Congratulations, Mary Jane! You've won Heather's oak leaf beads. Send an email to Heather and she'll send your prize right over to you!

Welcome to the Studio of Cindy Gimbrone!
Good morning, ABS-ers! The first question you're probably asking is: Where have I been?

Lots has transpired dear readers but the main culprit keeping me from you is a full time sign language interpreting job. Working my hands and arms all day keeps me from working my hands and arms all night and weekend making beads.

Something had to give. I've re-focused my energy into perfecting new beadmaking techniques and incorporating those beads into projects and articles.
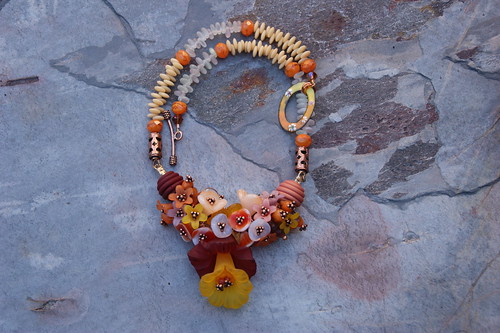
You've seen me branch out into polymer clay and metal. For the past few months I've been experimenting and perfecting molded fused rings. I've used frit mixes, single color frit, iridescent frit and dichroic frit. Here's a sampling of what's come out of the kiln.
Some people are able to work full time and still keep up with their production of artwork. I'm not. I had to choose. I'm wondering how you feel? Are you balancing everything or are you choosing? Share your thoughts and you'll be entered to win a fused glass donut. I look forward to reading your comments!

Friday, September 14, 2012

Art Bead Palette :: Indian Creek Art Glass

Random Minis


Rustic Discs in Black, Russet, and Brown


Southwest Discs in Squash and Russet


Southwest Discs in Russet and Turquoise

When autumn comes around, I'm ready for it, color-wise. After the bright, saturated colors of summer, I'm ready for the burnt oranges and mustard yellows, the sage-y greens, and the deeper, slightly muted colors that comes with fall.

And if you're looking for some beady goodness that mimics the coming season, then head on over to the lovely shop known Indian Creek Art Glass. Julie, the lampworking artist behind it all, uses amazing, natural colors that I'm totally digging right now. I had a hard time picking a favorite today, so I'm sharing my top four.

How about you - what colors are you loving? Are you seasonally inspired by color, too?

Thursday, September 13, 2012

Book Review: Necklaceology

Candie Cooper's latest book, Necklaceology, arrived on my doorstep yesterday.  The cover had me intrigued for weeks and I couldn't wait to see what awaited within.

Just like the title suggests, Candie has brought design lessons and techniques to school us on all things necklace-related.  The projects range from simple designs for a beginner, to complex multi-layered and collaged designs that are signature Candie Cooper pieces.

The author offers design alternatives and suggestions to push the reader to explore their own ideas and shared her sketches of her design.  It's not just necklaces, there are tips and tricks that caught my eye like a tutorial on making Tibetan inspired ribbon beads and how to make your own fabric covered cording that is deceptively simple. Candie brings on the DIY for clever ways to customize your jewelry and components throughout the book. 

I would look at each necklace in the book like a lesson to study - what technique is being presented, how could you interpret the design into your own style and of course - what art bead would best be showcased with this technique.  Most of the projects use beads you could find in your local craft store or bead shop, making it more accessible to beginners or those on a budget.

Here are two designs I sketched up inspired by projects in the book.

The first necklace is inspired by the necklace Pod.  I love the use of briolettes mixed with dangles to create an interesting pendant of gems.  I would have never thought of using briolettes that way - the stone shape always intrigues and this design is a great reason to finally pull of my stash!  I would match it up with a few of my new leaf headpins and a vintage chain.  (Headpins from Humblebeads.  Sunstone briolettes from Penelope Gemstone.)

The next necklace is very loosely inspired by her coral Scarlet necklace and mix of her Marie Antoinette design.  This necklace creates dangles using stones and wire. In the book Candie used stones in between the dangles, I would use these tiny faceted brass cubes for sparkle and interest.  I would finish the necklace with a luscious sari silk ribbon.  (Pendant from Humblebeads. Faceted cubes from Sharon Unlimited. Ruby zoisite from Moonlighte.

Mix and match techniques in the projects to get even more inspiration millage out of this highly recommended book!  Pull out your bead stash and see what you can come up with Necklaceology as your guide.