Showing posts with label bead caps. Show all posts

Thursday, March 26, 2015

Tutorial... erm... Thursday - Floral Cap Earrings

I'm not sure if it's been mentioned on the blog at all but, behind the scenes, the team have been having a bit of a rethink about how we plan our monthly post schedule.  Nothing is entirely set in stone just yet, but today I have a tutorial for you and it isn't a Tuesday.  It's for a relatively simple pair of earrings but I hope it will give you some ideas for different ways to use bead caps.


I love these vintage tin bead caps from Lorelei Eurto. There's so much cute detail it seems a shame to hide them away at the top of a bead, especially if another bead will be sitting directly on top of them. Here I've used a wooden disc as a backing so that the surface of the bead cap becomes the focal component. What other materials you use is mostly up to you. I've wired the cap and bead so that they have loops at the top and bottom. From the bottom loop I've hung a combination of czech glass beads.


The yellow flower is one of those dinky button flowers with the hole at the back. I've added the angel wing bead above to stop the flower twisting around. Other similar shaped beads can also do this job, for example, a large peanut bead.  Of course, you may wish to hang something completely different below your bead cap link. Moving on to the cap section, I have used 26 gauge wire. This was because the hole in my wooden discs was relatively small. If your beads have larger holes then a thicker wire would be good.


I found that the best way to keep the cap centred on the wooden disc, was to start making the wraps on each side and increase the tightness in each at the same time, rather than finishing one completely before starting on the next. Once this is done, make a wrapped loop at the bottom of your cap section, adding the czech glass drop before closing the loop.  Turning to the top of the earrings, I've added a little stack of beads.


I've used a large holed bone bead and a washer then added a vintage acrylic flower cap, which sits nicely in the large holes below. If you don't have such a thing, you could try using one of those little flat-ish czech glass 5-point star flowers (this sort of thing). I then sat a little wooden seed bead in the vintage cap and made a double wrapped loop, to compensate for the finer wire. Then you just need to add your ear wire and make your second earring.


Bye for now, Claire 

Thursday, March 19, 2015

To Cap it All - Bead Cap Inspiration

Hello all! It's my turn today on Art Bead Scene, and I thought I would share a post of mine from back int 2012 which I have long thought would stand a revisit. Things have been a little busy/hectic/stressful here, and I haven't had time to finish writing up the post I had planned - but never fear, that will wait for another day, and hopefully you will find a little inspiration in one of my favourite components to work with - the humble bead cap. Enjoy!

--------------------------------------------------------------------------------

We all love beads here at Art Bead Scene - readers and writers alike. But I bet I am not alone in saying that my personal love of beads extends way beyond 'small, decorative object(s)...usually pierced for threading or stringing.' (Wikipedia). Findings, fibres, cords, found objects that can be incorporated into my jewellery - all these are things that, alongside beads, I couldn't live without. Well, perhaps that's going too far but sometimes it can feel like that! 

Today though, I want to talk about one of my favourite of all non-bead components - the humble bead cap. When I first started out beading with wire, quite a few years ago now, I found these sweet little things endearing - they were, as you would think, tiny little caps; miniature headgear for the little beads I loved to work with. (I don't think I could have told you what an art bead was at this point!) They sat and looked pretty, and occasionally served a useful purpose in keeping my beads from falling off headpins if the holes were too big, but that was about it. I played around with having them on the bottom of a bead too, a cup rather than a cap, and also sandwiching a bead between two caps. All very pretty, but nothing earth shattering there! 

When I discovered art beads a few years later, I also discovered artists such as Shannon LeVart (better known to you and me as MissFickleMedia), and her stunning hand patinated components. I went ahead and bought some bead caps. They were really pretty and almost seemed too lovely to use with some of my beads....and when the caliber (and price tag!) of the beads you are working with changes, you don't always want to cover them up with bead caps, however pretty. And the bead caps were so lovely in their own right, I didn't want them to be secondary to the beads themselves. So I started to think, how else could I use these lovely components....I tried a few things out but wasn't totally happy.....so I stuck with the capping and cupping, just with more expensive headgear than before. 


Earrings made for the Bead Soup Blog Party earlier this year.
Still, my quest to elevate the bead cap from it's lowly status as a finding continued....and then I had several lightbulb moments over the past year....why not turn the cap around? Not merely cupping or capping, but springing out from the bead like a flower? Now I was onto something! (This is not to say this was desperately original. I know many people have done the same and many people continue to do the same! It was however, new and striking to me.)

Cupping, capping, layering and flipping of Vintaj and Fallen Angel Brass bead caps - all in one pair of earrings!Polymer clay rondelles - Humblebeads
The lightbulbs continued to flash - layer the caps! Stack them! And then I discovered more and more bead artists creating artisan bead caps - ChelleV2, GardanneBeads and TheaToo to name but a few. These caps didn't need beads to be beautiful - they could work all by themselves, turned into flowers or bells with cord, wire, headpins for stamen. 

Here are some examples if you are struggling with a stash of beautiful bead caps like I was:

A tiny ceramic bird from BoHulleyBeads perches atop a handmade bronze flower beadcap (TheaToo), handmade brass headpins form spiralling stamen. 
Patinated ring and headpins from MetamorphSupplies.
A series of earthenware clay bead caps from ChelleV2 are knotted on waxed linen cord and hang down artfully, mimicking faded flowers, or tears. 

This was made for Erin Prais-Hintz' Challenge of Music earlier this year. Watch out for her Challenge of Literature on Thursday! 

The difference that different media can make - look at these bell earrings, this time bead caps from NadinArtGlass. The light and delicate ridging on these caps make for an elegant pair.

I made these shortly before going on stage to sing as I had forgotten to bring any jewellery with me!
A different look again - these Vintaj bead caps make perfect earrings as well, or even a single one as a sweet pendant.
Created for one of Andrew Thornton's blog challenges last year.
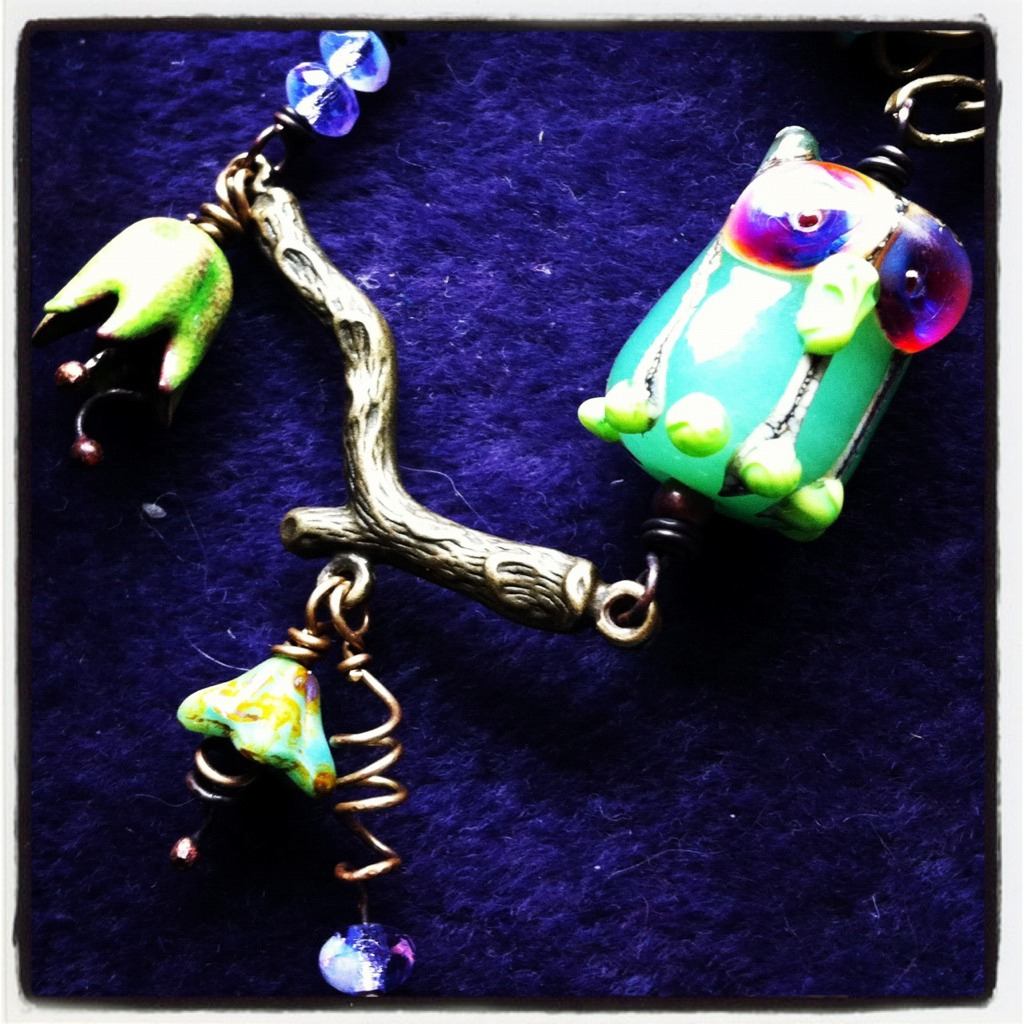
Enamelled flower bead caps add a pop of colour wherever needed - these bead caps from Anne of GardanneBeads are some of my very favourites, being a lover of colour. One hangs from an antique brass branch, a perfect complement to this cute lampwork owl from SoulSilver

These wee flower dangles are the perfect addition to many pieces of jewellery - Anne has just made me a custom rainbow hued order!
What components (other than beads!) do you love to work with? What handmade elements have you elevated beyond the ordinary? If you are a bead or component artisan, what are you working on beyond beads and pendants to make our jewellery making ever more unique and beautiful? 

Rebecca is a Scottish jewellery designer; currently living in Edinburgh, capital of her native land. You can read more about her and her work at her blog, songbeads.blogspot.com and see more of her jewellery at songbead.etsy.com. She also has a supplies shop at thecuriousbeadshop.etsy.com.


Saturday, November 8, 2014

Finding Center: Find the Center of a Metal Disc


In a couple of my previous posts I shared a tutorial on making a necklace using washers and another tutorial about using washers to create a pair of earrings.  The process of cutting washers from metal sheet leaves a metalworker with a pile of smaller discs. These smaller discs are a happy by-product of the process. 

These small discs can make nice bead caps; they can be domed or left flat. To be used as bead caps it's important to have a hole punched in the center of the disc. If the hole is off center the bead cap will sit crooked on the bead. I've been experimenting with various methods to find an accurate center on the discs.

You can find various methods for finding center of a circle with a google search. The one I preferred involved using a ruler to draw a line across the disc, turn the disc 90 degrees and draw another straight line. The point at which the two lines intersect is center. Sounds simple right? Not so much. If the first line doesn't bisect the disc at its true center point then the intersection of the two lines won't be center. 

Then I found this tool. Yes...eyebrows raised and a slow grin came across my face.


The EuroTool Center Locator.


Slide a round disc into the V slotted side of the tool.


Flip the center locator over, holding the disc in place and draw a straight line. 


Turn the disc 90 degrees and draw a line perpendicular to the first line.

Simple!


The tool has two sides. On side has a V shape to find the center of  a circle. The other side has a 90 degree angle to find the center of a square. The piece I have in the photo above is a rectangle. I just wanted to give you a visual of the other side of the tool.


All the discs are marked and ready to be punched. 


You need to pay attention to detail when marking the discs. The lines need to be drawn perpendicular to each other to ensure finding center. You also need to take care to line the punch up carefully. 

I'm loving this little tool. This has been the most effective way I've found to find the center of discs. The tool is very afforable, less than $9.00. I purchased my nifty Center Locator from Beaducation.


The discs after punching.


A collection of discs after cleaning up and adding some finishing touches. I embossed the discs, left some flat and domed others.


Ema Kilroy is a lampworker and metalsmith living and working in Central Massachusetts. 


Tuesday, May 29, 2012

To Cap It All - Bead Caps Inspiration

We all love beads here at Art Bead Scene - readers and writers alike. But I bet I am not alone in saying that my personal love of beads extends way beyond 'small, decorative object(s)...usually pierced for threading or stringing.' (Wikipedia). Findings, fibres, cords, found objects that can be incorporated into my jewellery - all these are things that, alongside beads, I couldn't live without. Well, perhaps that's going too far but sometimes it can feel like that! 

Today though, I want to talk about one of my favourite of all non-bead components - the humble bead cap. When I first started out beading with wire, quite a few years ago now, I found these sweet little things endearing - they were, as you would think, tiny little caps; miniature headgear for the little beads I loved to work with. (I don't think I could have told you what an art bead was at this point!) They sat and looked pretty, and occasionally served a useful purpose in keeping my beads from falling off headpins if the holes were too big, but that was about it. I played around with having them on the bottom of a bead too, a cup rather than a cap, and also sandwiching a bead between two caps. All very pretty, but nothing earth shattering there! 

When I discovered art beads a few years later, I also discovered artists such as Shannon LeVart (better known to you and me as MissFickleMedia), and her stunning hand patinated components. I went ahead and bought some bead caps. They were really pretty and almost seemed too lovely to use with some of my beads....and when the caliber (and price tag!) of the beads you are working with changes, you don't always want to cover them up with bead caps, however pretty. And the bead caps were so lovely in their own right, I didn't want them to be secondary to the beads themselves. So I started to think, how else could I use these lovely components....I tried a few things out but wasn't totally happy.....so I stuck with the capping and cupping, just with more expensive headgear than before. 


Earrings made for the Bead Soup Blog Party earlier this year.
Still, my quest to elevate the bead cap from it's lowly status as a finding continued....and then I had several lightbulb moments over the past year....why not turn the cap around? Not merely cupping or capping, but springing out from the bead like a flower? Now I was onto something! (This is not to say this was desperately original. I know many people have done the same and many people continue to do the same! It was however, new and striking to me.)


Cupping, capping, layering and flipping of Vintaj and Fallen Angel Brass bead caps - all in one pair of earrings!Polymer clay rondelles - Humblebeads
The lightbulbs continued to flash - layer the caps! Stack them! And then I discovered more and more bead artists creating artisan bead caps - ChelleV2, GardanneBeads and TheaToo to name but a few. These caps didn't need beads to be beautiful - they could work all by themselves, turned into flowers or bells with cord, wire, headpins for stamen. 

Here are some examples if you are struggling with a stash of beautiful bead caps like I was:

A tiny ceramic bird from BoHulleyBeads perches atop a handmade bronze flower beadcap (TheaToo), handmade brass headpins form spiralling stamen. 
Patinated ring and headpins from MetamorphSupplies.
A series of earthenware clay bead caps from ChelleV2 are knotted on waxed linen cord and hang down artfully, mimicking faded flowers, or tears. 

This was made for Erin Prais-Hintz' Challenge of Music earlier this year. Watch out for her Challenge of Literature on Thursday! 


The difference that different media can make - look at these bell earrings, this time bead caps from NadinArtGlass. The light and delicate ridging on these caps make for an elegant pair.


I made these shortly before going on stage to sing as I had forgotten to bring any jewellery with me!
A different look again - these Vintaj bead caps make perfect earrings as well, or even a single one as a sweet pendant.
Created for one of Andrew Thornton's blog challenges last year.
Enamelled flower bead caps add a pop of colour wherever needed - these bead caps from Anne of GardanneBeads are some of my very favourites, being a lover of colour. One hangs from an antique brass branch, a perfect complement to this cute lampwork owl from SoulSilver
These wee flower dangles are the perfect addition to many pieces of jewellery - Anne has just made me a custom rainbow hued order!
What components (other than beads!) do you love to work with? What handmade elements have you elevated beyond the ordinary? If you are a bead or component artisan, what are you working on beyond beads and pendants to make our jewellery making ever more unique and beautiful? 


Rebecca is a Scottish jewellery designer and singer, currently living in Manchester, England. You can read more about beads and singing at her blog, songbeads.blogspot.com and see more of her jewellery at songbead.etsy.com.