Friday, May 30, 2014

May Monthly Challenge Recap

I have to apologize for the lack of a Perfect Pairings post on Wednesday. I have been having some technical difficulties this week accessing the Flickr pool. That and I was busy with the funeral for my 89 year old mother-in-law. A good long life. We can all hope to be blessed with so many years.


Our challenge painting for this month is the Capriccio Padovano by Bernardo Bellato. My mother-in-law always wanted to travel. She would have loved this romantic Italian scene. Perhaps one day I can travel abroad as she never did. This landscape with the infinite waterways, the mountains rising in the distance, the strong architectural details and the shape-shifting clouds makes me want to travel to this place to see if it is still standing. There is a quality of light in this painting that is at once soothing and energizing. There was a wide range of inspirations from this one painting, and each of them is a marvelous exercise in creative interpretation.


Your turn!
Click the InLinz Link-up below to add your blog post to the hop!
Please add your exact URL to the blog hop for the
May 2014 Art Bead Scene Monthly Challenge Recap.
 

Tuesday, May 27, 2014

Tutorial Tuesday: Wee Bud Earrings

Long story short, I recently went to a beady event where there were a number of art bead makers selling their work.  Obviously I had to get a wee (or, in some cases, no so wee) something from every stall, and from Pippa Chandler I picked up some of these dinky little flower buds.


I'm loving the whole orange and teal thing at the moment, so these really appealed to me.  I knew I wanted to use two in a pair of earrings, but that left me wondering how to use them so that the colours could be seen inside and out.  Here's the solution I came up with.


By hanging the flowers so that they partly rest inside the oval links, they are lifted up, showing the orange centre.  Moreover, the flowers are kept in place because the 'back' of the flowers is cradled in the oval.  Here's a quick step-by-step to show how I made them.  Start by taking about 10cm of 22 gauge / 0.6mm wire and thread a third of it through a large czech glass leaf.


Fold the ends of the wire up to the top of the leaf and bend the longer length upright at the centre top of the leaf.  Wrap the shorter length around the upright wire, then trim and tuck in the end.  Add a couple of lampwork spacers to the remaining wire. (The orange spacer I've used here is from Puffafish Lampwork; I can't remember who made the mini turquoise one...)


Next, take an oval link - I've used some links from a large chain, each being approximately 17 x 11mm.  Attach your beaded leaf drop below the oval hoop with a wrapped loop.  Put your polymer flower on a headpin and attach to the top of your oval with a wrapped loop.


Take another 6cm of wire and make a wrapped loop at one end, attaching it to the hoop at the top of your flower.  Thread on a mini czech glass melon bead then close with a wrapped loop. Finish by attaching an ear wire.


Now all you have to do is make your second earring.


There are lots of bud and pod beads about at the moment.  You could use this technique to hang them - whether on earrings or a necklace - so you can see inside them.


All you need to do is find a suitable 'link' shaped base on which to rest your bud or pod.  It might take a big bone hoop, a large metal connector, or a chunky vintage lucite ring.  Whether you want to make a pair of wee bud earrings or have been looking for a way to hang a pod shaped focal, I hope you've found something helpful here.

Bye for now, Claire

something to do with your hands on Etsy
somethingtodowithyourhands blog


Monday, May 26, 2014

Amuse Your Muse Monday with Rebecca of Songbead

Hello there ABS-ers! Is it just me or has May simply flown by? I can't quite believe that we are on the brink of June and all that that entails - not least, the beginning of the craft fair season for many of us. My first fair is The Art Market at Holmfirth on the 22nd June. If you are in the North West of England, I do recommend you coming along. The standard is always 2nd to none and I have never managed to leave without opening my purse. 

A few flower beads today to inspire your Spring and Summer creations......I chose a selection of gorgeously bright creations to whet your appetite!


And now for the BeadBlogger Links. Have a great week!


Rebecca is a Scottish jewellery designer, currently living in Belfast, Northern Ireland. You can read more about her and her work at her blog, songbeads.blogspot.com and see more of her jewellery at songbead.etsy.com. She also has a supplies shop at thecuriousbeadshop.etsy.com.

Friday, May 23, 2014

Inside the Studio with Ema Kilroy of Ema K Designs

Welcome to Inside the Studio!

Each week one of our contributors gives you a sneak peek into their studio, creative process or inspirations. We ask a related question of our readers and hope you'll leave comments! As an incentive we offer a free prize each week to bribe you to use that keyboard. The following week we choose a random winner.

Congratulations Colleen! You have won three beautiful, beaded beads from Rebecca at The Curious Bead ShopPlease send Rebecca an email with your information.
________________________________

Hi Friends.
Recently I needed to summarize my creative process for some pieces I was creating for a special project. You'll have to read to the bottom of the post to find out more about where these pieces are heading and why I documented the process. I love to know how an artist works and I thought you might be interested too. So I thought I'd share my creative process with you in today's Inside the Studio post.

I begin with metal scraps. Thus far all of the copper I use has been salvaged and upcycled from the construction industry. Here's a look at the raw metal before being turned into pieces worthy of jewelry designs.


The copper is annealed (heated with a flame until it is glowing red) to soften the metal, pickled and then cleaned.


Patterns are added. The metal is cut using metal shears or disc cutters.


I then use a grinding stone to round off any sharp, pointy edges.

Now comes the fun part.....


I have collected and dried an assortment of flowers. I'm so excited that Spring is here as I continue to add to this collection everyday. I then apply the dried flowers to the component. Individually placing the flowers sometimes placing one little stem or flower to harmonzie with the shape of the component. 


In the step above I created a sandwich of paper, copper, flowers and paper. The sandwich is run through the rolling mill, impressing the dried flower into the metal, thus creating an image on the copper.


After the images have been impressed into the metal, pieces are tumbled to remove any construction grime and work harden the softened metal.


Fresh out of the tumbler. It makes all the difference. The pieces are so nice and shiney. Finally starting to look like something to be used in a piece of jewelry.


Liver of sulfer patina is applied. 


The pieces are hand sanded and dipped into liver of sulfer multiple times until I'm satisfied with the end result.


Renaissance wax is applied to finish each piece.
All these pieces have been sent to Chris Thommen at The Art of the Bead and will be for sale at Bead & Button June 6 -8, 2014. You can read the back story over at my blog over at Ema K designs. So if you're going to be in Milwaukee, WI and attending the Bead & Button show stop by booth #1200 to pick up your favorite.

A personal note:  Here in the US Memorial Day Weekend begins tonight, a time to celebrate and remember those who have served our country and lost their lives doing so. A special time to honor those who have fallen. Personally, I honor those who have served in any capacity. I would be amiss if I didn't give a shout out to all our military branches for the incredible job their doing! One my best girlfriends has been in the US Army for 20 years! I'm so proud of my friend Marilyn! 


I'm going to giveaway a copper pendant impressed with baby breathe, 1.25 inches round (impressed image may vary from picture). Answer the question below in your comment for your chance to win. 

Next week I'm planning to write a post about tools. Since I work in two different mediums I could go a  couple of different ways with this. I'd like to hear from you. What would you be most interested in? Do you want to see an overview of metal working tools or lampworking tools? As always, thanks for visiting ABS today!

Ema Kilroy is a lampworker and metalsmith living and working in Central Massachusetts. 


Thursday, May 22, 2014

Introducing Big Bead Little Bead

Don't you just love getting a present in the post?  Even if you've paid for it yourself?


This enticing looking package came from Big Bead Little Bead.  The UK art bead scene is less extensive than that in the US, but Big Bead Little Bead have been offering art beads for some years now and they are always keen to promote bead artists.  While the shop is based in the UK, they ship worldwide at a reasonable rate and their website allows you to shop a number of artists and only pay one lot of shipping! They stock art beads in a range of media and today I wanted to show you around their artist made selection and bring you a tasty bit of beady eye candy.


First up, ceramics, and a name many of you will know. BBLB have been stocking Bo Hulley's ever-popular pieces for about a year now. 


Bo frequently sends them new stock of her latest designs - these black and red hearts, for example.  Here's another ceramic artist a number of you may recognise.  I love the smokey glaze on these Chinook pendants.


Then there are some other ceramicists who are not so well known on the bead scene but make some of my favourite beads.  Maap Studio are known for their stunning porcelain jewellery.  (It really is jaw-dropingly beautiful - no exaggeration! Go look!)  They don't sell beads in their Etsy store, but BBLB stock an exclusive range of their beautiful Parian pieces.


Those wee exclamation marks are a new addition and very dinky indeed!


Another of my favourites is Jane Lidbetter, an Australian ceramicist. Again, Big Bead Little Bead have an exclusive selection of her work.  


I just love the graphic style of these hand painted pieces - kinda tribal and kinda mid-century at the same time!


Next, lampwork. How joyous are these bright fritty nuggets?


They're made by Lesley Silver of Beadsashore and I have several waiting in my stash. They're available in a range of lovely colours from these bright citrus shades to some delicate ivory hues.  Another lampworker well represented on the BBLB site is Dianne Cousins of Tobairas Beads.


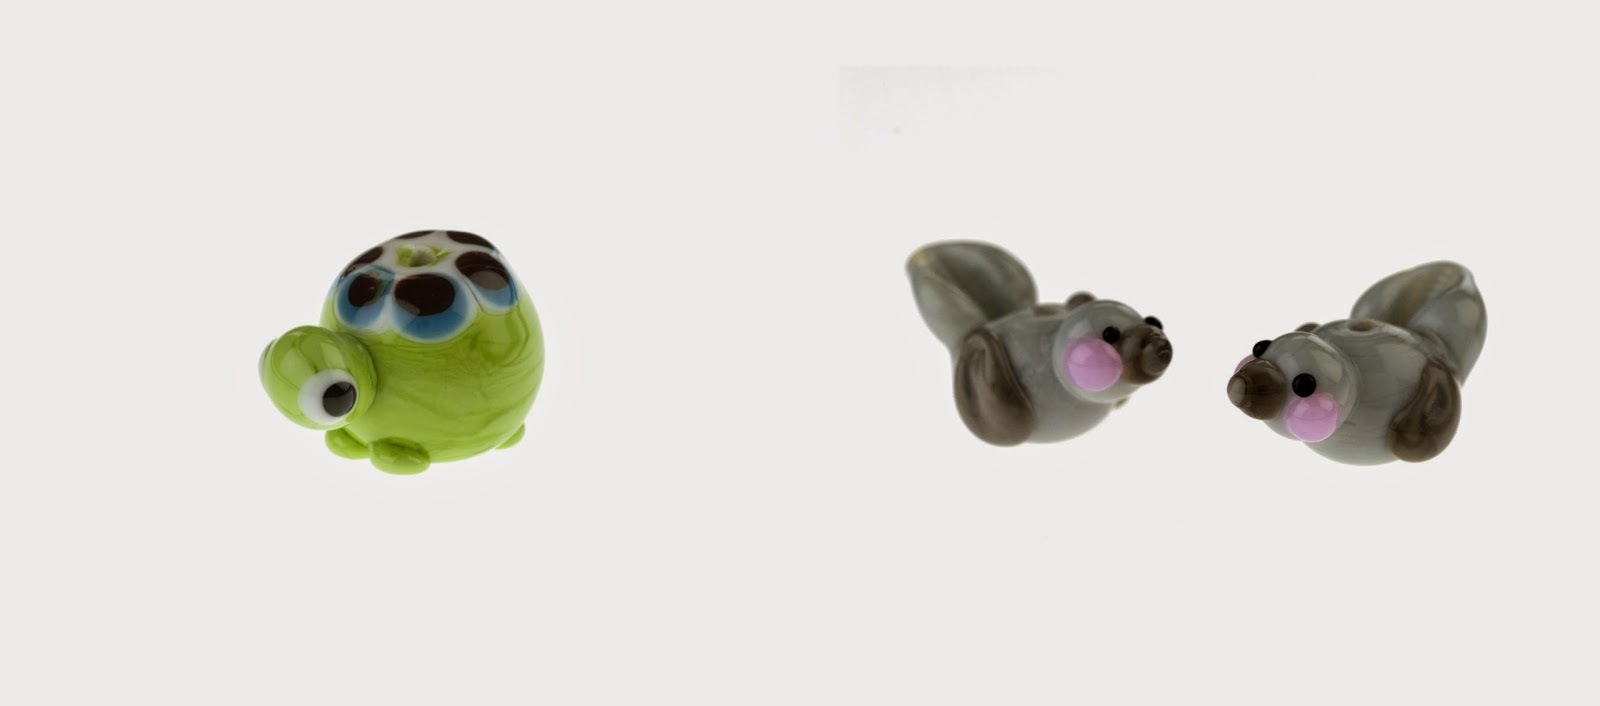
I've bought several sets of Dianne's rondelles; I rather fancy this subtle etched set too. But, if you're looking for something more fun and whimsical, how about these:


Isn't Carole Hughes's little turtle cute?  And who doesn't love a bird bead? These were made by Marcy Lamberson.  Here's a couple of other lampwork lovelies:


There's something so appealing about hollow lampwork beads; this one is also the work of Lesley Silver.  The lentil is another of Carole Hughes's beads, titled 'Bloody Mary' - also rather appealing!

There are fewer polymer pieces available on BBLB at the moment but there's still a range of good things to be had.


Clockwise from top left, these are made by: Continuum Designs, Jayne Kriel, Something to do Beads (yes, that's me!), and LC Beads.


Alongside these more common materials, Big Bead Little Bead stock a range of handmade paper beads and pendants.  There are Spoon's fun and highly affordable rolled beads, which are great for folksy designs. There are also a number of decoupage pendants made by another Australian artist, Eryka Garbutt. 

 I really like this square pair - I've come very close to buying them on several occasions.


Finally, Big Bead Little Bead have a small range of dichroic glass pieces, from Emma Vidler, and a selection of beautifully detailed beach themed pewter charms made by Yvonne Law.


I do hope you'll be tempted to take a look around the Big Bead Little Bead site.  Alongside the artist made pieces, they have an extensive range of vintage elements and a comprehensive selection of other beading supplies.  It's a lovely site - go explore!  I'm off to open my parcel!

Claire
something to do with your hands

Wednesday, May 21, 2014

Perfect Pairings :: Ahowin + Happy Fallout + Magdalena Ruiz


 What I love about this deceptively simple design is that there is actually so much going on in this bracelet. My eye wants to roam over the landscape of this bauble like it does in the challenge painting. The strong color palette with the terra cotta bricks, the brilliant blue skies, the soft luminous clouds are all represented here. This takes me to another place and time!

Featured Designer :: Ahowin
 
Featured Bead Artist :: Happy FalloutMagdalena Ruiz

Tuesday, May 20, 2014

Tutorial Tuesday Urban Bracelet


In keeping with the urban setting of this month's Art Bead Scene Challenge Painting, I have 
designed a this century city style bracelet for my tutorial using blackened copper ball chain and one of my art bead toggle clasps. This is a 3 strand double wrap bracelet that is simple to construct and fun and fashionable to wear.

Urban Chic Double Wrap Ball Chain Bracelet by Mary Harding

Supplies

1 toggle clasp 1 1/8 inch diameter
42 inches ( approximately) copper ball chain--2.4mm bead
6  2.4mm bead ball chain connectors
3 balled end head pins  20 gauge annealed copper wire 7 inches long or substitute copper end pins
3  size  5 mm jump rings
3  size  7 mm jump rings
1  size  9 mm jump ring
Liver of Sulfur patina
Acrylic Fixative Spray

Tools

Round Nose Pliers
Chain Nose Pliers ( 2 pairs for closing jump rings)
Flush Cutters
Flat needle file
Butane torch if you are making your balled end head pins Use 8 inch pieces of 20 gauge wire and anneal them for easier wire wrapping

Directions

These directions are based on  a 6 1/2 inch wrist.  You may need to adjust the measurement of the ball chain.  Bracelet is designed for a snug fit on your wrist. To figure how much chain to cut for your wrist, use a tape measure and wrap it tightly around your wrist.  Double that measurement.  You should come very close to a good fit with this method.

1. Cut the ball chain into 3 pieces  13  inches long.  Make one of the pieces 2 beads shorter than the other two.   I suggest you make all 3 pieces of chain a little longer than they will need to be to go around your wrist twice.  Then you can adjust later.

2. Add the copper ball chain connectors to both ends of all three pieces of chain.


3.  Make a small wire wrapped loop for 1 end of each of the chain as follows:
Insert the the non balled end of the head pin into the hole at the top of the ball chain connector and align it so that the smooth side faces out.


Then make a wrapped loop and continue wrapping the length of the connector as seen in picture below

When you have finished your wire wrapping flush cut the wire on the back side of your wrap. File the edge smooth.  
                         Back side of the wire wrapped connector

When you have finished wrapping all three  connectors, add the  7 mm size jump rings to the wire wrapped loops and  5mm size jump rings to the connectors that don't have wrapped loops

                                          7 mm jump ring added to the wrap loop


                  adding 5 mm jump ring to connector bead through hole on end of link

 
                            5mm jump ring connected to the connector bead


  Then put all 3 pieces of chain  into a liver of sulfur solution ( be sure to use in a well ventilated area,  wear eye protection and rubber gloves)  and wait until they turn completely black. Rinse with cold water.   Dry thoroughly with a hair dryer before continuing.

Bracelet Assembly
1.  Attach the three wrapped loop chains  to the three holes in the toggle clasp.


2. Lay out your chain, making sure that each strand is straight and attach the three jump rings on the other end to the loop in the toggle bar.


3.  Put on your bracelet by wrapping the chains 2 times around your wrist and closing the toggle clasp with the toggle bar.  If your bracelet is too big you can easily cut off the extra lengths with a pair of scissors or your flush cutters.  Remember to make the middle chain about 2 beads longer than the other 2 chains.

If you want to protect your patina lightly spray the chains  with  the Krylon Acrylic fixative spray.

Enjoy your new urban chic bracelet!!!

Sources:
3 hole Toggle Clasp   MaryHardingJewelry
Copper Ball Chain 2.4mm bead  Rio Grande
Copper Ball Chain 2.4mm bead connectors Rio Grande
Jump rings   Ornamentea
Balled end head pins MaryHardingJewelry
Krylon Acrylic Fixative Spray   Michaels and other art supply stores
Liver of Sulfur Patina   Etsy