Monday, July 31, 2017

July Monthly Challenge


This month's challenge art, Tiger in a Tropical Storm by Henri Rousseau, reminds me of this most famous poem.

The Tyger
BY William Blake

Tyger Tyger, burning bright, 
In the forests of the night; 
What immortal hand or eye, 
Could frame thy fearful symmetry? 

In what distant deeps or skies. 
Burnt the fire of thine eyes? 
On what wings dare he aspire? 
What the hand, dare seize the fire? 

And what shoulder, & what art, 
Could twist the sinews of thy heart? 
And when thy heart began to beat, 
What dread hand? & what dread feet? 

What the hammer? what the chain, 
In what furnace was thy brain? 
What the anvil? what dread grasp, 
Dare its deadly terrors clasp! 

When the stars threw down their spears 
And water'd heaven with their tears: 
Did he smile his work to see? 
Did he who made the Lamb make thee? 

Tyger Tyger burning bright, 
In the forests of the night: 
What immortal hand or eye, 
Dare frame thy fearful symmetry?

The tiger in this poem, and in this painting, is a fearsome sight. It is fully of raw power and unbridled fury. I see the coiled tiger about to strike in the midst of this great stormy wind. Makes me wonder if I am the hunter or the prey. A powerful poem - and art - indeed.

Loads to work with! So many greens, the shapes of the leaves, the stripes of the tiger, the lightning bolt in the sky. What intrigued you about this painting? Let's see what you created...

If you put up a post (on your blog, your Facebook, your Instagram, etc) grab the URL and upload it below for a second chance to win fantastic prizes!

Wednesday, July 26, 2017

Bead Table Wednesday - Vintaj Patina Paints and Stencils

Today on Bead Table Wednesday I shared how to create painterly pendants using stencils and Vintaj patinas on brass blanks.

You can watch the video here:

Resources mentioned in the video:


(*Amazon affiliate links)

Vintaj Patina colors used today: chalcedony, coral, green opal, white gold, rose gold

The Painter's Garden Pendant 

Supplies:
34mm hand-painted brass pendant 
Painted leaf pendant
13-15mm polymer clay disk
flower bead cap
4 Czech glass leaf and flower beads
English cut glass bead
Brass flower bead cap
2 4mm Czech glass rondells
2 6mm Czech glass melon beads
Arte Metal leaf charm
2 4mm spacers
2 11/0 nickel seed beads
15" 20 gauge brass wire
26" gunmetal chain
15mm brass etched jump ring
8mm gunmetal jump ring
5mm brass jump ring
2 2" copper ball headpins
Directions:
1. String the glass flower onto the headpin, create a messy wrapped loop. Repeat with the English cut glass bead and flower bead cap. String both dangles on a 5mm jump ring.
2. Attach an 8mm jump ring to the bottom of the hand-painted pendant, slide on the painted leaf pendant, small leaf charm and jump ring with the two dangles. Close the jump ring.
3. Cut a 5" length of wire, create a large loop. Open the loop and slide through the top of the pendant. Wrap the wire around the top of the loop, tightly two times and then two more times loosely. String on a disk bead and create a wrapped loop on top of the bead.
4. Attach the 15mm jump ring to the top of the wrapped loop.
5. Cut two 5" lengths of the wire. Create a wrapped loop, string on a rondell, spacer, glass leaf bead, nickel seed bead and glass melon bead. Create a loop on top of the last bead, open the loop and string on the chain, close loop and wrap the wire under the loop tightly two times and loosely two - three times to create a messy wrap. 
I have a limited number of complete kits on my website for today's project. You can find them here.

Tuesday, July 25, 2017

Corfu Blue:Free Necklace Tutorial from MaryHardingJewelry

Last month I promised a tutorial using the above components and that is what we will be doing today.  Since then I have given the necklace a name.   My inspiration came from watching  The Durrels in Corfu (streaming on Netflix)  and then reading Gerald Durrel's Corfu Trilogy.  Upon arriving in Corfu for the first time, Gerald describes the sea surrounding Corfu as "butterfly blue."  Feeling sure that these crackle glazed porcelain beads must be that color, I was inspired to name my necklace Corfu Blue.
I have made some changes in my original plan.  What follows  is a picture of it laid out before I actually put it together.


And then I made some more changes and here is  how it looks now.
                                                     Photograph of the full necklace


                                   close up of the Leaf Pendant and the Large bail

Supplies
8 feet of 20 gauge sterling silver wire (patina before using.)
5 Corfu blue porcelain beads --ranging in size from 8mm-14mm
1 porcelain Corfu blue bird bead
2  10mm golden bronze stoneware beads
1 small porcelain flower charm
8 10 mm dark brass or steel jump rings
2 dark brass or steel 11mm jump rings
3 7mm dark brass jump rings
11  6mm dark brass jump rings
1 dark brass  eye pin
5-6 inches eclectic handmade chain
3 pieces of 6 inch chain (one teal and 2 gray)
1 Copper and Wire Toggle clasp
1 Zola Elements Patina Green Brass Scrolled Focal Link 64mm x 56mm
11 size 6 antique gold color seed beads
1 Queen Ann's Lace Ceramic Leaf Pendant

Directions
1. Using the 6 mm jump rings attach the #6 seed beads to the 8 loops on the Zola Elements Bail
2.  Wire wrap both ends of the golden bronze 10mm beads  each with a 6 inch piece of the sterling silver wire.  Enough wire has been allowed to double wrap them if you wish.
3.  Attach the golden bronze beads to each end of the bail with an 8 mm jump ring.
4.  Attach an 11mm jump ring to each end of the group of  three strands of 6 inch chain (one teal and 2 gray)
4.  Make a wire wrapped chain with 2 Corfu blue beads and 1 bird bead.  Position the bird bead between the two other beads.
5.  Make another wire wrapped chain with the three more of the Corfu blue beads
6.   Attach one chain of beads on each side of the necklace to the golden bronze beads with an 8mm jump ring.
7.  Then attach the last wrapped loop of chain on the left to the eclectic handmade chain and on the right side to the three chain strands.
8.  Use an 11mm jump ring to attach the eclectic chain to the copper toggle clasp
9.  Chain together 3 of the 5mm jump rings and add them to the toggle bar
10.  Attach the above  chain to the group of 3 chains 10mm jump ring
11.  Make a wrapped loop on the small flower with the eye pin making sure to attach it to a ring in the chain before you closed it.
12. Add the Ceramic Leaf Pendant to the loop at the center of your Zola Elements Bail with an 11 mm jump ring  Attach 3  # 6 seed beads on the 6mm jump rings to the 11mm jump ring as seen in the picture above.

Your necklace is finished.  Since this necklace is composed of many handmade elements, I encourage you to substitute beads and chain from your own stash or search on Etsy and other places for handmade components and art beads.  General Sources for supplies follow.

Sources
Art beads, Ceramic Leaf Pendant,  handmade chain, toggle clasp and are made by me. I have listed the leaf pendant and a set of the corfu blue beads and bird as Made To Order  in my Etsy shop  www.maryhardingjewelry.etsy.com    I also encourage you to seek out substitutions or beads from your own stash to make this necklace.   I have checked Lima beads and you should be able to get one of the Zola Elements Bails. Here is the link 
Chain          Michaels.com
Teal Patinated chain  MissFickleMedia.etsy.com
Zola Elements Bail  at this link:https://www.limabeads.com/Zola-Elements-Patina-Green-Brass-Scrolling-Focal-Link-64x56mm-P42144
Jump rings and eye pins  Michaels.com
Golden Bronze ceramic beads Firefly Design Studio   https://www.etsy.com/shop/fireflydesignstudio

Thank you so much for stopping by today.  I enjoyed making this necklace and sharing its progress and development with you.  Look forward to seeing  you next month.
Mary
www.maryhardingjewelry.etsy.com
www.facebook.com/MaryHardingJewelry/

Monday, July 24, 2017

Inspirations from The Clay Hen

My posts here are centred around inspiration and there are certain artist that stand out to me as artists that are directly inspired by the world around them.  Melissa Gable is one of those artist that comes to mind.  She once made the tiniest, cutest ceramic teapot beads that I adored!!  I love her work and asked her if she would share with us, the things that inspire her most.  So here is what Melissa had to say:
I have been making ceramic beads and components for nearly 3 years, I started with earthenware but I now mainly work in porcelain as I find it nice and strong once it has been fired. My beads and components are sold under my The Clay Hen name. I have also just started to make one off slab constructed leaf plates with underglaze and sgraffito design


In my past life I was a potter for ten years...I hope to get back to someday, once my studio is bigger! I used to make funky one off functional ware from teapots to bowls. I LOVE working in clay! I love all aspect of making, but I have to say my favourite part is opening the kiln, it is always such a surprise and there is a touch of alchemy about it. I live on the beautiful Far South Coast of NSW in Australia, surrounded by nature, which I absolutely love.

My first experience in clay was when I did a course in 1991 – 92 in ceramics. It was an excellent course that taught me all the fundamentals of ceramics, from throwing to glaze technology. From that point on I was hooked.  I have been working in clay on and off for about 25 years, although I did have a break for a few years and worked as a web publisher in Government, prefer the clay work!
My recent work has been inspired from trips to the beach, snorkelling:
 

Seeing how the seaweed sways in the ocean currents, spying octopus under rocks with their tentacles darting out to touch your foot and watching the silver fish glimmer as they swim about. Really amazing!! I think my experiences seep into my brain and then come out as I am working. I occasionally draw my ideas, especially if I don’t want to forget them. But, a lot of the time it is from experimenting with the clay in the studio…just playing around.
My last series was partly inspired by looking at Nasturtium petals and just how utterly beautiful they are! I did a series of pod and petal inspired beads.

I develop a new technique that gives me a water colour effect after the final firing.


The porcelain I am using is very fine and white so it is a perfect canvas for this particular technique. I especially love it when it is combined with oxides and a peak of white clay shows through.
I have also started to do a range of rustic caps made from the fine porcelain and raku clay which has a lot of grog in it, this gives it a rustic quality and some of the glazes just look fantastic on it.


Where you can find Melissa's work:
http://www.theclayhen.com.au/
https://www.etsy.com/au/shop/TheClayHen


Isn't Melissa's work amazing!! I Have some of her rustic pods on their way to me and I just cannot wait to get them and make earrings for myself!!
As you are reading this I am still a few days from being home from my trip. I am putting this post together before flying off to Italy.  I look forward to next post - sharing lots of inspiration from my trip!!  See you then! And until then....
Wishing you all "inspiration in everyday"!!
Terri Del Signore
artisticaos

Tuesday, July 18, 2017

Creating Eclectic

When I started my lampwork journey I was very focused on making beads that matched, I worked hard to create sets that were evenly sized, its good practice to get into, it certainly helps to develop skill. The down side is it can become very restrictive, perfect for days when your mind doesn’t wander and the results are fabulous when you see a bunch of uniform beads that work perfectly together. 
This post is about an unravelling of sorts, when you’ve been in that focussed place for a while it can be really hard to let go and just explore. To make the transition easier I decided to work within a colour palette, giving me structure, with these sets I have explored working with different sized mandrels (the steel rods lampwork beads are formed around) different patterns and textures, shapes and sizes, and I worked on something completely new for me, off mandrel hearts (these are formed directly on the end of a glass rod and the hole is pierced through with a hot tungsten tool) 


This set is my favourite in terms of colours. 

This set just screams summer beaches to me. 

I love these warm heathers and soft teals. 

I am really quite pleased with where these sets have taken me, they have given me the freedom to explore a new way to make bead sets, I think they could be great for the eclectic jewellery maker mixed with some polymer clay, wooden beads and cords. 
I have been adding to my personal stash too, just because I love seeing them all together in my bead trays :) 


You can follow me on Facebook here:https://www.facebook.com/SoulSilverSally/


Tuesday, July 11, 2017

Goody Two-Shoes

Goody Two-Shoes!

Using whimsical  miniatures in your earring designs!


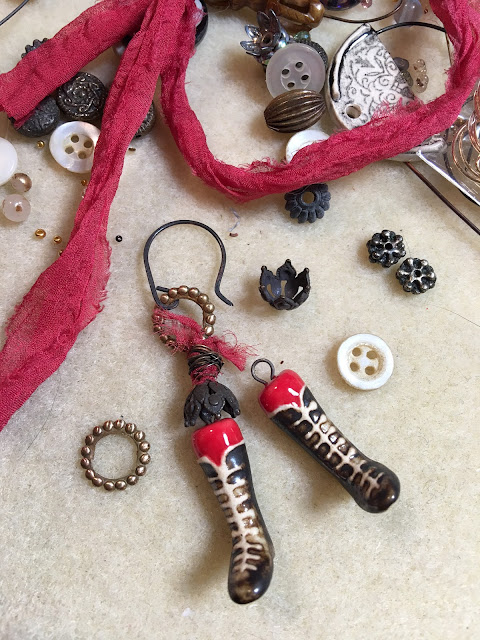
I've been collecting these sweet little ceramic earring pairs by Melissa Gabelle of The Clay Hen for a while.  I have a soft spot for vintage items or ones with a vintage/antique feel like these! They really tug at my heartstrings! Turning unique shapes into earring designs can be a challenge, but I found once I jumped in, the ideas started flowing!


I put all the little shoe pairs in front of me on my work table and asked each one  ~ Who are you?


The sweet little yellow boots looked like galoshes and thought might pair with some vintage 'rain' crystals and an umbrella! The crystals were salvaged from a 1930 necklace and I used oxidized over-sized bead caps to  give the impression of an umbrella.


Here are some little men's shoes that felt as if  they belonged to a gentleman of the 1700's. I wanted to keep it a bit masculine, so I added some antique mother of pearl shirt buttons, some oxidized metal beads and some subtle sparkle with rhinestone spacers.


These are quite possible my favorite!  I get a French military feel with these....I could be all wrong but that's my artistic license, no?  I added a little flare with the touch of red fabric and the brass wreaths.

It took quite a while to find just the right components. I wanted to enhance the little boots but not overpower them.  I wanted to add to the sweetness.


I think I'm all set for Halloween! I went with the pattern of the socks and decided to go all stripes!  Using Indonesian black and white stripe glass beads I continued to layer more stripes with some tin bead caps by Lorelei Hill Eurto.  Then, softening the look with a bit of frayed silk. 


I was careful to consider the weight of the earrings.  I never make anything that I wouldn't wear myself and I'm all about comfort.


I was going to end my blog post here, but I still had one pair of boots and an orphan! Here we go....


I decided to create a lariat necklace!  Whaaa... not earrings?!!  :)


The vintage chain is from Allegory Gallery, more vintage crystals...and wait for it... the bead caps are hand finished bullet shells from Artwear Elements on Etsy!  


Last, but not least, a hand wired pin!  I love this this so much!


Resources

Boots and shoes:  The Clay Hen

Wire, silk and hand finished bullet shells:  Artwear Elements

Vintage supplies and beads:  Allegory Gallery ,  Shipwreck Dandy SuppliesLorelei Hill Eurto


Thank you for joining me for this month's post of The Earring Whisperer!  Until next time!

Loralee  :)

Loralee Kolton Jewelry

Monday, July 10, 2017

Art Bead Evolutions :: Tropicalico

There are sooooo many possibilities with this month's inspiration art..... stormy sky.... blowing leaves... waving grasses.... tiger stripes..... and of course with so many choices it is really hard to choose! Also, since I am full-on in the midst of creating kits for the two classes that I am teaching at the upcoming Adornments Retreat (time is running out but there is still space in classes and we would LOVE to see you!), and Sunday night we celebrated my husband's 49th birthday with dinner out and a Phil Vassar concert (Ended up in the FRONT ROW, which was awesome, until mid way through the concert they didn't hold back the people who just bought general admission so then we couldn't see a thing for the drunk hoards that careened in front of us )...so, needless to say, I was very short on time. 

We were so close to Phil that it was like we were practically best friends. Soooo good!
In addition to his own songs - and he has written so many great songs that other artists have made famous -
he did an amazing rendition of Come, Sail Away and Piano Man that had has all singing.
Hey! I just noticed how awesome his background looks and works so well with this month's palette!

I toyed around with the idea to make a sort of modified tiger stripe cane, but I also know how hard it is to create a beautiful cane (which is why I will gladly buy any beautiful caned work from my favorite polymer clay artists!), so I knew that was not going to make sense for me even if I had the time, because I clearly lack the patience. So I settled on focusing on the color palette and a very simple stylized leaf shape, since the jungle foliage dominates the entire scene.


I started by mixing all my own colors. That is something that I spent a lot of time on in the Julie Picarello class at the Bead & Button show. Sure, right out of the package there are a vast variety of greens along with gold and yellow and russet red and flame orange, but Julie really instilled in me that you need to take it just another step to make it great. These colors are all very earthy and while bright they are a bit more subdued in hue. I think they play well together.


Next I spent some time cutting out strips in varying widths and laid them on the diagonal on a backing sheet of black.


Finally, I cut them into an inverted teardrop shape for a mod leaf, slightly off center, adding texture to various parts.


And.....that is where I left off.

I am actually not sure what will happen next! Perhaps some more distressing.... definitely some patina.... not really sure where I am going with this. I am baking some up right now to experiment with some options. With any luck, I will have some to share at the Adornments Retreat! ;-)


Friday, July 7, 2017

July Monthly Challenge Sponsors: Allegory Gallery + JunQue Jules

We have two very talented artists as our wonderful sponsor for the July Challenge. We will have 2  Lucky Winners this Month!

Allegory Gallery
Andrew Thornton of Allegory Gallery creates handmade jewelry, jewelry components and unique art at his studio in Ligonier, Pennsylvania.

"We are a creative space that's one part bead store, one part jewelry boutique, one part fine art gallery, and one part gift shop. The aim of Allegory Gallery is to promote artisan craftspeople, inspire the community to explore their creativity, and act as a focal point for classes and artistic education in the area."

Andrew is donating in everything pictured above valued over $64 which is composed of vintage seed beads, vintage glass, serpentine, hand-dyed silk, Czech glass, red agate chip, deer skin lace, waxed linen, a polymer clay pendant by Andrew Thornton, and one of our Fiber Cards.  The cards include a mixed assortment of four strands that are three meters long.  They are perfect for kumihimo projects, adding fiber embellishments, or adding a little bohemian flair to your next jewelry project.  

Visit Andrew on FacebookEtsyTwitterInstagramAndrew's Blog and Allegory Blog.
: :


JunQue Jules
Emily  Hoffman-Sperry creates ceramic beads, buttons, pendants, and essential oil diffusers. Along with making her own components, Emily also makes wonderful jewelry. She creates one of a kind jewelry using everything from vintage celluloid gumball charms, sea glass, collectible vintage buttons, antique skeleton keys, and crystal, to precious stones. All of this fabulous creativity happens in her Norton Shores, Michigan studio.

Emily is donating beads and components valued at $50 for the Monthly Recap winner.

Visit Emily at her Etsy, and Facebook.

Tiger in Tropical Storm by Henri Rousseau

Submit photos of your wonderful Jewelry creations using one or more Art Beads here. Submit photos of your wonderful Bead creations here.

This Month's art has many different elements that can be used for inspiration:  tigers, cats, landscapes, trees, foliage, weather, rain, green, yellow, orange and red

We can't wait to see where your creativity takes you with the art for this month's challenge! 

**IMPORTANT** Please remember to put JUL ABS in the title or tag of your submission(s).  Pinterest doesn't keep Pins in the order they are posted.

Provide us with the artist of the Art Beads used and we always love to know all the materials you used. 

***Art Beads MUST be used in your entry.***