Showing posts with label necklace. Show all posts

Tuesday, July 25, 2017

Corfu Blue:Free Necklace Tutorial from MaryHardingJewelry

Last month I promised a tutorial using the above components and that is what we will be doing today.  Since then I have given the necklace a name.   My inspiration came from watching  The Durrels in Corfu (streaming on Netflix)  and then reading Gerald Durrel's Corfu Trilogy.  Upon arriving in Corfu for the first time, Gerald describes the sea surrounding Corfu as "butterfly blue."  Feeling sure that these crackle glazed porcelain beads must be that color, I was inspired to name my necklace Corfu Blue.
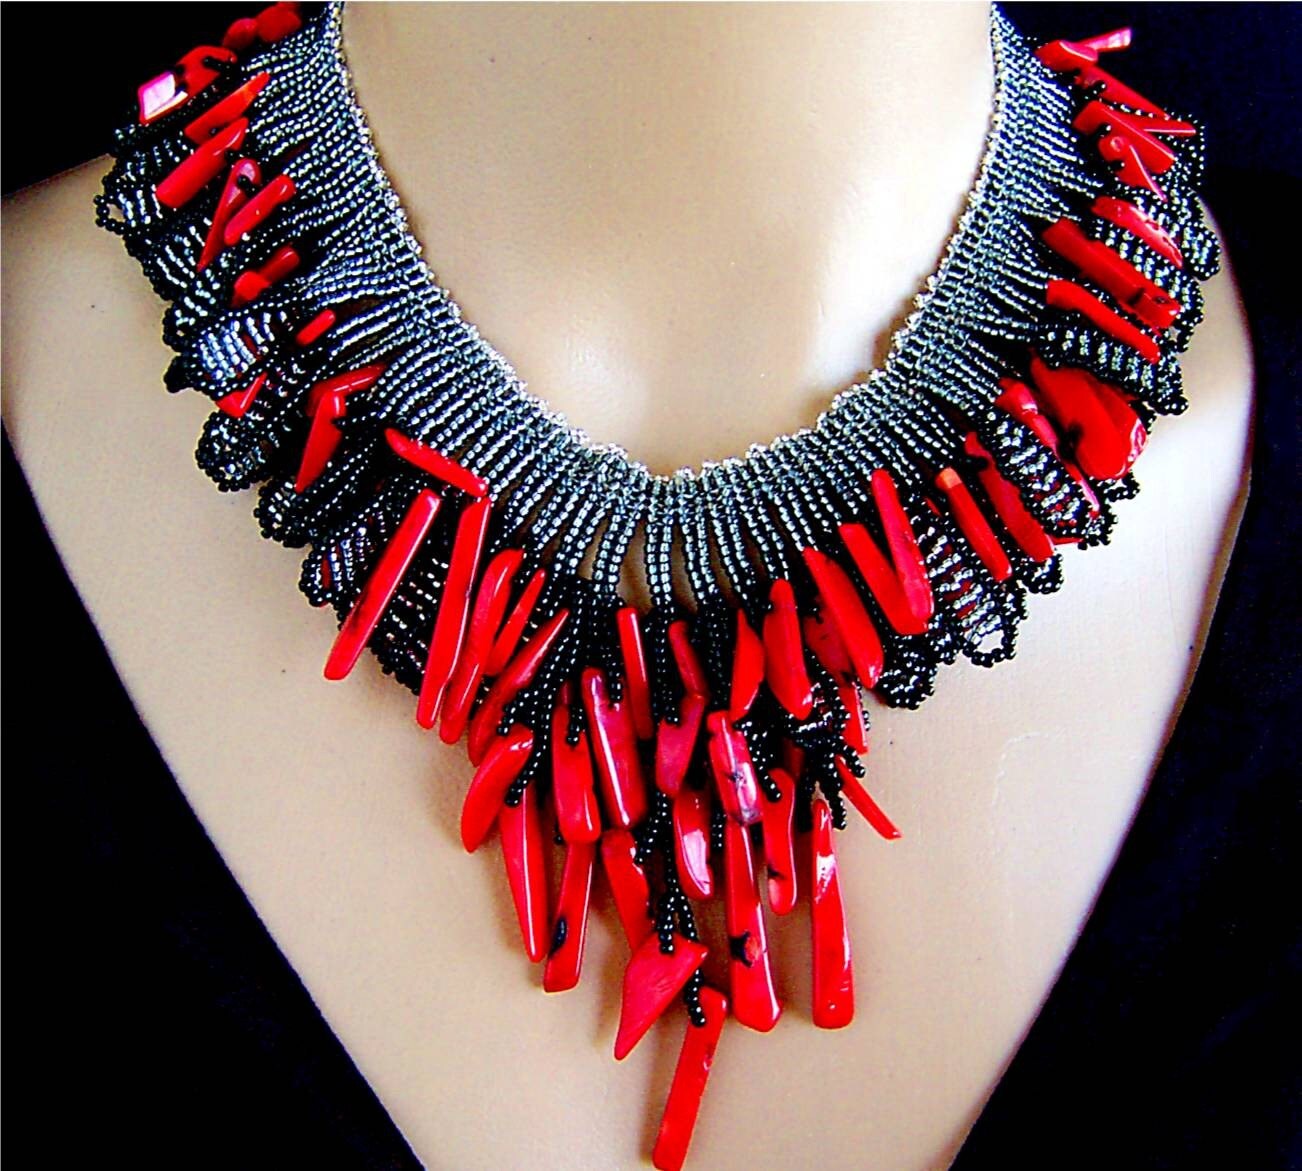
I have made some changes in my original plan.  What follows  is a picture of it laid out before I actually put it together.


And then I made some more changes and here is  how it looks now.
                                                     Photograph of the full necklace


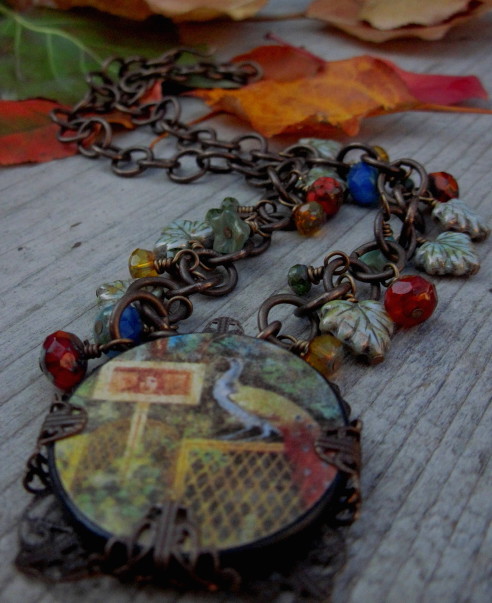
                                   close up of the Leaf Pendant and the Large bail

Supplies
8 feet of 20 gauge sterling silver wire (patina before using.)
5 Corfu blue porcelain beads --ranging in size from 8mm-14mm
1 porcelain Corfu blue bird bead
2  10mm golden bronze stoneware beads
1 small porcelain flower charm
8 10 mm dark brass or steel jump rings
2 dark brass or steel 11mm jump rings
3 7mm dark brass jump rings
11  6mm dark brass jump rings
1 dark brass  eye pin
5-6 inches eclectic handmade chain
3 pieces of 6 inch chain (one teal and 2 gray)
1 Copper and Wire Toggle clasp
1 Zola Elements Patina Green Brass Scrolled Focal Link 64mm x 56mm
11 size 6 antique gold color seed beads
1 Queen Ann's Lace Ceramic Leaf Pendant

Directions
1. Using the 6 mm jump rings attach the #6 seed beads to the 8 loops on the Zola Elements Bail
2.  Wire wrap both ends of the golden bronze 10mm beads  each with a 6 inch piece of the sterling silver wire.  Enough wire has been allowed to double wrap them if you wish.
3.  Attach the golden bronze beads to each end of the bail with an 8 mm jump ring.
4.  Attach an 11mm jump ring to each end of the group of  three strands of 6 inch chain (one teal and 2 gray)
4.  Make a wire wrapped chain with 2 Corfu blue beads and 1 bird bead.  Position the bird bead between the two other beads.
5.  Make another wire wrapped chain with the three more of the Corfu blue beads
6.   Attach one chain of beads on each side of the necklace to the golden bronze beads with an 8mm jump ring.
7.  Then attach the last wrapped loop of chain on the left to the eclectic handmade chain and on the right side to the three chain strands.
8.  Use an 11mm jump ring to attach the eclectic chain to the copper toggle clasp
9.  Chain together 3 of the 5mm jump rings and add them to the toggle bar
10.  Attach the above  chain to the group of 3 chains 10mm jump ring
11.  Make a wrapped loop on the small flower with the eye pin making sure to attach it to a ring in the chain before you closed it.
12. Add the Ceramic Leaf Pendant to the loop at the center of your Zola Elements Bail with an 11 mm jump ring  Attach 3  # 6 seed beads on the 6mm jump rings to the 11mm jump ring as seen in the picture above.

Your necklace is finished.  Since this necklace is composed of many handmade elements, I encourage you to substitute beads and chain from your own stash or search on Etsy and other places for handmade components and art beads.  General Sources for supplies follow.

Sources
Art beads, Ceramic Leaf Pendant,  handmade chain, toggle clasp and are made by me. I have listed the leaf pendant and a set of the corfu blue beads and bird as Made To Order  in my Etsy shop  www.maryhardingjewelry.etsy.com    I also encourage you to seek out substitutions or beads from your own stash to make this necklace.   I have checked Lima beads and you should be able to get one of the Zola Elements Bails. Here is the link 
Chain          Michaels.com
Teal Patinated chain  MissFickleMedia.etsy.com
Zola Elements Bail  at this link:https://www.limabeads.com/Zola-Elements-Patina-Green-Brass-Scrolling-Focal-Link-64x56mm-P42144
Jump rings and eye pins  Michaels.com
Golden Bronze ceramic beads Firefly Design Studio   https://www.etsy.com/shop/fireflydesignstudio

Thank you so much for stopping by today.  I enjoyed making this necklace and sharing its progress and development with you.  Look forward to seeing  you next month.
Mary
www.maryhardingjewelry.etsy.com
www.facebook.com/MaryHardingJewelry/

Friday, December 18, 2015

8th Day of Christmas + Inside the Studio with Erin Prais-Hintz

Each week one of our contributors gives you a sneak peek into their studio, creative process or inspirations. We ask a related question of our readers and hope you'll leave comments! As an incentive, we offer a prize each week to encourage you to use that keyboard and tell us what you think. The following week a winner is chosen at random from all eligible entries. And here are the results from last week!

This week's winner is Mary Morris.
Congratulations! 
You have won a JOY ornament from Michelle of Firefly Design Studio.

 Please contact Michelle to claim your prize!
 
++++++++++++++++++++++++++++++++++++++++
Hello lovely art bead peeps!

I am pinch hitting for Miss Heather of Swoondimples today (you can read her Inside the Studio next week, on Christmas!). Since I didn't know that I was going to be doing this post until about 9:30 on Thursday after I got home from the Christmas concert (the most lovely rendition of Silent Night and Carol of the Bells by the chamber choir along with a stirring medley of the Nutcracker by the band - puts me right in the holiday spirit!) I had to quickly whip something up. Fortunately, I seem to thrive under the last minute pressure. As luck would have it, I also realized in that moment of yes that I needed to also make earrings for my monthly We're All Ears challenge on the Earrings Everyday blog. It is my party that I host each month (would love to have you join in!), so I had to find a way to roll this all together.


For the We're All Ears theme for December I came up with the Leftovers Transformation challenge. The idea is that we all have that craft table littered with the remains of projects past, or the craftermath, as I call it. What better time than now to do something with those! Sometimes limiting yourself to just a few materials and giving yourself a very tight time frame can really kick things into high gear. I figured that what would work for the Earrings Everyday blog would work for this post as well.


The first step to the Leftovers Transformation Challenge is to take a picture of what you are working with. So here are a few pictures of the craftastrophe that is my studio..... please don't laugh! I actually work in about a 6" square space (and you can't see the floor behind this table is piled up.... but there are paths to walk in!).


As I was going through my trays and bins, I came across two bean beads from Heather Millican of Swoondimples, that I had her make in late spring/early summer when she was doing the Awareness Words hop. I had her put the word "remember" on these purple beads for Alzheimers' and intended to make something for my sister and I to wear. Mom lives in a facility not too far away, and I do get to see her, but she really doesn't have any words, so it is hard to figure out what she is thinking.


When it comes to the holidays it is a bit sad for me as my mom is in the latter stages of this terrible disease. The holidays are always filled with a lot of memories and traditions and it has been years since I could share those with her. But my sister and I are doing our best to keep those memories alive and continue the traditions that my mom started with us so long ago. Like baking my mom's chocolate lace cookies and using her spritz cookie maker... giving an ornament to each kid so that when they leave home they will have a whole set of ornaments to start out... putting an orange and a walnut in the toe of each stocking... I inherited the gold glass ball garland from my dad after last Christmas. This was my grandmother's decoration. I can vividly recall watching the adults gingerly place this on her tree each year. When I was putting these fragile strands on each branch, it was like dressing up in my grandmother's costume jewelry (I also inherited her jewelry box and some of her costume jewelry when I was 18). This is a special old memory and new tradition that I will be carrying on.


My sister Kelly celebrates her birthday on January 3rd and even though we don't really give each other many gifts for Christmas (we focus on the kids more), I do try to make her birthday something special. So I thought I would make something just for her. Oddly enough, my sister doesn't have that much of my jewelry. Her tastes tend to be very simple. So I might be really pushing her boundaries with this wackadoodle style, but I think that she will appreciate it.

This is a pretty old picture of us... from about 2006... I was so much younger and thinner with way shorter hair... Kelly (on the left), well, she hasn't changed all that much and looks pretty much the same!
I like making necklaces with orphan beads. My studio is overflowing with them! I actually just bought two sets of orphan beads from two different glass artists from overseas stating that I never met an orphan I didn't like. I much prefer the challenge of making different beads in different mediums work together. I call this style a "this and that" because it is a little bit of this and a little bit of that!


To make your own "This & That" necklace...

Ingredients:
assorted art beads with a color theme in mind (try to find ones that are made from different materials)
beading wire (about 8" or more if you are going to bead the entire thing)
crimp tubes
spacer beads
seed beads (optional)
chain (about 10-12")
clasp

1::String a combination of art beads separated by smaller spacers onto the beading wire (use a bead stopper on the end so they don't fall off). You might need to pull them on and off until you reach the right balance for the weight of some beads, and color placement. Make sure that it will hang correctly (i.e., don't put the heaviest beads to one side!).
2::Separate the chain links in half.
3::On one end, string a crimp tube and then about 7-9 seed beads (to cover the wire). Crimp the wire securely.
4::Repeat step 3 for the other side.
5::Attach a clasp.

I had fun combing through my art bead stash for this necklace. I pulled all different shades of purples for Alzheimer's and in a variety of mediums and shapes. In addition to Swoondimples, I used glass from Cathie Roberts, a beaded bead from Malin de Koning, an enamel filigree and a Facet Effects bead (I made both). I know there are at least two other glass beads, but I am not sure who made them - the swirly purple and the dottie blue/lilac/lime. (Speak up if you know and I would love to give credit!). I added some funky black gunmetal chain links to the back. That way if I need to adjust it to fit her, it will be a simple thing to do.


I also made a pair of earrings as part of the Leftover Transformation Challenge. If you would like to see what I made to complement this necklace, head over to the Earrings Everyday blog. (P.S. I am also having a giveaway over on the Earrings Everyday blog...if you join in the fun and create some earrings to share in the hop! It is not too late to play along... you have one week to join in. Check it out!)

I have a $25 gift certificate to give away to one lucky reader for answering this question....
What is your favorite holiday memory?

I wish you many fond memories of this holiday season spent with those that you love carrying on those time-honored traditions and making new ones!


Saturday, August 29, 2015

Wire Rocks!

The last time I blogged for Art Bead Scene, I shared a look inside my studio as I was getting ready for Bead Fest in Philadelphia.  One of the goals I set for my self while at a large show, is to learn a new skill to add to my jewelry designing arsenal.  I was fortunate to be able to connect with one of my favorite artists and designers, Staci Louise Smith, for an after show class she was teaching.  It was all about wire and connections and cool beads.  What's not to love?

Staci's class is called "Wild Wire Gypsy Charm Choker."  The kit included 16, 18, 20 and 22 gauge wire.  It was great to handle each one and learn more about differences and when to use each one. Staci annealed the wire before class to give it more flexibility and a vintage look.  The copper wire started out very shiny.  I found out I can anneal the wire with a hand held torch.  Pretty cool!

The base of the choker uses 8 feet of 16 gauge wire!  Thankfully it was cut into two 4 foot sections which made it easier to handle.  Every student hand formed the choker base so differently.  You really can't do it wrong after the basic shape is formed.  I found out I was in a symmetrical mood when I was designing my choker.  Staci told me it looked like daisy petals!


This is my finished necklace.  What an amazing statement piece!  I added some of my ceramic beads to the wonderful selection of gemstones, glass, metal, and polymer beads included in the kit.  I plan on making another unique choker necklace for an October Breast Cancer Awareness blog hop that Andrew Thornton is hosting.  I will use silver 16 gauge wire for the choker base with a wonderful mix of pink beads.  It is going to look so different, but equally amazing!

The good news is Staci is going to be teaching this wonderful class again at Bead Fest Philadelphia at the Spring 2016 show.  So if you love it like I do and want to learn some great techniques from an instructor that is so giving with her tips and techniques, don't miss it!

Tuesday, January 21, 2014

Tutorial Tuesday :: Bobbers

 I love fishing. 
You put that line in the water and you don't know what's on the other end.
Your imagination is under there. 
~Robert Altman


One of the calls for submission for the Summer issue of Stringing Magazine was Upcycled Jewelry. Basically, using materials that are not traditionally meant for jewelry. When I started making jewelry that is exactly what I did, re-purpose and re-cycle. In fact, that is where my company name, Tesori Trovati (Italian for 'treasures found') originated.

I made this necklace for their consideration, but it was not selected. So I thought I would share with all of you a little tutorial of sorts to get you thinking about new sources of inspiration.


Whenever I get stuck or feel uninspired, one place that always intrigues me is the hardware store. We have one of those little mom-and-pop shops that has a little bit of everything and all of the bits are stored in those mysterious little drawers. I like to walk the aisles, peeking into the drawers and discovering what is there. I always come home with a little baggie of something and put it in a box with all the other hardware store trinkets. Sometimes these things show up in my work directly, and sometimes I am just inspired by their shape or construction.
Barrel Swivel with Coast-Lock (mine are a different metal tone)

On one such trip, I discovered items that are meant for fishermen. Little baggies containing what looked like wire wrapped beads. I don't fish, so I wasn't exactly sure what they were for, but I thought that they looked cool. Turns out these are called barrel swivels with coast-locks. In reading online about them, I can tell that they are used in tying bait to hooks and they swivel so that the line does not get tangled. The gold color of mine would flash in the water attracting the attention of the fish. One end has a wire wrap closed hook called a coast-lock. I quite like the look and the usefulness of this coast-lock and will attempt to do that in some wire real soon.


Adding to these. I decided to add a little flash with some external tooth locking washers, square nuts and some tiny brass washers.


And here is the instruction to make this quick necklace that looks like you spent hours on the wire wrapping! (Resources at the end of the article).

First, open the coast-lock by squeezing it gently, and add a tiny brass washer. Open a second coast-lock and attach it to the same washer. Before closing both of the coast-locks, add an external tooth locking washer for a little movement and flash. Continue making sets of the barrel swivel links for a total of six barrel swivel links.

For the beaded sections, cut galvanized steel wire into 5" lengths. Create a loop on one end and string on a barrel swivel link before closing it and wrapping the wire securely. String a Czech glass bead, a brass washer, a square nut, a ceramic round, a square nut, a brass washer, and a Czech glass bead before closing the loop and adding the next barrel swivel link.

Continue connecting the barrel swivel links alternating with the beaded links. This necklace doesn't need a clasp, as it is long enough to fit over your head, but you can always pinch open one of the coast-locks if you need a clasp!

Bobbers


These beads from Jennifer Heynen of Jangles looked just like bobbers or floats that you see fishermen using, and so that is what this necklace is called. Bobbers!

Just slip it on and start fishing for compliments! ;-)

What items can you find at the hardware store to inspire your designs?

Resources:
12 barrel swivel with coast-locks - your hardware store or fishing tackle shop
6 external tooth locking washers - your hardware store
18 brass washers - Objects and Elements
12 Czech Picasso finished fire polished faceted grey glass rounds
24"galvanized steel wire - your hardware store
6 ceramic rounds - Jangles

Friday, November 9, 2012

Free Project - Gypsy Ways Necklace


Gypsy Ways
Erin Siegel

 This necklace is colorful and fun featuring a bohemian-inspired pendant by Heather Powers, ceramic beads by Elaine Ray and enameled charms by C-Koop. It's quick and easy to make. Perfect for all those free spirits on your gift list!

Materials
25 turquoise 6mm Greek ceramic heishi beads
6 red aventurine 4mm rounds
5 purple 6mm ceramic rounds
4 tangerine 10mm enameled metal tags
1 paisley 33x20mm polymer clay pendant
6 antique copper 3” balled headpins
4 antique copper 7mm jump rings
1 copper 15x17mm Greek ceramic saucer
24” of crimson Greek leather cord
6” of copper 22 gauge wire

Tools
Round nose pliers
Pair of chain nose pliers
Wire cutters
Scissors

Finished size: 18”

1: Use the copper wire to string the pendant; form a double wrapped loop bail. Set aside. Use 1 headpin to string 1 red aventurine; form a double-wrapped loop. Repeat 5 times. Set aside. Attach 1 jump ring to 1 enameled tag. Repeat 3 times. Set aside.
2: Fold 3” of the leather cord back onto itself. Use the folded end to form an overhand knot, creating a ¾” loop to fit over the Greek saucer bead. Tighten knot and trim tail.
3: Use the leather cord to string 1 red aventurine dangle, 1 ceramic round, 1 enameled tag, and 5 Greek heishi beads. Repeat 4 times, except in the second set, string the pendant in place of an enameled tag. String the last dangle.
4: Use the leather to form an overhand knot 17” from the previous knot. String the Greek ceramic saucer; form an overhand knot. Tighten knot and trim ¼”.

Resources:
Paisley pendant: Humble Beads. Ceramic rounds: Elaine Ray (Ornamentea.com). Enameled metal tags: C-Koop Beads. Greek beads and leather: Mykonos Beads.

I would pair my necklace with a long gypsy skirt or a flowy cardigan, jeans and boots like this for a modern bohemian look!
Modern Gypsy
Modern Gypsy by erinsjewelry featuring platform ankle booties


Erin Siegel is a jewelry designer, beading instructor and co-author of the jewelry book, Bohemian-Inspired Jewelry: 50 Designs Using Leather, Ribbon and Cords. To find out more, visit her blog: Erin Siegel Jewelry

Thursday, February 9, 2012

Thinking Outside the box!

If you are like me, you love a good challenge to get those creative juices flowing. I have put together a few fun things to help challenge yourself into seeing your Art beads in a new light!

To start here we have one of my own Ephemera pendants. When you see this you think of a necklace, something maybe a little mythical or "Avenging Angel"! lol

Well, what if you had two...

Now this could be interesting... so think outside the box! What would you do with a pair of wings? You could certainly put one on each side in a necklace, or you could...

Make Earrings!!  These are quite large of course, but that is the fun of thinking outside the box!
So here is the next idea...

A beautiful Pendant by Summers Studio! As you can see, the pendant has two holes at the top and one on the bottom. It is made to be hung a certain way, with a dangle at the bottom.
Well, think outside the box!

Turn the pendant sideways and add dangles to two of the holes, in unexpected places! 

What a fun and unique piece it becomes! It hangs beautifully and you would never know it was meant to be done a different way!

What else can you do? How about using a Toggle in a different way?

Love this toggle from Vintaj! Beautiful shape, texture and colour!

Why not change it into...

Earrings! You just add your Art Beads {in this case lampwork by SueBeads} to the combo, sideways with jump rings as an extra out of the box touch! These are really perfect for spring and you know no one else will be wearing them ;)


Keep an eye out for my next post, it will be a continuation of this one, with pieces made by other designers I have challenged to "Think outside the box!"


Marie


All Jewelry pieces and ephemera art beads are made by Marie-Noel Voyer-Cramp of Skye Jewels. Ephemera pieces are available at More Skye Jewels on Etsy

Thursday, January 19, 2012

Tree Top Necklace

Shh, don't tell anyone but this is really the last 12 Days of Christmas project.  I'm just a little late...

Anywho, I thought this was a fun project to share because it's a simple one that you can whip up in no time flat yet offers a nice visual impact with the large pendant.  I love having the clasp in the front and as such an integral part of the design.

Have some cabochons or pendants without holes?  Wrapping them in filigree is the easiest solution.  If you haven't done this before here is a tutorial on filigree wrapping from Vintaj.

Supply List
1.5" Ephemera pendant
2 12mm polymer clay disks
2 8mm Czech glass beads
2 8mm smoky quartz beads
2 6mm brass beads
2 2" headpins
1 15mm brass jump ring
16" brass chain
4 6mm gunmetal spacers
59mm clover petal filigree
2 9.5mm etched jump rings
2 6mm brass jump rings
25mm leaf toggle bar

Directions:
1. Wrap the corners of the filigree around the pendant.
2. Use two pairs of pliers to open and close the etched jump rings.  Attach the jump rings to the top loops of the filigree.  String the large jump ring through both of the etched jumped rings.
3. String the glass bead, spacer, disk bead, spacer, quartz and brass bead unto the eye pin.  Trim the wire the form a simple loop.  Repeat with the second headpin. 
4. String one beaded link onto the large jump ring and close the jump ring.  On the other beaded link attach the toggle clasp with two jump rings, doubled up for strength. 
5. Attach the chain to the top loops of both links.

Resources:
Pendant: More Skye Jewels. Disk beads: Humblebeads. Glass beads: Beads by C. Filigree and jump rings: Vintaj. Chain, brass beads, spacers and eyepins: Hobby Lobby.  Toggle clasp: Nunn Designs or Bello Modo. Smoky Quartz: Rings & Things.

Tuesday, November 29, 2011

Pulling Colours

One of the ways I get inspiration for my jewelry, is the focals I use. Just grabbing my favorite focals will sometimes speak to me and bring inspiration as I lay them out. There are hidden colours and undertones that you may not see at first until you see them in a different light or by some accent beads that you have laying around from another project. I have piles of leftover beads everywhere! They do have a purpose however.

 This is the best example I could find of really pulling colours! This Fresco Painting is truly stunning! It has the warm colours like the red of the feathers and the yellow/gold of the fence. It has the cool colours like the blue of the bird's chest and it has the undertones of green and brown that every artist uses. You can see where I pulled the colours and added a mix of shades of each colour, pulling the different tones from the focal. Using a mix of different beads also added texture and interest to the finished necklace.

 This particular piece is more subtle than the last. The pendant has very simple shades of what seems to be grey and brown behind the Eiffel Tower. Certainly you could make a very simple piece using some black chain or some wood beads, but to really make the focal shine, put it in your tray of beads, see what hidden colours pop out at you, perhaps some unexpected combinations will shine! I found that this piece really pulled me toward using Vintaj brass with it's earthy rich brown patinas. You can see that adding the filigree really pulls out the brown in the lower half of the pendant. 

 The Vintage Style key by Tim Holtz was a nice contrast to the deep browns of the filigree and fleur de Lis. It pulls some of the more subtle Grey/browns of the Eiffel tower. The top of the pendant has very cool blues hidden in it's grey sky. I noticed that the crystal in certain positions, mimicked the sky, but when it sparkled, it sent out an array of other beautiful blues, green and teals! So the crystal was added and was the inspiration for the recycled silk sari wraps at the top of the key. The combination makes for a very unique colourful piece that could have turned out very differently depending on the colours you might have seen.

 Last but not least I wanted to show a variation of the second necklace, with completely different colours. You can see that once again the Artbead Focal had an array of beautiful colours.The warmth of the brass was perfect for the warmth of the corals and peaches of the pendant. This piece is warm where the last one was cool. But looking at the colours in your chosen focal will bring to life any piece.

 You might have seen different colours than I did, you might have seen the Gun Metal grey of the Eiffel Tower, or the soft browns at the base of the pendant. Your version of the necklace would have been completely different. Just imagine the possibilities, when you pull colours!!

Tuesday, March 30, 2010

Give Back to Haiti


I have teamed up with Andrew Thornton, to collaborate on a piece of jewelry that we wanted to auction off for charity to help in the efforts to rebuild Haiti after the devastating earthquakes. 

Go over to my blog post, and leave your bids in the comments. The auction started yesterday and continues through til Midnight on Monday, April 5th.

A donation will be made to The American Red Cross/ Haiti Relief Fund.

Friday, February 20, 2009

collar

col•lar: anything worn or placed around the neck.

Collars are very interesting pieces of adornment. When I typed "collar" into etsy I experienced a vast array of necklaces that varied in size, style and materials.
Here are some examples of what I found...