Showing posts with label Toggle clasps. Show all posts

Friday, March 25, 2016

Inside the Studio with Mary Harding

Inside the Studio: Mary Harding

Each week one of our contributors gives you a sneak peek into their studio, creative process or inspirations. We ask a related question of our readers and hope you'll leave comments! As an incentive, we offer a prize each week to encourage you to use that keyboard and tell us what you think. The following week a winner is chosen at random from all eligible entries. And here are the results from last week!

Congratulations to Andrea Porter You have won of a $25  gift certificate from Humblebeads. Please email Heather to claim your prize.
-------------------------------------------------------------------------------------------------------------------------

My Inside the Studio post this month is a follow up on the post I did in Februrary titled Inspiration Part I  about being inspired by some sea shells sent to me by a friend.  Today I am revealing the results of using the textures of these shells to create ceramic clay beads.  

                                                various shell textures
I found this set of textures the most useful for making beads. I made silcon molds from some of these shells and used them to create  a variety of beads with.  I also found that some of the textures that pleased me in this set did not make good molds:  either the texture was too great and would result in long protrusions that could easily break off or be harmful or that the texture was too small to be be visible in a small pendant.   Of this set I made 2 molds that turned out really well.  One was of the small clam shell as seen in the picture below:

several small pendants or charms made from a clam shell mold

These clam shell beads came out well because the mold was bold and clear.  It was easy to form these small charms and the addition of an iron oxide stain on the stoneware clay, defined the ribs on the shell and I think make a dramatic presentation.  

                                           2 part silicon mold of the underside of a sand dollar shell

Of all the molds I  made, I found this  mold to be the most versatile and beautiful.  It has an intricate pattern that extends over a wide area so it can be used both selectively and as a whole print.  I chose to use it on several long hollow beads that I made.
                                   
long hollow bead sand dollar texture view 1
                               
                                                long  hollow bead sand dollar texture view 2

I used it again on two other hollow beads:


                                                   sea shells from Florida 

The other shells that I found most successful for making textures were the two clam shells on the far left of this picture.  I did not make a mold from them but rather used them to imprint textures into beads as in the examples below:


                            Long hollow bead imprinted with clam shell and sand dollar textures
                                     Bib pendant with clam shell and other textures


And then I made some toggle clasps with imprints from some of the shells

And finally, I used a sea urchin to imprint the toggle clasp below and glazed both the clasp and the clam charm in a creamy white/red glaze giving the pieces a much less rustic look.


The Ice


And how did all that beautiful ice inspire me? I had a hard time thinking of how to interpret the ice as a texture.   I think it must have been a subconscious effect as I made quite a few drop beads during these last weeks that I dipped into glaze for coloring like the ones below:

Colored icicle bead drops
Not exactly a texture but surely a shape reflection...

Now for our question:  While I was making these beads I realized that there are lots of textures out there that I had never noticed before--like what I found on the sand dollar, or the tiny spirals on the top of snail shells-- you can see one in the third bib pendant.  
 What kinds of textures do you like to use in your work and where do you find them?
Leave a comment in the section below and you will be automatically entered to win a set of sea shell textured charms.
I hope you enjoyed seeing the beads I made with sea shell textures.
Thanks so much for stopping by.
Mary

Friday, July 31, 2015

Inside the Studio with Mary Harding

Each week one of our contributors gives you a sneak peek into their studio, creative process or inspirations. We ask a related question of our readers and hope you'll leave comments! As an incentive, we offer a prize each week to bribe you to use that keyboard and tell us what you think. The following week a winner is chosen at random from all eligible entries.


Congratulations to Amara Honeck!!! 


You have won a $25.00 gift certificate to Humblebeads.com
Please email Heather to claim your prize.

++++++++++++++++++++++++++++++++++++++++++++++++++++++++++
Welcome to the studio of Mary Harding Jewelry.  I am delighted to host this week's Inside the Studio post.  July has been a busy month and I have been in and out of my studio teaching classes, and participating in a craft show for the first time in several years.  Last week I posted some of the raku beads that I  made as color samples for a collaborative Raku Bead firing one of my classes participated in. You can read all about it  here.  

Now that the classes are over and no shows are on my  horizon, I have been busy making some new toggle clasps with soft solder and copper sheet.  I really enjoy soft soldering because it is such an intuitive and impromptu medium.  I have been working on some clasps that are similar in feel to one that will be published next month when Stringing magazine releases its Best Beads of 2015 issue.  I called that one Poetic Grunge.  The series I have been working on is inspired by that clasp and by the book I have been reading for Andrew Thornton's Inspired by Reading Book Club---Swamplandia.  I wanted to capture my interpretation of what the author, Karen Russell, refers to as the Sawtooth Age.


So I used a saw type motif through out this series of clasps.  For the ones pictured above I flooded the clasps with soft solder and then added the copper saw tooth wire bits by placing them on the solder and then reheating it.  


For a more lyrical effect, I wrapped copper wire around the clasp after completing the basic soldering.  I think it almost looks like some kind of exotic tropical flower, as well.


I floated bits of copper in the solder to create the texture of the  alligator hide in the two clasps pictured above.

This clasp is more 3 dimensional and has two layers of saws.  The bottom layer juts out from the surface of the clasp but the saws are soft and smooth due to filing and tumbling.

I have also been experimenting with toggle clasps made from steel rebar wire.  I was inspired by Keith Lo Bue's online class Steeling Beauty and his lessons on playing with the wire.
I have tried out a few clasps by bending and forging the 16 gauge steel wire and plan  to continue on seeing what I can come up with.  Here are a couple of examples of what I have been trying out.

There is no solder on this clasp.  All the shapes are made by bending the wire with strong linesman pliers.

 A  square toggle clasp wrought from 16 gauge rebar wire.


Now for my question: Is making work in a series something you  like to do?  Leave a comment below related to this idea and you will be automatically entered to win a $20.00 gift certificate to my Etsy shop.
Thanks so much for stopping by.
Mary

Tuesday, December 30, 2014

Tutorial Tuesday: Adirondack Heritage Wrist Wrap Bracelet

Adirondack Heritage Wrist Wrap bracelet by Mary Harding

It is Tutorial Tuesday and today's wrist wrap features handmade toggle clasps and leather; and is inspired by a beautiful painting, by Judith Utter, of an Adirondack legend: the Adirondack Heritage Trout, a descendant of the original fish that colonized the Adirondacks after the last ice age.

Adirondack Heritage Brook Trout c. Judith Utter

You can read more about this fish and artist Judith Utter on my blog  AND you can enter my  giveaway to win one of my toggle clasp kits that celebrate this heritage "brookie" and its gradual return to the waters of the Adirondacks on my blog HERE.    

I tried to use just the colors I found in this painting when I made my toggle clasps.

Palette For Adirondack Heritage Leather Wrist Wrap  


I made a series of 18 toggle clasps including our sample clasp


Tutorial

Supplies
Art Bead Toggle Clasp with large stringing hole and toggle bar hole
Leather Lace 1/8 inch wide by 58 inches long ( this yields at least a 4" tail on each stand)
or a vegan substitute like ultra micro fiber available on Etsy and bead stores.

Tools
Scissors
Chain nose pliers to pull leather or micro fiber through the hole  in the toggle clasp (optional)

Directions


1.  I am using leather lace in a  medium brown color that measures about  58  inches long and is 1/8 inch wide. It is long enough to wrap around my wrist 3 times and leaves about a 4 inch tail.  I used a length 9 times longer than my 6 1/2 inch wrist. This formula takes into account the larks head  and the overhand knots you will be making, as well as, the 4 inch tails.  I purchased this leather from Michaels.   
Leather Lace 1/8 inch wide


2.  Once you determine the length of your leather, fold it in half making sure the cut ends are even.   Then string the toggle bar on the strand on your right.


toggle bar strung on the length of leather on your right

3.  Next you will make an overhand knot leaving about 4 inches, or less as suits you, for a tail.  Again make sure the ends of the leather are even before you tie the overhand knot. 


4.  Now find the center of the folded end of the leather lace and push it from back to front of the toggle clasp stringing hole. You will be making a Larks Head knot.


5.  Make the Larks Head Knot by bringing the knotted end of the leather through the loop you have made.  Then draw it tight.
Making the Larks head Knot


Adjust you knot until it looks like the one in the picture above.  


6.  Now wrap your leather lace around your wrist three  times, secure the bracelet by bringing the toggle bar through  the clasp.  Pull the knot and the tails through too.You can choose to leave  them out or tuck the tails back in. Use your index finger to align the the leather lace by running it under the leather until they even out and are smooth.  Enjoy your Adirondack Heritage Wrist Wrap Bracelet.


Adirondack Heritage Wrist Wrap Bracelet by Mary Harding


Thanks so much for stopping by.  Be sure to check out my blog to enter to win one of these toggle clasps.  Several are also in my Etsy shop.
Thanks so much for stopping by!!
Mary


Friday, December 5, 2014

Inside the Studio with Mary Harding

Inside the Studio - Mary Harding

Each week one of our contributors gives you a sneak peek into their studio, creative process or inspirations. We ask a related question of our readers and hope you'll leave comments! As an incentive we offer a free prize each week to bribe you to use that keyboard. The following week we choose a random winner.

Congratulations Leilani
You have won a $25 gift certificate from Humblebeads Etsy Shop
Please send Heather an email with your information.
______________________________________________________________________________________________

Welcome to my studio.  These last weeks, I have been busy making toggle clasps on a copper base.  Lots of sanding and polishing to do once the image is finished.  But I love making these each step of the way.  
                               Metal soldered stamped toggle clasps by Mary Harding  some now in my Etsy Shop


I was thinking back the other day to when I first began making toggle clasps and realized it has been quite a few years now.  My first toggle clasps were made from ceramic clay.  I continue to make some that way to this day.
I love how they look and especially enjoy painting on the glazes.  Looking at the date this photo below was taken, it is safe to say that I have been making toggle clasps for over 6 years.
                                 The  photo of this ceramic toggle clasp by Mary Harding was taken on July 23, 2008.


                           This picture of a 3 hole toggle clasp/donut pendant by Mary Harding was taken in September 2014.


My metal clasps have evolved a bit since I started making them a couple of years ago.  

                                            Copper clay toggle clasp by Mary Harding
                                     Flame Patina toggle clasp by Mary Harding

Double layer toggle clasp with flame patina by Mary Harding

Soldered Butterfly Toggle Clasp by Mary Harding


Now my metal toggle clasps have many more steps before they are completed.  Since I love using the torch so much, I take time to think up some new ways of making them.  This fall I came up with this combination of metals and textures

Textured Toggle Clasp by Mary Harding


This week I had a new idea for a toggle clasp.  It started out this way:

                                                     Wrapped wire and solder toggle clasp work in progress  by Mary Harding


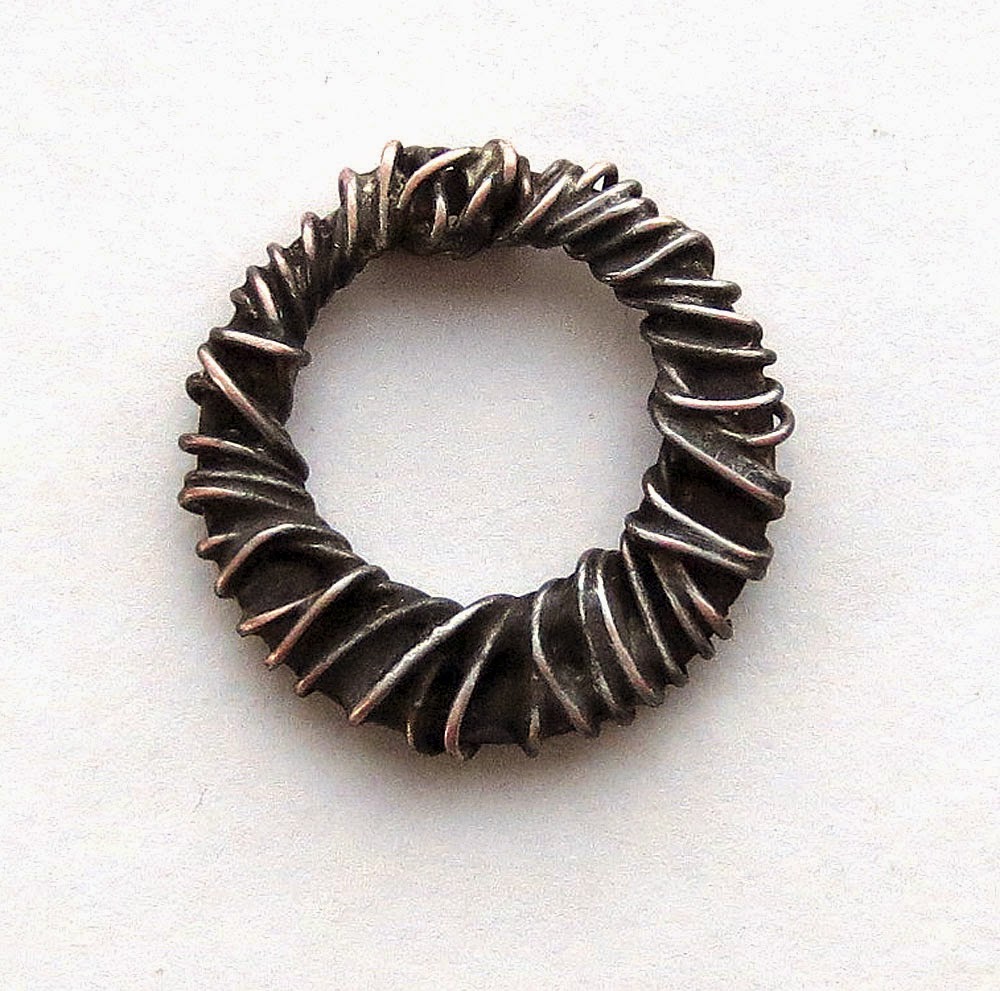
Then I thought it needed to have a smaller middle opening so I wrapped wire around a base and came up with this design which I think has promise
wrapped wire over a base toggle clasp work in progress by Mary Harding

I think that it is important for studio/beading sessions to have some play and experimentation time. For me it usually comes close to the end when I am tired of standing and need a bit of a break. Whether or not this design will go any further is not as important as it is to let go of inhibitions and take chances.  Which brings me to my question.  How do you play/experiment in your beading/studio sessions?

Leave a comment below and you will automatically be entered to have a chance  to win one of my new silver metal toggle clasps.  One winner will be randomly chosen next week. I look forward to reading what you have to say.

Thanks so much for stopping by.
Mary


Friday, April 25, 2014

Inside the Studio with Mary Harding


Inside the Studio with Mary Harding


Welcome to Inside the Studio!

Each week one of our contributors gives you a sneak peek into their studio, creative process or inspirations. We ask a related question of our readers and hope you'll leave comments! As an incentive we offer a free prize each week to bribe you to use that keyboard. The following week we choose a random winner.

Congratulations Lecia Woessner !! You have won a $25.00 gift certificate from Humblebeads.com   Please send Heather an email with your information so you can redeem your gift certificate.

Today we visit the studio of
of
Signs of Spring in Northern New York

I have been enjoying the change in light and since my last Inside the Studio post.  I love Daylight Savings time because it makes my studio day longer. Thanks to our cats, I am up earlier every day and because afternoons are so nice and long, we have put our dinner hour 1 1/2 hours later.  All that extra time is just great for making art beads.  I am totally enjoying all the transformations to the earth that Spring brings like melted snow, green leaves and warmer weather.


I thought this visit I would share some transformations in my work and  show you some pieces I have been making in copper clay and sheet metal recently.  Sometimes I think I like the process of making as much as the product.  It is such a thrill to see the changes materials go through on the way to the finished bead, bracelet bar or toggle clasp.  Take these toggle bars for example.  They start off as wire on a roll


Then the wire is cut into pieces

Then they get annealed and formed into the toggle bar


And then they are patinaed with Liver of Sulfur

And  rubbed with steel wool  and tumbled and polished


And finally get paired up with a toggle clasp which also was transformed by patina.


Copper Clay also goes through many changes before the final art bead goes into the shop or into a piece of jewelry.  I find each of these stages exciting and an important part of the creative process that continues to drive me back to the studio with enthusiasm and a sense of adventure. Copper clay starts off as a lump of copper brown clay like material.  After it is conditioned and formed into a shape it needs to be dried at which point it is a light reddish brown.

When copper clay is in this stage, it is very flexible and can be cut into a more desirable shape with scissors or an exacto knife. The edges can be smoothed with a wet sponge.  Once it re-dries it is fired in a brick lined ceramic kiln (for best results) in a stainless steel container buried in a bed of coconut carbon.  During the firing process the binder that is mixed in with the copper burns off and the pure copper metal remains.

 These pieces are just out of the kiln and some of the  carbon they are fired in is still sticking to them.  Notice their dull surface.  It takes a good spin in the tumbler to get that off.

Tumbled copper clay pendants  Mary Harding

Tumbling can be the final step or a further transformation occurs when a liver of sulfur patina or a flame patina is used.  I think this is my favorite transformation.  But sadly, it is not always possible to get a good flame patina.  Below, as my last example of transformations for this post,  I have included a few pendants that were flamed with my torch with varying results.

Lilac Bloom Pendant  Flame Patina  Mary Harding

Rosemary Donut  Flame Patina  Mary Harding

Cedar Bough Donut   Flame Patina  Mary Harding

Carrots Liver of Sulfur Patina Mary Harding


Thank you for visiting with me in my studio today.  I have enjoyed showing you some of the transformations that occur in my work space.  Now comes  my question for you:

  What is one of the most rewarding/exciting transformations you find in the creating you do?  

Tell us by leaving  a comment below and you will be entered in a random draw to win one of my copper clay nature pendants from my Etsy store

The winner will be picked next week.   Have a great one!!