Showing posts with label decorations. Show all posts

Friday, November 23, 2012

Thankful Sale and Free Project

We are so thankful to the community here at the Art Bead Scene and our faithful readers.  Thank you for participating in our monthly challenges, joining in our blog hops, joining us for our Studio Saturday adventures and sharing your thoughtful comments with us. Our creative endeavor here is enriched because you join in with us exploring the world of art beads. Thank you!!!

A few of our contributors are having sales for a weekend.  Here are the coupon codes and websites to check out!  Sale dates are listed below - be sure to use the discount codes when you check out.

Gaea - Use coupon code BEADINGBLISS for 15% Friday through Monday. 

Tesori Trovati - 15% off with discount code HOHOHO or Free Shipping with the code: FREESHIP. Both offers are valid from 11/23-11/30

Humblebeads - Save 20% off now until Monday with discount code THANKS20.  Orders of $100 or more will receive a free holiday charm! 

Free Project - Thankful Banner

I created this tiny banner to offer some cheer to someone dear to me this Thanksgiving.  You can adjust the message or personalize it with a name or date to create a sweet ornament for the holidays. 

Materials:
Brass leaf
12" 22 gauge brass colored wire
3mm faceted brass bead
14mm disk bead
Acrylic paint
Ball peen hammer
2-hole metal punch
Letter stamps
Round nose and chain nose pliers
Buffing block

1. Stamp your word onto the brass blank.
2. Texture around the word with the round end of the ball peen hammer.  Use a buffing block to highlight the texture.
3. Paint the letters and wipe of the access paint.
4. Create a hole with the 2-hole punch, so there is a hole on both ends.
5. Create a wrapped loop and string on the polymer clay bead and brass bead.
6. Create a loop to hold the beads in place.  Twist the wire with your hands and pliers to create the vine textured wire.  Hold the wire with one hand and twist it to create the crooks and turns, use round-nose pliers to create the small loops in the wire.
7. Attach the wire with a simple loop to the other side of the leaf.

Resources: Leaf and wire: Vintaj.  Polymer clay bead: Humblebeads. Brass Bead: Rings & Things.

Wednesday, November 14, 2012

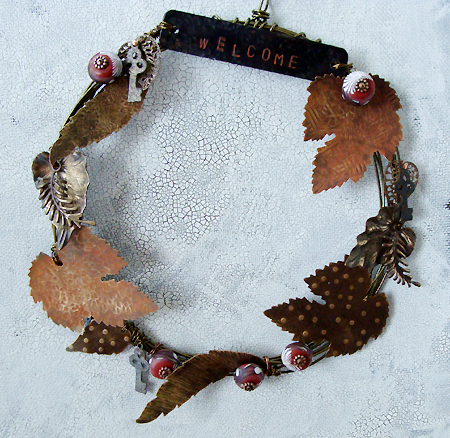
Best of the ABS: Autumn Wreath Tutorial

I created this wreath with wire, Vintaj components and art beads as a house-warming gift for a dear friend.  You could create a similar one to welcome your guests during your fall celebrations or as a special gift.  Another variation would be to stamp the family name of the recipient on the name plate instead of 'welcome' for a more personalized touch. 

Supplies:
4.5" 18 gauge brass color wire
11 3" lengths of 24 gauge brass color wire
5 polymer clay disk beads
1 arte metal name plate
3 brass maple leaves
2 brass slender leaves
2 brass woodland leaf pendants
2 brass fern charms
2 brass filigree leaf charms
1 brass trailing leaf
3 arte metal keys
5 6mm flat copper spacers
5 3" copper headpins
2 1" copper headpins
8" silk ribbon
Acrylic Paint Dabber
Renaissance wax
Steel wool

Tools: bench block, letter stamps, ball peen hammer, rivet hammer, Phillips head screw driver, brass texture plates, round and flat nose pliers, wire cutters.

Directions:
1.  Create the wreath by wrapping the wire into a large loop, approximately 5 1/2" wide.  Wrap the wire in into a large loop 9 times around.  Create a wrapped loop at the top of the wreath and wrap the ends of the wire around several times for a secure finish.


2.  Texture the leaves with the hammers, texture plates and screw driver. (Watch this video for several techniques.) Highlight the textures with the steel wool. 


3. Stamp "welcome" into the arte metal name plate with the letter stamps. Use the ball peen hammer to texture the blank. Use the acrylic dabber to add paint, rub off the excess with a paper towel. After the paint has dried rub a light coat of wax to protect the color. Paint two of the large leaves in the same way.

4. Place the leaf pendant on the bench block and strike the center with the round end of the ball peen hammer to shape the leaf in the concave form. Repeat with the other leaf and the two filigree leaves.


5. Attach the welcome name plate to the wreath by wrapping it the 24 gauge wire.

6. Attach the leaves to the wreath by wrapping them with the 24 gauge wire, securing them to the wreath. I found that wrapping the wire criss-cross over itself helps the leaves stay in place on the wreath. Layer some of the leaves together for an interesting texture. There is no right or wrong way to the attach the elements, whatever holds them most secure when wrapping the wire around the wreath will work. 

7. String a key and a filigree wreath onto a 1" headpin and from a loop. Attach to the wreath.


8. String a flat spacer and polymer clay disk bead unto a 3" headpin.  Attach the headpin to the wreath by wrapping it around the wire several times. 

9. Add the ribbon to the top loop on the wreath, tie a simple knot at the top of the ribbon.


Resources: Disk Beads, Humblebeads.  All brass and wire from Vintaj - retail at Bello Modo.  Silk Cord, Angela Brittain. Copper findings, Rings & Things.

Tuesday, November 13, 2012

Beaded Harvest Napkin Rings - Free Project

Create a special set of beaded napkin rings that would make a wonderful hostess gift or for a Thanksgiving celebration. You could change the color combination to fit your decor or season. 

This project was first published on my blog, but as turkey day approaches I thought it was worth another look!
Supplies:
4 silver 5mm flat spacers
4 copper 14mm coin pearls
Nickel seed beads
Bronze bugle beads
4 gunmetal headpins
4 gunmetal headpins with balls
10" green wire mesh ribbon
Bracelet memory wire
Instructions:
1. Cut 1 loop of memory wire, cut at 1/4" after the loop overlaps.
2. Use round nose pliers to create a loop on one end. Use flat nose pliers to close the loop completely.
3. Randomly string bugle beads and nickel seed beads to cover the memory wire, leaving a 1/4" at the end. Use the round nose pliers to create another loop to close the wire.
4. String the flat spacer and disk bead on the ball headpin. Trim wire to 1/4" and create a loop with the round nose pliers. Attach to one of the memory wire loops.
5. String a nickel seed bead and pearl on a headpin. Trim the wire and create a loop, attach to the other memory wire loop.
6. Cut 2 1/2" of wire mesh ribbon, tie around the headpin loop of the disk bead. Twist the ends of the wire mesh to form a point. Pull the middle of the ribbon to open in the shape of a leaf.
Repeat to create 3 more napkin rings.

They look like a little pumpkin patch don't they? They almost make me want to go buy a set of cloth napkins. (I just happen to have one that I used as a back drop for something!) Ah, I will probably give this set as a hostess gift, I don't throw many fancy soirees.

Saturday, December 3, 2011

Studio Saturday with Erin Prais-Hintz

Welcome to Studio Saturday! Each week one of our contributors gives you a sneak peek into their studio, creative process or inspirations. We ask a related question of our readers and hope you'll leave comments! As an incentive we offer a free prize each week to bribe you to use that keyboard. The following week we choose a random winner.

Congratulations Lela Bouse-McCracken! You won a golden branches disk bead set from Heather Powers at Humblebeads.  Email Heather your address and she will send that right out to you.

Let's deck the halls with Erin Prais-Hintz at the Tesori Trovati Jewelry Studio.


As soon as one holiday is over I can move onto the next season. I only decorate for Halloween in October. I wait until the fourth of July to put up my flag. I never listen to Christmas tunes before Thanksgiving. I love all holidays for their rich traditions and customs, but I love Christmas most of all. All the hoopla in the stores months in advance of the actual season makes my eyes twitch uncontrollably and my ears feel like they are bleeding. In fact, since they started running those crazy lady in the red jogging suit and heels commercials for a certain red retail store, I haven't even set foot in that place. And it is my favorite place to shop (and truthfully, the only place to shop in my town!). It was just too much and I was completely turned off.

It is very hard for me to think well in advance of a season or a holiday of designs that I might like to put out. I am more of an 'in the moment' sort of artist. Of course, I have to think ahead when there are publication deadlines, but that is really hard for me to do. 

This year I actually started thinking about Christmas designs in October.
Shocking! 

I started thinking about what sort of holiday pendants I wanted to create. I had this great idea for about a dozen pendants to correspond to a Christmas holiday classic tune. I even found some designs I thought would work. I had some custom stamps made for me. They didn't work. I bought some other ones. Nada. I am not giving up on that thought. It just might be something I can focus on next year.

I was sitting at the Gallery Q in downtown Stevens Point, WI where I exhibit my work and I was talking to some of the artists. The place is jam packed with holiday gifts of art in all shapes, sizes and price points. But I noticed an alarming lack of ornaments. In fact, not a single one. 

I love to decorate for the holidays. We put a forest of trees on our front porch that glow with a thousand white lights. The mantle has my collection of Possible Dreams Santas. This year we even took out the very large (each character is about 10" tall!) Nativity scene that my sweet sister-in-law Mary made for us as a wedding present 19 years ago. And of course there are the handmade-by-me stockings hung by the fireplace (the gas one with no entrance for Santa!) with care (and 3M hooks ;-). 


 Every year that I have been married and probably a few before that, I have made ornaments for everyone in the family. There were years when every friend I had far and wide would receive a new one for their tree. When I started making jewelry I sort of gave up on the ornament tradition because they were getting bling for them instead of their tree.

But while sitting at the gallery I had an ephiphany. Why not make ornaments from the 'simple truths' line?

{Smack forehead here.}

They thought it was a wonderful idea so I went home the week of Thanksgiving and got crazy with my clay creations. Even though it was barely Thanksgiving and it killed me to have to do it, I came up with about 25 ornaments and then found the cutest little rustic metal ornament tree to display them on (I actually talked a store owner into letting me buy her display from her!).

I started with Nutcrackers. 

Nutcrackers

I have fond memories of the Nutcracker as a child. I still love the music. My dad put on the record of the music every Christmas.I love the ballet and the costumes and the story. I would love to go and see it this weekend with my daughter, Tiny Dancer, if I can steal her away on Sunday afternoon. I made three different Nutcrackers with three different messages and embellished them with glass leaves and berries.

Next came the Holiday Botanicals. 

Holiday Botanicals: Holly, Poinsettia, Mistletoe, Pine

I had some bezel settings that were larger than I was used to using. And these stamped images fit them perfectly. But I thought they were sort of plain by themselves. So I got some glittery ribbon and a whole box full of picks and I set about creating embellishments that went with each: holly, poinsettia, mistletoe and pine. I got my Martha Stewart on, and I still have the glitter in my hair to prove it!

But my holiday decorations are not complete without snow.

Snowflake & Snowman

I like snowmen and snowflakes most of all because they last beyond the Christmas rush and are accessible to anyone. Even though I dread winter, I love the look of it. Quiet and sparkly. For the snowflake, I came up with a design that reminded me of a winter sky at sunset. The colors are soft and seem to melt into the horizon. And the cool part is that they can have a message on the back. I like to put the year and the recipient's name, but it could be a snippet of poetry or just "let it snow." I made some Swarovski crystal "Blingcicles" too. 

And of course, my little made to order snowman, while a perfect pendant, would make a great ornament as well!

Each of these works as an ornament but can be worn as a pendant as well, like a double gift! I plan to make them for family members this year to get back to the tradition.

Would you like to win a 'simple truths' ornament of your very own?  

You can win YOUR CHOICE of ornament (Nutcracker, Holiday Botanical, Snowflake or Snowman - none of these will be embellished so you can add your own creativity or save it to wear as a pendant for the holidays). Just answer one of the following:

1. Tell me which one ornament you would like to win
2. Do you think ahead for holiday designs, or are you more of an in-the-moment artist like me?
3. What designs for the holidays are you creating?