Showing posts with label vintaj. Show all posts

Monday, March 20, 2017

Earthy Spring Vibes with Summer Wind Art

Earthy Spring Vibes: 

By Ashley Bonney-Summer Wind


I have been playing around a lot lately with mixing different elements in my jewelry. When I was designing this piece, I wanted to have some fun bright elements, but I also wanted to keep it earthy. I found that adding leather cord to the end and some natural stone beads kept it nice and grounded. 


When I am adding leather cord, I like to take a long piece, fold it in half and then use a crimp end to secure it. I then add a lobster clasp and jump ring for the closure.


I really like using Vintaj Brass Findings because they age really well and are very easy to manipulate. You can see in the picture that I just linked the stone beads using eye pins and jump rings. I'll be sure to post the sizes at the end. 


The wood beads on this necklace were tricky, because one hole was very small and the other was larger. I find that wood beads do best when they are secured with twine or hemp. I have tried using eye pins in the past, but I experienced more movement than I like, so I switched to twine. In this case, because the smaller wood bead's hole was much smaller, I had to actually take the twine apart so I had a nice thin piece. I then just made a loop and the top and knotted between the beads and at the bottom. 


I hope you got a little inspiration from my post, I am always so inspired by all the ladies that post to Art Bead Scene. I have soooo much to learn, as far as techniques go, and I am so glad that we have so many talented artists here. Hope everyone has fun creating! 

Ashley Bonney
Summer Wind Art
https://www.etsy.com/shop/SummerWindArt 


Supplies:

Twine-I used Baker's Twine from Lima Beads
Leather Cording from Micheal's Craft Store
Stone Beads, any earthy color or shape
Wood Beads- Summer Wind Art

Findings:
Vintaj Natural Brass
CE20 - 9mm Crimp End
CL0003 - 12mm Classic Lobster Clasp
JR60 - 15mm Smooth 15ga Jump Ring
JR40 - 7.25mm Smooth 16ga Jump Ring
EP1 - 1in Eye Pin


Wednesday, April 24, 2013

Skye Jewels and Vintaj

After a rough year it is so great to be back in full force! To start things off I was offered a chance to participate in the Bead Partner Program with Vintaj! What an honour! I was so thrilled that even though I was not finished with my cancer treatments, I jumped at the chance! What a great way to get back into the swing of things!
With the help of digital collage artist Ella Bouchard, we came up with a set of Exclusive images just for the weeping willow challenge! Vintaj supplied me with a colour palette that I should work with. I forwarded that to Ella and gave her ideas of what I was picturing for images. She did an amazing job and these pendants are the result!
I have a selection of 1X3, 1X2, 1X1 and 1.5inch circles and 1inch circles. You can find them all in my Supply Shop on Etsy. I love the colour theme, and I love the rustic images. I chose a variety of things to go into it since not everyone will want to play with trees.
Of course for those of you who are interested in trees, I have quite a few to choose from! I have a few different versions of the Weeping Willow and also the tree Jess Italia Lincoln used in her design featured on the Design Challenge ad.
I hope you will take a moment to participate in the challenge. I am excited to see what kind of pieces will be entered! Use your imagination and don't forget to include your favourite Art Beads with your Vintaj findings for the best results! My tiles of course go very well with the Vintaj filigree, shown in the necklace I created at the top of this post.

Thanks for visiting, I hope you leave us some of your thoughts to read :)

Marie

Wednesday, November 14, 2012

Best of the ABS: Autumn Wreath Tutorial

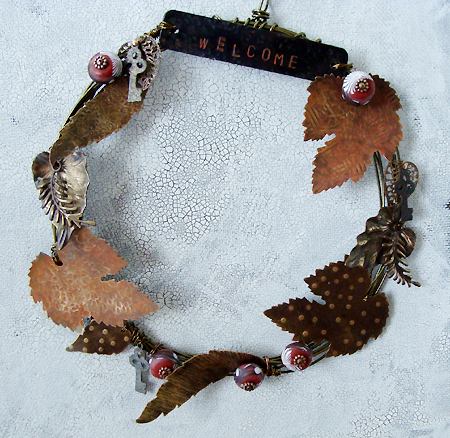
I created this wreath with wire, Vintaj components and art beads as a house-warming gift for a dear friend.  You could create a similar one to welcome your guests during your fall celebrations or as a special gift.  Another variation would be to stamp the family name of the recipient on the name plate instead of 'welcome' for a more personalized touch. 

Supplies:
4.5" 18 gauge brass color wire
11 3" lengths of 24 gauge brass color wire
5 polymer clay disk beads
1 arte metal name plate
3 brass maple leaves
2 brass slender leaves
2 brass woodland leaf pendants
2 brass fern charms
2 brass filigree leaf charms
1 brass trailing leaf
3 arte metal keys
5 6mm flat copper spacers
5 3" copper headpins
2 1" copper headpins
8" silk ribbon
Acrylic Paint Dabber
Renaissance wax
Steel wool

Tools: bench block, letter stamps, ball peen hammer, rivet hammer, Phillips head screw driver, brass texture plates, round and flat nose pliers, wire cutters.

Directions:
1.  Create the wreath by wrapping the wire into a large loop, approximately 5 1/2" wide.  Wrap the wire in into a large loop 9 times around.  Create a wrapped loop at the top of the wreath and wrap the ends of the wire around several times for a secure finish.


2.  Texture the leaves with the hammers, texture plates and screw driver. (Watch this video for several techniques.) Highlight the textures with the steel wool. 


3. Stamp "welcome" into the arte metal name plate with the letter stamps. Use the ball peen hammer to texture the blank. Use the acrylic dabber to add paint, rub off the excess with a paper towel. After the paint has dried rub a light coat of wax to protect the color. Paint two of the large leaves in the same way.

4. Place the leaf pendant on the bench block and strike the center with the round end of the ball peen hammer to shape the leaf in the concave form. Repeat with the other leaf and the two filigree leaves.


5. Attach the welcome name plate to the wreath by wrapping it the 24 gauge wire.

6. Attach the leaves to the wreath by wrapping them with the 24 gauge wire, securing them to the wreath. I found that wrapping the wire criss-cross over itself helps the leaves stay in place on the wreath. Layer some of the leaves together for an interesting texture. There is no right or wrong way to the attach the elements, whatever holds them most secure when wrapping the wire around the wreath will work. 

7. String a key and a filigree wreath onto a 1" headpin and from a loop. Attach to the wreath.


8. String a flat spacer and polymer clay disk bead unto a 3" headpin.  Attach the headpin to the wreath by wrapping it around the wire several times. 

9. Add the ribbon to the top loop on the wreath, tie a simple knot at the top of the ribbon.


Resources: Disk Beads, Humblebeads.  All brass and wire from Vintaj - retail at Bello Modo.  Silk Cord, Angela Brittain. Copper findings, Rings & Things.

Wednesday, October 10, 2012

Vintaj Patinas

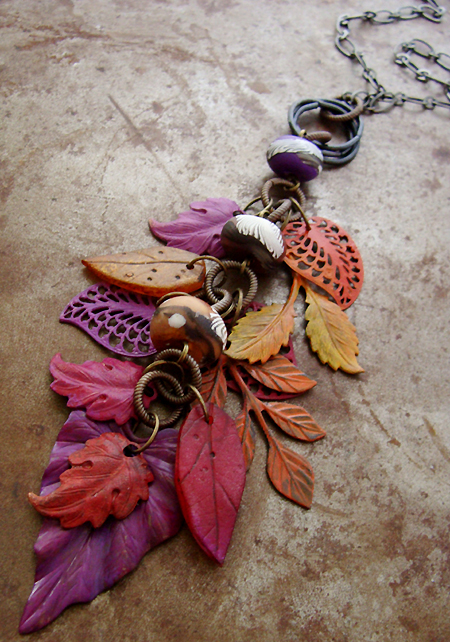
The new Vintaj Patinas for metal have been on my radar for a while.  I was able to try out the new metallic colors and glaze at CHA this year and they offer some fun ways to alter metal.  I was totally inspired this morning by a photo of leaves and wanted to work up something that captured the colors of the autumn leaves.  I knew it time to pull out my collection of patinas and paint up some metal. 

What I love about the patinas is how easy they are to apply and their instant gratification.  Just put a little dot on plate and them brush it onto your metal.  That's it.  Done and over.  You can layer on other colors or mix the colors like paint on your palette.  No chemicals are needed, no sealers.  That's my kind of color system!


For the project above I used the opaque colors of amethyst, ruby, ochre and rust.  There is a whole rainbow of colors available including the new metallics.  Now why is the Renaissance wax peaking out of the corner there? 
 
Well, let me tell you - the patinas can be shiny when they are a solid color.  I didn't want to buff them to make the metal show, I liked the opaque, saturated color.  So I pulled out the wax and dabbed on a light layer changing the patina to a matte finish.  Ah yes, much more my style. 

When opaque the patinas almost remind me of enamel.  Use can use the glaze for different wash effects.  They can be used as a faux natural patina on metal or go crazy painting up your metal in fantasy colors.  

Metal leaves from Vintaj.  Disk beads and polymer leaves from Humblebeads. 

Check out Lorelei Eurto's results from last week.  I love how she did the patina on the chain.  So many possibilities, so little time.

Saturday, May 12, 2012

Studio Saturday with Erin Prais-Hintz

Welcome to Studio Saturday! Each week one of our contributors gives you a sneak peek into their studio, creative process or inspirations. We ask a related question of our readers and hope you'll leave comments! As an incentive we offer a free prize each week to bribe you to use that keyboard.
The following week we choose a random winner.

This week's winner is Jill aka The Beading Mommy
Congratulations! You have won a ceramic house button from Tari Sasser of Creative Impressions in Clay. Send Tari an e-mail with your address and she will get it out to you as soon as possible!
~~~~~~~~~~~~~~~~~~~~~~~~~~~~~~~~~~~~~~~~~~
This week we visit the studio of
Erin Prais-Hintz of Tesori Trovati Jewelry.
~~~~~~~~~~~~~~~~~~~~~~~~~~~~~~~~~~~~~~~~~~
Unwritten

No one else can speak the words on your lips.
Drench yourself in words unspoken.
Live your life with arms wide open.
Today is where your book begins.
The rest is still unwritten. 

~ Natasha Bedingfield

This month has been all about the story for me. I am honored that the sweet ladies at Vintaj chose me to represent their May theme of 'storybook' for their monthly Art Bead Partnership. Vintaj has been important to me in telling my own creative story and this month has been such a delight for me!

{imagine - castle - available on Etsy}


I created nine new limited edition 'simple truths' designs to go with the storybook/fairy tale theme. I also had a lovely interview with the ladies at Vintaj and posted a video blog of where my creative story lives... in my basement... late, late, late at night... with chaos all around (try not to laugh too hard at my space ;-)

To wrap up this fairy-tale-come-true for me, and to keep to the theme of this month with my quarterly Challenge of Literature (there are 34 really talented people playing with me to reveal their literature inspired creations on a blog hop on May 31st!), I thought I should do something a bit fun.

{storybook story beads - limited edition phrases - available on Etsy}

So I started a with progressive story starter on my blog post here, and invited my readers to add to the story, line by line, in the comments. Not only are there some incredibly creative jewelry designers, but there are some skilled storytellers as well! 

{happily ever after - available on Etsy}
So far there are magic hats, and quilts and keys... dragons and owls and fairies... a princess named Angelina and a Lady Erina ;-)... a castle on the edge of a forest in Wisconsin... and all sorts of creative twists and turns.

You still have time to add your line to the story...
The comments on this post will be open just through today, Saturday, May 12th.
{write your own happy ending - available on Etsy}


To sweeten the deal to entice you to comment, I am giving away a very special prize on my blog to a random comment on this post. Want to know what it is? Go and check it out! There is no limit on the number of comments  you can leave, the only rule is that you have to keep the story going! Next week  I will see if I can pull all the comments and compile the story including writing my own happy ending!


{tales they tell - tulips - available on Etsy}

But I need to gift a lucky reader of Art Bead Scene with a prize today as well. I will give away one of the 'tales they tell' tulip pendants pictured above to a random comment on this post.
To win, all you need to do is answer this question...

Every person has a tale to tell and every art bead can tell it.
Which art bead artist(s) do you feel could tell YOUR tale best with their artisan components?

Erin Prais-Hintz invites you to go on a journey of inspiration at her blog Treasures Found :: Inspiration is Everywhere. You can view a gallery of her work at http://www.tesoritrovati.com/ or purchase her new line of 'Simple Truths' in her Etsy shop.

Thursday, February 9, 2012

Thinking Outside the box!

If you are like me, you love a good challenge to get those creative juices flowing. I have put together a few fun things to help challenge yourself into seeing your Art beads in a new light!

To start here we have one of my own Ephemera pendants. When you see this you think of a necklace, something maybe a little mythical or "Avenging Angel"! lol

Well, what if you had two...

Now this could be interesting... so think outside the box! What would you do with a pair of wings? You could certainly put one on each side in a necklace, or you could...

Make Earrings!!  These are quite large of course, but that is the fun of thinking outside the box!
So here is the next idea...

A beautiful Pendant by Summers Studio! As you can see, the pendant has two holes at the top and one on the bottom. It is made to be hung a certain way, with a dangle at the bottom.
Well, think outside the box!

Turn the pendant sideways and add dangles to two of the holes, in unexpected places! 

What a fun and unique piece it becomes! It hangs beautifully and you would never know it was meant to be done a different way!

What else can you do? How about using a Toggle in a different way?

Love this toggle from Vintaj! Beautiful shape, texture and colour!

Why not change it into...

Earrings! You just add your Art Beads {in this case lampwork by SueBeads} to the combo, sideways with jump rings as an extra out of the box touch! These are really perfect for spring and you know no one else will be wearing them ;)


Keep an eye out for my next post, it will be a continuation of this one, with pieces made by other designers I have challenged to "Think outside the box!"


Marie


All Jewelry pieces and ephemera art beads are made by Marie-Noel Voyer-Cramp of Skye Jewels. Ephemera pieces are available at More Skye Jewels on Etsy

Friday, November 18, 2011

Holiday Inspired Jewelry - Gaea and Vintaj

Ceramic beadmaker Gaea has partnered with Vintaj this month for a beautiful holiday inspired collaboration.  

This one is titled Victorian Christmas.  I love the mix of brass with arte metal component.  You can find a step by step tutorial on the Vintaj blog.


I'd also like to take a moment and officially welcome Gaea to the Art Bead Scene along with Brandi Hussey, Rebecca Anderson and Erin Siegel!  

But we'll do a more formal introduction next week with this new talented group of bloggers and designers.


Friday, October 21, 2011

I Heart Tools: Vintaj Big Kick

In September I was fortunate enough to attend a two day Vintaj workshop in Galena, Illinois at the Vintaj Earth Studio.  It was an incredibly inspiring weekend with more tips and tricks packed into two days than one would think possible.  One of my favorite projects was working with the new Vintaj Big Kick Machine.  We embossed textures and images unto Vintaj blanks to create fun pendants and components.

Here are some class projects of the altered blanks embossed and riveted with charms and pendants.  I love the look of layering the pendants.  It's fun way to customize your metal without hammering away or pulling out the chemicals.  The process is so simple, you can whip out a ton of pendants in a short session.

Add the embossed blanks with your favorite art beads for quick and easy holiday pendants.  In fact, that is what I'm doing this weekend to prepare for upcoming holiday shows.  I'm pairing up the tree pendants with my egg, bird and branch beads.
Step by step directions and video links can be found here.

This is the Big Kick - it's sort of like a printing press.  You place your metal blank into the folder, layer it between the two sheets of plastic and run it through.  Yep - that's it!  After your pendant is done, you can add some depth by buffing it.  The black Arte Metal blanks buff up with silver highlights - loved them!


This is my favorite folder - me and that tree became fast friends.

You can find the Vintaj Big Kick & folders at Hobby Lobby or online at Beadaholique or Bello Modo.

I see that Vintaj is hosting a one day workshop covering the embossing and melt art techniques in November.  Click here for more details.


Friday, August 12, 2011

Book Pendants

I was seeing what's new in the Vintaj Idea Gallery and ran across this brilliant idea from designer Betsy Kaage - book pendants!  I couldn't love them more!  What an awesome way to tuck in a secret message into your jewelry and the way the pendants are layered to create an unusual book shape is just so creative and unexpected.  Here are the components used to create Betsy's Bead the Night Away Pendant.

I love how the designer used some of Vintaj's non-traditional components, like the ribbon sliders used in both of these pendants.  Here some of the pieces used in her Tend to Your Garden Pendant. 

Check out the necklace gallery for more book and layered pendant ideas.

Tuesday, December 28, 2010

A Garden Memory Necklace

First up, our Vintaj Arte Metal and Brass charm winner is Kade. Please email Heather (me) your address and I will send this awesome prize pack out to you!
I created another gift for my daughter that she wore to her holiday concert this year. It's a lovely garden inspired piece layered with charms and pendants. I will walk you through my design tips for this necklace. Again, the Arte Metal from Vintaj can be find exclusively at Hobby Lobby and they do have an online shop.
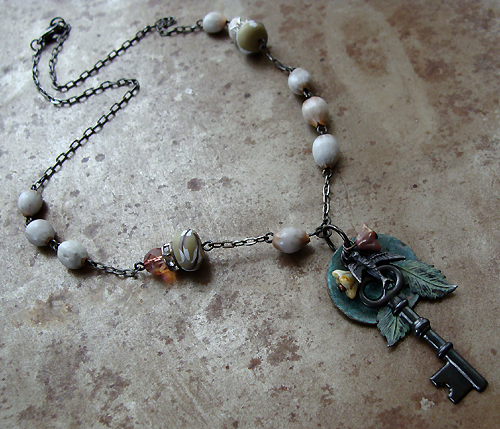
The first part of the pendant starts with a patina pendant from Miss Fickle Media. Use a large jump ring on the disk pendant to attach the smaller jump rings. Using jump rings I attached a Vintaj Skeleton Key and a dangle of a Czech glass flower.
Next up, to relate to the patina pendant I took a two leaf dangle and used an acrylic paint dabber in a light green to give it a faux patina. After it dried I put a protective layer of Renaissance wax. This pendant and a bird were also attached on jump rings.
Another glass flower was added to the charm cluster.
To accent the pendant component of the necklace I used gunmetal chain, job's tear seed beads in light white/pink hue, polymer clay disk beads, rhinestone rondelles and fire-polished glass. I choose the job's tear beads for frosty hue and that they relate to the garden being seeds themselves.
The complete necklace with asymmetrical placement of the seeds and polymer clay links. A simple lobster claw clasp ends the design.