Saturday, August 30, 2014

August Monthly Challenge Recap


The color of the inspiration painting by Anne Redpath are bright without being saturated. The subject matter makes me think of both far off places (the ornate rug) and comforting spaces (the red slippers). Let's see what inspired you for this month!


For my own homage to this lovely painting, I created what I am calling "Magic Carpet Ride" pendants. These 2" x 3/4" connectors have sort of an off-kilter glimpse of an ornate rug, as a nod to the perspective and colors. I mixed different patterns, from botanicals to architectural for these and made them in three different metals (gold, silver and copper) and each one is different - a mystery flying its way to you with dreams and wishes come true! These are the pendants that my subscribers to the Simple Truths Sampler Club received for August. I just added these to my website (just in case you are interested!).


Your turn!
Click the InLinz Link-up below to add your blog post to the hop!
Please add your exact URL to the blog hop for the
August 2014 Art Bead Scene Monthly Challenge Recap.

Friday, August 29, 2014

Inside the Studio with Mary Harding

Inside the Studio with Mary Harding

Each week one of our contributors gives you a sneak peek into their studio, creative process or inspirations. We ask a related question of our readers and hope you'll leave comments! As an incentive we offer a free prize each week to bribe you to use that keyboard. The following week we choose a random winner.

Congratulations haezz!
You have won a set of ceramic beads from Claire at Something to do with your Hands
Please send Claire  a message with your information.
....

August has been a busy month for family and friends visiting.  It has been lots of fun and has kept me out of my studio more than usual.  But not entirely, as I was also participating in an online class called Getting Attached: Rivets Revealed taught by Keith Lo Bue at Artful Gathering. 


That's the beauty of online classes, you can do them anytime of the day and that is what I did. I watched his videos early in the morning or at night after everyone was sleeping on my ipad with ear buds.  I went to my studio before anyone was up to try out each new teaching.  And because online classes extend over a long period of time, I was able to keep up before and after the company came and even during the time when I was busy preparing the house for visitors ( you know what I mean, packing away the beading sprawl and removing the dust bunnies.) 
This was not my first online class but my first time taking one from Artful Gathering.  I have been very happy with how well it is organized and by the high quality of the video lessons.  And of course, I just love Keith Lo Bue's off beat teaching style.  What's best of all about this class is his precise and extensive knowledge of rivets that he has shared with us in minute detail.  
My Inside the Studio post today will be a look at some of the rivets we made.  Since Keith teaches technique, not project, I devised projects for myself to practice the various rivets we were taught.  What follows is a picture tour of the rivets that I learned.

This pendant, made from copper scraps in my studio, was a way of practicing the first kind of rivet that we were taught to make.  A simple rivet with a slightly rounded head.  We used rebar steel wire from the hardware store.  Last year at Artful Gathering, Keith taught a class called Steeling Beauty. It was all about making jewelry from steel wire.  You can see a video preview of the class and learn more about this kind of wire HERE.( this is a 13 minute video and it is well worth watching.)   Unfortunately, I did not know who Keith Lo Bue was last summer nor had I ever checked out Artful Gathering.  I heard about the class by chance after it was over, and looked up Keith Lo Bue and that is how I found out about the Getting Attached Class. If you are interested in what he may be teaching next summer at Artful Gathering you can follow him on Facebook or on his website.


This brass bar pendant is made with mechanical rivets.  These riveted bars move and the necklace changes shape along with body movements of the wearer.  


This is a tube rivet that has been used to attach driftwood and mica together.


Another tube rivet.  This time attaching beach glass, mica and driftwood together.  It was to learn how to attach such fragile materials together with rivets that was the draw for me to take this class.  And I have not been disappointed!!

This pendant was made to practice making a rivet through a hollow concave shape.


This dragonfly pendant combines capturing a piece of resin paper between two brass pieces of metal and adding a three dimensional object in the window opening between the two sheets of metal.  The rivets used are escutcheon pins which are like half rivets as they come with the rounded head already made. I got mine from Ace Hardware.


This round pendant illustrates attaching an object with a balled head rivet.

Now we are looking at the most fragile rivet that I was able to make so far:  ceramic and glass attached with a tube rivet.  This was my first try and I purposely made the rivet too long so I would not hit the ceramic piece and break it.


Here you can see how the tube rivet is quite long.  It can be useful if strung as a pendant or if one were to use it for part of an earring, I think.   My next try at a tube rivet with a ceramic piece ended up in me breaking the ceramic disk I was trying to rivet to a piece of copper.  After that I decided I needed more practice. 


Polymer Clay beads attached with a tube rivet

  
So I began practicing on polymer clay.  Each of these beads is made up of 6 pieces and the tube rivet holds them all together.  No glue or curing binds.  I found making these difficult because all the pieces are hard to hold on to while hammering on the tube rivet.  But the good part is when I missed my mark, the bead did not shatter. 


  I am still challenging myself to make a clay bead pendant or stack that is held together by a tube rivet.  Since this class is still going on for a few more days, I may get them done in time.  If not, there is always the CDs of the class that each instructor makes available for purchase  to current students.  And much later  Keith will publish a CD for the public.

Now for my question to you:  if you have taken an online class what did you like best about that kind of venue for learning and if you have never taken one, what concerns do you have about learning in a virtual setting?
Please leave a comment below and you will be entered to win a pair of my tube riveted polymer clay beads or if I master the task, one made from ceramic clay.

Thanks so much for stopping by today.
Mary

Thursday, August 28, 2014

A little extra from the studio - new ceramic beads, from Something to do beads

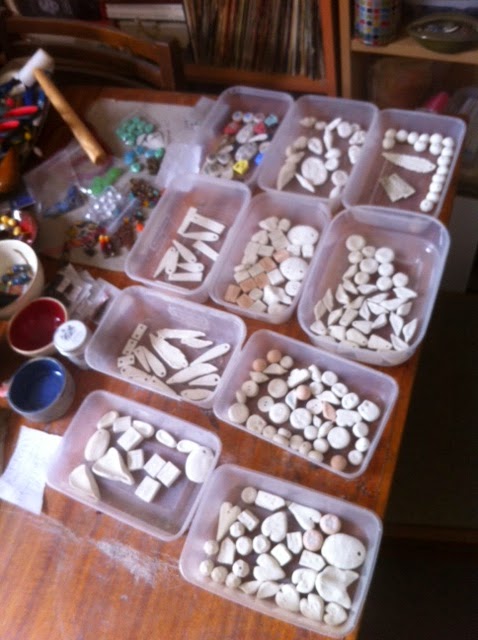
So, this is a bit of an add on to my Inside the Studio post last Friday. If you read that you'll know that I'd just picked up a bumper load of beads after firing (I haven't got a kiln yet). Anyway, I didn't have time to take any pictures so I'm sharing them today.  On Friday I included a picture of some earrings made with a couple of dinky bird beads. Well, I've made quite a few birds...


If I have a spare bit of clay left out after making something I tend to make it bird-shaped. There are bird sets, lone birds, and birds in pairs for earrings.


Talking of earring pairs, I've made rather a lot of them.  


There were several casualties on the way to getting these warp-free, and I'm sure there'll be more warping in the future.  The glaze on the pair on the right is beautiful (and it's not like I made it, so I'm allowed to say that!), but, frustratingly, I've struggled to take a picture without having all of that light reflecting off them.  

I did say lots of earring pairs, yes? 


I do like crackle glazes. I've also always been a sucker for any glaze with crystal inclusions, like those I've used on a couple of these pairs.


They can be messy to use but I love them.  Had to make these glossy bonbons using them too.


I tried making up some of my old polymer designs in ceramic. These turned out quite nicely.


And, of course, there was bound to be some owl-age.


Which fox do you prefer - realistic fox or stylised fox?


These have a hole running down the centre at the back. Here's another fox-y piece:


And here's some more pendant pieces.


I've been having a go with glaze stains; I'm quite pleased with these sets.


This is a bit of an ongoing project - faux beach pottery. I've yet to get them exactly how I want them.  


Here's a few more miscellaneous pieces. I particularly like the tiger stripes and the cobalt feather set.


Yellow may be my favourite colour of rose. The rosebuds above, to the right, have also been an ongoing experiment. I really wanted to get a pinched, paper-like feel to them.  Here's an earlier set that I made as I attempted to get the look I was after. 


If you read Friday's post you may remember that I said the prize for the ITS giveaway would be a mystery bundle of beads. Well, let's clear that mystery up! The winning commenter will receive this set of roses. But I promised a bird too, so here's everything that's up for grabs:


If you'd like to win these, head here and add a comment saying what piece of equipment you'd most like for your workspace.

I hope you've enjoyed this little preview of these new beads. I have many more: a frankly alarming amount of photoshopping lies ahead. I'm hoping to get them in my shop within the next week or so.

Bye for now, Claire


Tuesday, August 26, 2014

Tutorial Tuesday - Super Simple Button Bracelet

This tutorial is for a very simple design, but I though it might be handy if you have any lovely handmade buttons that you're unsure how to use, or that you want to use as a bracelet focal. I love to incorporate buttons in my work, most frequently as a closure, combined with a beaded loop. This can really make the button a focal feature in your design. However, I have heard some people say they struggle making beaded loops - my guess is it must be something to do with the knotting. So, this design may get around some of the problems you might have experienced. As I say, it really is a doddle to make.


The ingredients list is also fairly basic. Along with your button (mine is from Bo Hulley Beads), you'll need seed beads (around 4mm), approximately 40cm of 4ply Irish waxed linen, and a wire figure-of-eight link. I've used the eye link from a Vintaj hook and eye clasp (like this one) but you could always form your own from some wire. To start, thread enough beads to loop around your button onto the cord and move them to the centre of the cord. Next, thread each of the ends of your cord through the two holes of your figure-of-eight link.  Then, continue threading beads onto both ends of the cord until you have enough length to fit round the wrist.


Next, thread your two cord ends in opposing directions through the holes in your button. Then take both threads together and tie an overhand knot that sits snugly against the back of the button.


Finally, make beaded tassels on the ends of your cord. I've knotted at the top and bottom of my tassel beads so they stay neatly in place and are kept out of the way of the loop. Then you just need to trim your ends about 5mm below the beads.


And that's it!


Easy peasy!

Bye for now, Claire 

Friday, August 22, 2014

Inside the Studio with Claire Lockwood

Each week one of our contributors gives you a sneak peek into their studio, creative process or inspirations. We ask a related question of our readers and hope you'll leave comments! As an incentive we offer a free prize each week to bribe you to use that keyboard. The following week we choose a random winner.

Congratulations Marybeth!
You have won a set of selection of handwoven beads from Rebecca at Songbead
Please send Rebecca a message with your information.

*******

I'm struggling to know where to start with this post! Jewellery or beads? Let's start with beads. As I mentioned last time, I recently started making ceramic beads.  I did ceramics when I was younger - here's a porcelain piece I made years and years ago, which sits on my parents' mantlepiece -


but my knowledge and technique were in need of some refreshment, so I started doing a class. This quickly snowballed into me taking clay home, then acquiring my own materials, then more materials, and so on.


My current favourite trip out is a visit to Bath Potters, my conveniently local-ish pottery supply place; a trip that is made all the more enjoyable if followed up by lunch in a country pub.  I've just finished work on a huge batch of beads. (Apologies for the slightly blurry shots!)


There was much glazing to be done.  As you can see, it was all conducted in the orderly fashion typical of my workspace.


Anyway, after several weeks and a good amount of traipsing to and from the studio of my wonderfully obliging pottery instructor, for numerous firings, this morning I picked up a fully finished bumper load of beads. I couldn't have been more excited.  


(The abject creatures on the left belong to my dog, in case you're wondering... And, yep, that's my finger just below them!)

Obviously, I haven't had chance to photograph them individually yet.  I'll be back next Thursday to share some images of the results! And I'll be adding them to my currently bare bead shop in the near future.

As you'll see, looking at those pictures of my workspace, not all the clutter was clay based. As I was concentrating on making beads I had little opportunity to make jewellery. But did that stop me buying more beads? Ha! Once I'd got the clay out of the way, I spread out the haul that had accumulated.


Profligate? Moi?! I should note in my defence that these accumulated over a fairly long while. There's a good few art beads amongst the gems and czech glass.


I found time to have a bit of a making spree whilst waiting on some firing. Here's just a few pieces made using some of these new goodies. A pair of asymmetrical earrings -


A simple but sweet bracelet -


And another pair of earrings - I can't decide whether they need more doing to them.  What do you think?


Finally here's the first item I've made using some of my new ceramic beads.  These are from an earlier firing.  There's some crazing but I'm happy to live with that! I quite like it... Anyway, I'll be holding on to these.


I've paired my birds with some Gardanne lampwork drops. I hope these will encourage you to comment below and enter this week's giveaway. The prize will be a for-now-mystery bundle of my new beads - which will certainly include at least one bird! I'll share a shot with you on Thursday. The question to answer if you want to enter, is: If money and space were no object, what piece of equipment or tool would you most like for your workspace?  I'm trying to work out how to house a kiln!

Bye for now, Claire