Monday, August 31, 2015

August Monthly Recap


The stylistic rendering of this textile is rich with symbols and a very earthy palette. But simple doesn't mean lacking, and there was a lot of direction to go in for an image so simple. I am still working my way through mine for this month (mainly because you have seen a glimpse into my actual working studio and that things that I was working on have now been buried in my attempts to get organized... baby steps! But it is coming along and I think that I will report back at my next Inside the Studio... now where is that clay?!). I hope that to have that done very soon (better late than never, right?!).

Let's take a tour of the rustic beauty that you created for this month.

August Monthly Recap by Slidely Slideshow
August 2015 Monthly Recap by Slidely Photo Gallery

Be sure to click the image to make it full-screen and to listen to the haunting Native American flute music to go with it! 

Now it is your turn! Show us what you made so we can celebrate you!
Get the InLinkz code for your blog!  

Saturday, August 29, 2015

Wire Rocks!

The last time I blogged for Art Bead Scene, I shared a look inside my studio as I was getting ready for Bead Fest in Philadelphia.  One of the goals I set for my self while at a large show, is to learn a new skill to add to my jewelry designing arsenal.  I was fortunate to be able to connect with one of my favorite artists and designers, Staci Louise Smith, for an after show class she was teaching.  It was all about wire and connections and cool beads.  What's not to love?

Staci's class is called "Wild Wire Gypsy Charm Choker."  The kit included 16, 18, 20 and 22 gauge wire.  It was great to handle each one and learn more about differences and when to use each one. Staci annealed the wire before class to give it more flexibility and a vintage look.  The copper wire started out very shiny.  I found out I can anneal the wire with a hand held torch.  Pretty cool!

The base of the choker uses 8 feet of 16 gauge wire!  Thankfully it was cut into two 4 foot sections which made it easier to handle.  Every student hand formed the choker base so differently.  You really can't do it wrong after the basic shape is formed.  I found out I was in a symmetrical mood when I was designing my choker.  Staci told me it looked like daisy petals!


This is my finished necklace.  What an amazing statement piece!  I added some of my ceramic beads to the wonderful selection of gemstones, glass, metal, and polymer beads included in the kit.  I plan on making another unique choker necklace for an October Breast Cancer Awareness blog hop that Andrew Thornton is hosting.  I will use silver 16 gauge wire for the choker base with a wonderful mix of pink beads.  It is going to look so different, but equally amazing!

The good news is Staci is going to be teaching this wonderful class again at Bead Fest Philadelphia at the Spring 2016 show.  So if you love it like I do and want to learn some great techniques from an instructor that is so giving with her tips and techniques, don't miss it!

Friday, August 28, 2015

Inside the Studio :: Erin Prais-Hintz, Tesori Trovati

Each week one of our contributors gives you a sneak peek into their studio, creative process or inspirations. We ask a related question of our readers and hope you'll leave comments! As an incentive, we offer a prize each week to bribe you to use that keyboard and tell us what you think. The following week a winner is chosen at random from all eligible entries.

Congratulations to Terri on winning a $20 gift certificate
to Heather's swoondimples  Etsy shop.
Email Miss Heather to claim your prize!


~~~~~~~~~~~~~~~~~~~~~~~~~~~~~~~~~~~~~~~~~~
Today we visit with Erin Prais-Hintz of Tesori Trovati.


 “Don't own so much clutter that you will be relieved to see your house catch fire.” 
 

I might not be the ideal candidate for 
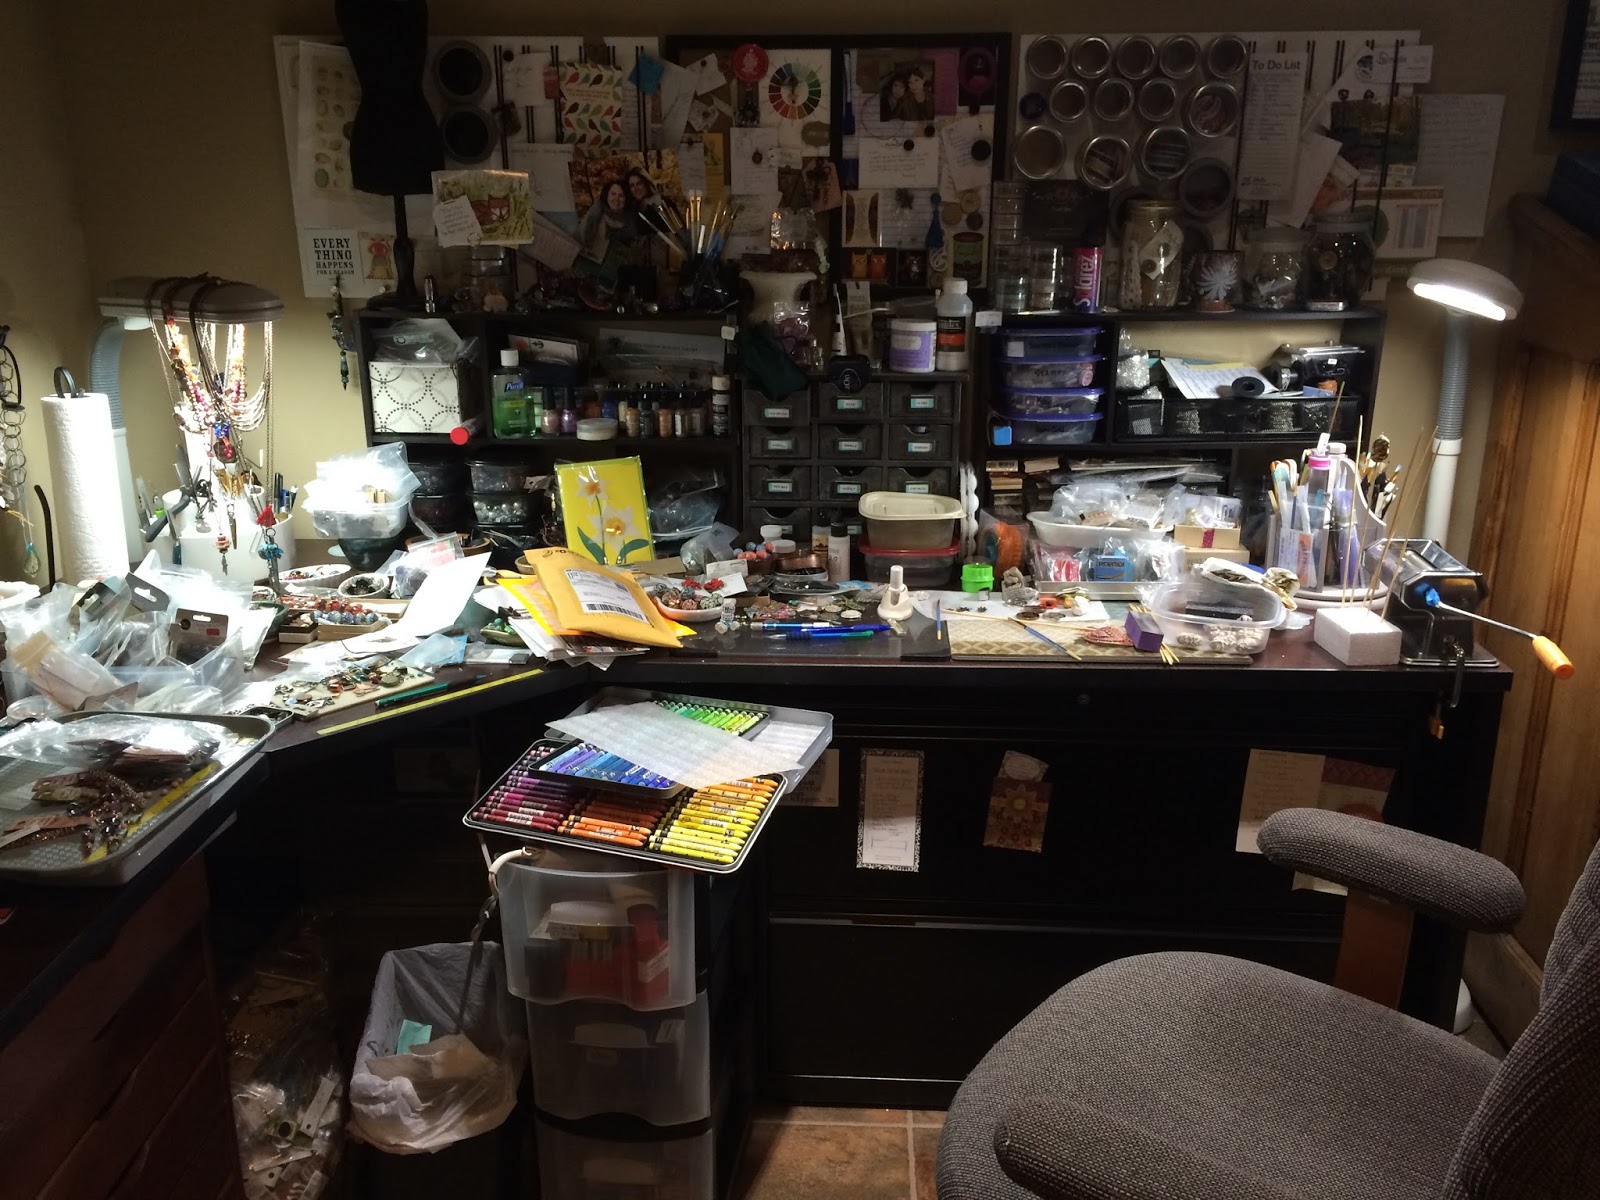
Hoarders but my studio seems to be teetering right on the brink! I am about to get real in here. I wish my studio looked like this....

NOT my studio....but this one would be ideal! Light, bright and filled with tons of storage
~ Photo from paper crafter Richard Garay

But in reality my studio looks a lot more like this.... (raise your hand if you are with me!)

My workspace in early 2015....see that little bit of space to work? Right above the tray of watercolor crayons and in front of the blue pencil? About 6 square inches! And all those useless things on the wall...Oy! All the magnetic tins were EMPTY!
They have been moved and all my storage seems to be going vertical! (See below for a transformation)
When we moved to this house in late 2009, I started with a blank slate of a room. I knew it was the house for us when I was standing there stumped as to what we would do with this, and my husband said that he thought it would make a great studio. Right! It seemed quite a bit larger than what I had known, and I figured that I would have plenty of space. Yet I quickly filled it to the hilt.

Around that time, my office was downsizing and I got some really nice office furniture for the price of free. I also found my prized printers' cabinet on eBay for a steal. And I purchased a series of awesome little rolling drawer carts. But yet I still have a problem with tripping over all that I have amassed. I am ashamed to admit that there are no less than 7 drawers that are mostly completely empty in those rolling drawers! So I clearly have a problem with putting things in their place.

My prized Hamilton printers cabinet.
Can you believe that at one time I thought that this would house all the beads I might ever need?!
BUwahaahaha!
This holds a lot of beads by color (that I really should use or purge!) as well as the majority of my art bead collection... I have drawers for certain types of beads, like lampwork, and even parts of drawers that are devoted to just a handful of artists that I love.
My sister has the OCD bug. Her house is immaculate and looks like Pottery Barn threw up in it. I did not inherit this gene for neakfreakery. But this spring, completely fed up with myself, I really wanted to refocus on coming to terms with and making this space not only functional, but beautiful, and a place that I couldn't wait to create in and even invite people into! The past two years have been fraught with a lot of personal drama, so I truly need this space in my life to be free to experiment and create and find my voice. A retreat. A sanctuary. This clutter and the uncertainty of my daily life has left me with no urge to create, and even less to be in this space. And that is just not right.

The Plan
So I created a little floor plan diagram as a visual reminder and made lists upon lists of what needs to be done. I re-read Heather's great post from earlier this summer on The Life Changing Magic of Tidying Your Bead Room and found this great article on Craftsy about ways to make your jewelry design space work. I searched a lot of magazines and websites that show studios of creatives to get ideas. I started taking stock of the things that I had, including those things that could be repurposed from another part of the house. But I was still confounded by issues...
Repurposed TV cabinet...before...
crammed full of stuff
...and after...installed a shelf
from The Container store and organized the boxes... now I need labels...
One issue comes in the form of Time. I am not a full-time artist. At best I am able to work in here a few nights a week and a few hours on the weekend.  In addition to the organizing that needs to happen, it is also a working studio, in that I have orders that have to be filled and Simple Truths Sampler Club members that are counting on me (if you are one of them, I am working on it!). There is just no space, not even 12 square inches, to do that! Add to that the usual busy-ness of my summer life complete with baseball or softball every single night and weekend (not an exaggeration) from June-the first week in August. We only recently finished up those seasons and are already back in school as of this week. Tonight, as I write this, might be the rare occasion where I am actually sitting still.

I bought this wall shelf from Hobby Lobby. There is a nice top for storage of displays, metal baskets to hold fibers by type and color, and a rod that I hang carded beads by color from shower curtain hooks in easy reach.
Another issue is that I am easily distracted. (Ooh, look! Shiny!) Tiptoeing through my studio (and you must walk gingerly for fear of cave-ins!) it is easy to unearth layers of treasures, like a sort of beady archeological tour.

"Here we have the pile of 'muffin tin' projects put together in 2010 wedged between a destash haul from 2014 and the original half-used containers of resin from the Susan Lenart Kazmer class at Bead & Button in 2008!"

The view from the hallway...that clutter is on its way up and out!
To do the sort of overhaul that I have in mind, might indeed need an intervention! And once I actually paid a professional organizer to come in and help me. Even she was a bit overwhelmed and suggested that we start with my ribbon addiction. (Bah!) I have a friend that is very OCD and loves to organize and she actually offered to come and help me but we have not been able to set a date. Again, I fear she will run screaming from the house and told her as much. Those that have maid service  might understand my predicament (I never have, but I have heard...). I want to tidy the studio up a bit before I have my friend come over and really whip me into shape! :-P

Under the corner L-shaped desk are several of these cherry rolling drawer cabinets Home Decorators. Each one rolls out for additional work space, and the plastic jewelry trays with the flocked compartment inserts fit perfectly inside (2 to a drawer) for handy storage of often used items like jump rings, head pins, clasps and ear wires. Over the door towel bars put my favorite tools within reach. And I still have space for one more... which I might be buying soon! I love them!
Metals station has WHEELS!


Still, I am trying. At the beginning of the summer I made a pledge that I would have my studio cleaned out and put back together by the end of August. Well, guess what my calendar says this weekend is?! I started out good by pulling things out into the hallway and making piles for keep, use, donate and trash. Of course, in all the rearranging, it means shifting storage to other areas which leads to arranging other rooms, notably the adjacent furnace room which has lead to even bigger piles for purging and a clear need to tackle those rooms as well. So clearly, my clutter is not confined to this one room! And then my life starts to feel like one big roundabout story....

If you give a girl a hammer... she might need to buy 7 more. And then she will need to find a really nifty rotating lazy susan for storing them... And if you give her a rotating tool caddy she will want wheels on her table...

ARGH!

{Have I mentioned that my husband is a saint for putting up with all of this?}


Before... the black hole bookshelves...

...after... repurposed a cubby bookshelf from another room. It takes up the same amount of space and feels lighter somehow...

I did check a few things off my list...
  • I moved the filing cabinet over next to the computer (which meant that I had to get inventive to make the table just a little bit higher to accommodate it by making my own polymer clay bun feet to raise the table 2"!)... 
  • I had my husband put rolling casters on the large butcher block table that I use in the center of my room for metal work (hammering, jigging, stamping, dapping, torching - on a proper fireproof base!)... 
  • I swapped out the two tall dark shelves that had become a black hole catchall with one cubby shelf that now houses 1/2 of my book collection (for more on where the rest of those are going, read on), the printer and boxes hiding my shipping materials. 
So I can attest, there has been progress!

All of these shelves and storage containers used to be spread out,
but I found a way to go vertical to keep all the clay stuff together and
repurposed the old printer cart to hold art supplies.
This is the same space as my first messy desk shot, but now much more functional.
Today, Friday, as it is my only day off, will hopefully be spent really getting down to the dirty work of making my studio functioning (remember that self-imposed deadline?). I have grand ideas that the floor will be free from bags and boxes and bins... which means that things will need to FIND THEIR PLACE (and then I will need to give my label-maker a workout!)... I want to file all the paperwork that has piled up in a makeshift basket... I must get all the things that are to be trashed or donated out of my sight line... I need to hang some art. For then I might be able to BREATHE and feel ENERGIZED to tackle making new things and taking my art in a NEW DIRECTION.
Rotating bin storage from Harbor Freight for inks, embossing powders, resins and assorted. Going vertical saves space! And I have another one that is not yet put together as soon as I can figure out what will be on it.
So if you are reading this, I have hopefully unplugged from technology, cranked the tunes, focused on the task at hand and will have something to show for it... as of Tuesday. ;-)

One of my favorite storage hacks is to hit up the kitchen accessory aisle. This ornate paper towel holder from Hobby Lobby hangs on my wall and uses fancy copper colored shower hooks to house a lot of my footage chain pieces by type of metal/color. Easy to see and grab when I need it, plus it is pretty. I actually need another one of these for spools of chain, and I am working on getting rid of the cellphone cord clutter by using metal sponge holders for your sink on my wall with a brand new outlets that have USB ports. I love me some funky organizers!
 “There are, it seems, two muses:
the Muse of Inspiration,
who gives us inarticulate visions and desires,
and the Muse of Realization,
who returns again and again to say, "It is yet more difficult than you thought."
This is the muse of form.
It may be then that form serves us best when it works as an obstruction,
to baffle us and deflect our intended course. 
 It may be that when we no longer know what to do, we have come to our real work; and that when we no longer know which way to go, we have begun our real journey. The mind that is not baffled is not employed. The impeded stream is the one that sings.”
-Wendell Berry

My mind has indeed been baffled by this task, but I want my studio to allow me to sing! So maybe that is the real work that I have to do...for when I do that I will be ready to embark on my true journey, the one that my soul will be ready and open to undertake.
 
I have shown you just the tip of the iceberg, but also along the way a few of my favorite storage and organization techniques. And I am always looking for more help and ideas. So.....What are your favorite storage ideas and tips? or What would your ideal studio space look like? Give me your answer in the comments for a chance to win! Feel free to add links to your favorite products for organizing or even your favorite studio space images.

See that stack of books? (Click on it to make it larger!) That came from The Great Purge (but don't worry, there are like 50 more that stayed on my shelf!)
 

My prize for you is up to 3 of these titles - your choice! - that I will ship to you in continental United States (if you are from outside of the US and happen to win, I will make a deal with you to split the shipping cost 50/50, okay?). There is something for everyone here! Most retailed for anywhere from $15-25 a copy and I am ready for them to find new homes. (And those that are not chosen should be up for sale dirt cheap in the near future!)

Wednesday, August 26, 2015

Perfect Pairings :: Alice Peterson + Ragged Robyn + Grubbi Ceramics

I have a tendency to over complicate my designs. I am often guilty of the 'just one more' school of thought on beading design. So it is always refreshing to me when I see a design that is decidedly uncomplicated. I love the simplicity of this design. The arrow shape of the beads. The spaces giving them a chance to 'breathe,' to be treasured individually and collectively without a lot of 'noise.' This necklace is a very wearable piece of art and I like that.

Featured Designer :: Alice Peterson
+
Featured Bead Artist :: Ragged Robyn + Grubbi Ceramics

Just a friendly reminder... We have a slightly new format for uploading your pictures for consideration for the Perfect Pairings each Wednesday, as well as the Monthly Challenge Recap post.  
We are now using Pinterest! You can find more details in this post about the exciting new changes, including a board devoted to art beads inspired by the monthly challenge!
(Ooh! Look! More pretty beads to lust after!)

Pretty please make sure that you post a link in your Pinterest description so that I have someplace to attribute the picture to! And don't forget to tell us about those art beads!

Deadline to get your pictures posted to the Pinterest boards for the creation of the
Monthly Challenge Recap post is August 28th

TIP: If you upload your photo to pin it rather than pin it from your blog or shop, edit the pin (the little pencil button) and add your link as the source. Save your edits. This will allow us to click directly on your photo and go to your blog or shop to read more about your entry. 

Monday, August 24, 2015

Amuse the Muse - handmade metal beads - with Rebecca of Songbead

Hello all! It's the last week of August - how did that happen?! Here in Scotland, we've had some lovely sunshine (at last!) and I have to say, I'm just not ready for the Summer to end. I'm going to savour every moment left! 

It's handmade metal beads this month on Amuse the Muse, and so here's what I found for you this week. Enjoy!


And now for the BeadBlogger links. Have a great week! 


Rebecca is a Scottish jewellery designer; currently living in the capital city of Edinburgh. You can read more about her and her work at her blog, songbeads.blogspot.com and see more of her jewellery at songbead.etsy.com. She also has a supplies shop at thecuriousbeadshop.etsy.com.


Saturday, August 22, 2015

Book Review: Handcrafted Metal Findings by Denise Peck and Jane Dickerson


I think this is a wonderful book for both the novice and advanced jewelry designer and maker.  It is good for those just starting out in metal because of the skills and equipment you do NOT need to have, like saws, drills, and big tank torches.  It is great for the more advanced person because of the great artistry in the projects chosen to be included:  30 in all as it says on the cover.  The projects include links, clasps, bails, end caps, ear wires, beads, head pins, and bead tabs.  To me this book was written to enhance handmade art beads. 
Let's take a look and see.  For example, Cindy Wimmer's  Twisted Tunnel Bail ( page 60 looks so great with  handmade metal art beads wrapped in wire.  I love the play set up between the two different wire textures and how they enhance each other.

Wrapped open pod bead with feather by Mary Harding Jewelry

Keirsten Giles' Poppy Bead Caps, featured on the cover of the book (see first picture above)  would be a fabulous match with many of the earring drops from 
Claire Lockwood of Something to do Beads 

Scorched and Tattered Drop Earring Charms
Scorched and Tattered Ear Ring Drops by Claire Lockwood of Something to do Beads
Watercolour Wing Charms
                WaterColor Ear Ring Charms by Claire Lockwood of Something to do Beads

I think that the Accordian Link on page 27 designed and made by Jane Dickerson has so much potential when used with art beads, and it introduces you to a very cool tool, the Tube Wringer.


This tool produces a corrugated texture that you can then turn into all sorts of fun findings for your work.  You insert a strip of metal into the corrugating jaws and crank the handle.  Pretty easy to use.  It is quite inexpensive, only  $24.95.  Available at Rio Grande and Rings and Things.

The Accordian Link can be made in a variety of base metals as well as in Sterling Silver, as illustrated.   Like all of the projects in this book, the step by step instructions with pictures are excellent and easy to follow.
Who doesn't love these tiny decorative links designed by Denise Peck?  I tried them out in copper and silver and see endless ways of being creative with them.( pictured on the cover above-- top right)
They would look so great strung with these art beads by NKP Designs
Teal Blues Swirl Sprig Ceramic Beads
                                    Ceramic art beads by NKPDesigns

Denise Peck's Speak to Me Ear Wires

                                    Speak to Me Ear Wires by Denise Peck

would be a great match with some of Claire Maunsell pods like these:

                                              Pod beads by Claire Maunsell


I  hope I have whet your appetite for knowing more about this timely and versatile book and how you can use these metal findings and make them your own with art beads.  You can shop for Handcrafted Metal Findings on Amazon and at the publisher  Interweave.
Thanks so much for stopping by!!!
Mary


Friday, August 21, 2015

Inside the Studio with Heather Wynn Millican (swoondimples)

Each week one of our contributors gives you a sneak peek into their studio, creative process or inspirations. We ask a related question of our readers and hope you'll leave comments! As an incentive, we offer a prize each week to bribe you to use that keyboard and tell us what you think. The following week a winner is chosen at random from all eligible entries.


Congratulations to Cory Tompkins
Yay!! She has won a 20$ gift certificate to Firefly Design Studio.  
Please contact Michelle McCarthy to claim your prize!


Hello and welcome to my very first Inside the Studio post. I have recently initiated a YouTube channel and am hoping to create a series of polymer clay bead and jewelry tutorials. I have been working with polymer clay for near 25 years and have taught students of all ages. My first experience was teaching at a local art supply store. I was 18 at the time and was teaching a class full of children ages 5 through 12. Boy was that fun (and stressful)! My first video, however, was far more relaxed. I wasn't responsible for a room full of littles using butter knives to slice their canes. (butter knives are a bad choice, by the way, but it was my only option at the time) Who wants to hand over a medical grade tissue blade to a 6 year old? not me. And yes, everyone's cane was smooshed but they had fun regardless :)

My husband is incredibly supportive and is well experienced in producing media. This made for a great 'first video' experience. I would love to know what you think and all comments and suggestions are most appreciated. What would you like to learn in polymer clay? Please share your suggestions in the comment section below and a random winner will be chosen to receive a 20$ gift certificate to swoondimples


Happy Friday! 


Thursday, August 20, 2015

a celebration of small - with Julie of Uglibeads!

Hello everyone! I'm back from my lovely oceanside holiday, and it was absolutely wonderful. So much beautiful inspiration, so many amazing people to share special moments with, and a lot of food for thought. We all need that sometimes - to find a way to plug in, to feel more alive, to get deep into what our hearts need to be happy. 

At the moment, my creativity is in one of those 'ebb' phases. Not so much 'flow'. And frankly, I'm ok with that. I've really enjoyed taking the time to reflect. When you're caught up in filling orders, or dreaming up the next best thing, it can be hard to remember to do that. The creative spirit needs time to breathe.


So I've been spending some quality time thinking about the 'little things'. About how crucial those tiny, unassuming, easily overlooked details of life and the world really are. And I think that's what artists do. It's our job to bring attention to the beauty, wonder, and importance of things that are easy to miss... if you look without seeing.

It seems a tad poetic that in my beadmaking life, I've been feeling the most grateful for and inspired by and connected to others by beads that are... little.


I've made thousands of these tiny beads now (my beloved weenie beads!), and I keep coming back to them. During times when I'm feeling a bit untethered, I can always steady myself against the calming repetition of making these simple, tiny beads. One at a time. One after another. Like tying knots between pearls, passing a needle back and forth through tiny seed beads, or soldering links of chain together. 

Creative meditation.

In the beginning, I struggled with the fact that I enjoyed making these beads SO much. Shouldn't I be spending my time making 'important' beads? Big, fancy beads? Really-super-beautiful, technically difficult beads? It was a bit agonizing, really.

But as I started to send the weenie beads off into the universe, I very quickly realized that I needed to rethink my ideas about what makes a handmade bead 'important'. I saw people using them in the most beautiful, clever, creative ways, and I'm so happy (and proud!) that I get to play a part in that.

Karin Grosset-Grange of Ginkgo et Coquelicot created these beautifully serene earrings - "inspired by the hidden treasures of the sea, a ship at the bottom of the ocean, maybe..." using two pairs of my tiny weenie beads, along with gorgeous headpins from Genea Beads:


Angela Gruenke of Contents Jewelry does the most amazing things with metal, and here, she used a tiny etched pair of grey weenie beads to create these fantastical earrings, full of movement and energy:


As I'm sure you are guessing, I could share weenie bead creations with you all day, but just one more - from Sarah Ostriyznick of Sarah O Creations. Timelessly elegant, these feel so perfect for fall! She used a pair of etched transparent olive weenie beads, perfectly complementing the stunning ceramic disks by Mari Carmen of Majoyoal:


I've absolutely fallen in love with the fact that there are so many wonderfully tiny handmade beads out there, and I'm willing to bet that you already have a few in your collection that could use some attention! Perhaps you'll be inspired to have a dig through the bead stash (or do some shopping) a bit later...

In celebration of small, here are some of my favorites. First, these 'Mini Round' ceramic beads by Robyn Cove of Ragged Robyn. The colors and the textures of these beads... the lovely hand-formed, organic shapes... Just absolutely bursting with life, aren't they?


As I was putting my thoughts together about this whole 'tiny but mighty' bead thing, I discovered via her Facebook page that Robyn had been working on listing a whole pile of new work, including this set. I managed to borrow a moment of her time during a busy update day to get her take on things. Robyn said,

"Small beads are what make the more elaborate designs blend and work with other components, especially with my work; the painted surfaces seem to really need a smaller bead with a similar finish elsewhere on the piece. I adore making the small ones because they continue to change throughout the making process. It's the small beads that absorb me into the jewellery making because they can look so different when paired with other colors or textures. I gather them around me in bowls and baskets when making jewellery and scatter them out next to the big pendants to see what ones highlight the more subtle aspects of the work. They are ever changing."

Let's hear it for small beads!!

How about these gorgeous ceramic 'Seed Beads' from Bulgarian art bead maker Nadia Karapencheva of NadiaTerra


The beautiful, soft, subtle surface treatment is engobe (a white or colored slip / liquid clay - and YES, I definitely had to Google that!) fired at 1200 degrees Celcius. Nadia says, "The material is timeless, is not affected by sunlight, water, heat..." and perhaps that is part of the reason that these beads have such a grounded, soothing quality about them. As a glass beadmaker, I'm so drawn to their warmth!

I'll leave you for today with these incredibly beautiful, tiny ceramic beads from Kylie Parry of Kylie Parry Studios, who will surely be familiar to many of you. She made these after returning from an inspiring trip to Costa Rica. Reading her blog post about this series of work absolutely took my breath away - I could nearly smell the earth and the trees and the forest as I looked at her beautiful photographs...


Before I go, a confession. 

Most artists wouldn't choose the 'in hand' photo as their favorite way to show off their work. Typically, it's meant to be useful - a way of communicating the size of the object(s). Of course I chose these photos, in part, to show that these are some seriously beautiful, seriously SMALL beads! Our eyes need a sense of scale so our brains can process these things.

But there's more to it than that. So much more. When I look at these beads - in my hand, Robyn's hand, Nadia's hand, Kylie's hand - I'm reminded of what is SO special about them, and I get a little excited about it.

So yes. A ruler does the job. Or a coin, that works too. But I'm in favor of showing off your stained, dry, scarred, bashed up, wrinkly, paint-covered hands. Because - they're beautiful.

They made something.

xo

Julie

f a c e b o o k : www.facebook.com/uglibeads
i n s t a g r a m : @jules_sontag

Wednesday, August 19, 2015

Perfect Pairs :: Karin G + Scorched Earth


What I like about this piece from our friend Karin in France is that it is very simple and rustic, yet it has a complexity to it. The brick red deerskin lace brings in that earthy color of the textile inspiration. The pendant from Scorched Earth looks as though it were hewed straight from the rocks of the American Southwest. And the bead stitched tube beads are the perfect touch for this necklace.

Featured Designer :: Karin G
+
Featured Bead Artist :: Scorched Earth

Just a friendly reminder... We have a slightly new format for uploading your pictures for consideration for the Perfect Pairings each Wednesday, as well as the Monthly Challenge Recap post.  
We are now using Pinterest! You can find more details in this post about the exciting new changes, including a board devoted to art beads inspired by the monthly challenge!
(Ooh! Look! More pretty beads to lust after!)

Pretty please make sure that you post a link in your Pinterest description so that I have someplace to attribute the picture to! And don't forget to tell us about those art beads!

Deadline to get your pictures posted to the Pinterest boards for the creation of the
Monthly Challenge Recap post is August 28th

TIP: If you upload your photo to pin it rather than pin it from your blog or shop, edit the pin (the little pencil button) and add your link as the source. Save your edits. This will allow us to click directly on your photo and go to your blog or shop to read more about your entry.