Welcome to Studio
Saturday! Each week one of our contributors gives you a sneak peek into
their studio, creative process or inspirations. We ask a related
question of our readers and hope you'll leave comments! As an incentive
we offer a free prize each week to bribe you to use that keyboard.
The following week we choose a random winner.
This week's winner is Kayz Kreationz.
Congratulations! You have won a set of bittersweet disk beads from Heather Powers of Humble Beads.
Send Heather an email with your address and she will get your prize out to you soon.
~~~~~~~~~~~~~~~~~~~~~~~~~~~~~~~~~~~~~~~~~~
This week we visit the studio of
Erin Siegel of Erin Siegel Jewelry
~~~~~~~~~~~~~~~~~~~~~~~~~~~~~~~~~~~~~~~~~~
Hello! Right now, I'm working on magazine submissions. Today, I invite you inside my studio to take a sneak peek at the materials I'm creating with for the Spring 2014 issue of Jewelry Stringing Magazine! It's time to submit jewelry designs for next year's Spring issue, now. And yep, I'm actually sharing with you exactly what I'm working on for the pieces I plan to submit to the magazine. That might seem kinda crazy, but I embrace the idea of freely sharing information that might help someone else find success in getting published. I thought it'd be fun to do a little show and tell to give you a glimpse of my process. I hope this information will help other designers feel more confident about creating jewelry for publication. Getting your jewelry published can be a tricky thing. Personally, I find that challenge fun! There's absolutely no guarantee that anything I make will be selected. All I can do is try my best to follow the magazine's guidelines, let the themes and color palettes provided inspire ideas for my designs and stay true to my own style, esthetic and creative process. Jewelry Stringing is one of my all-time favorite beading magazines. I'm intrigued and captivated by the themes and color palettes the editors come up with to inspire their contributing designers. Come join me now and get a taste for what I'm working on and my process for creating jewelry pieces for this particular magazine. I hope to inspire you to work on your own creations as well and submit your designs.
Jewelry Stringing
provides guidelines, themes and color palettes for each one of their
upcoming issues. You can find the full details and guidelines for
submission here. I've provided some of the information for the Spring 2014 issue here in this post.
The
first theme and color palette for Spring 2014 is "Soft Jewelry". (The
following description is taken from the guidelines on the magazine's
website.)
Soft Jewelry
 | ||||||||||||
| Leather,
ribbon, cord, thread, embroidery floss, and fabric are most commonly used as
stringing materials and structural components in jewelry pieces, but they also
lend themselves to creative and compelling focal elements. Submissions in this
category will range in style, but they should all include fibers, textiles, or
leather as a prominent design feature. Consider highlighting these materials
through techniques like knotting, braiding, and wrapping, or incorporating
current trends like fringe or tassels into your designs. See their Pinterest inspiration board for this palette at: http://pinterest.com/stringingmag/soft-jewelry-spring-2014/ | ||||||||||||
So, here's what I've chosen to work with for this theme: The second theme and color palette for Spring 2014 is "Spring Greens". (The following description is taken from the guidelines on the magazine's website.) | ||||||||||||
Spring Greens
 | ||||||||||||
| If there is one color that ubiquitously
represents springtime, it has to be green. Fresh leaves sprout from the trees,
grass peeks out from beneath snowdrifts, and budding shoots speckle our garden
beds. From subdued mossy shades to high-energy lime tones, each piece in this
category will celebrate spring in all its green glory. See their Pinterest inspiration board for this palette at: http://pinterest.com/stringingmag/spring-greens-spring-2014/ Here are some materials I've chosen to use for this palette and theme: 
Shimmer Floss Ribbon, Czech glass beads, Irish waxed linen and a gold button.
I've got some hand-painted Shimmer Floss ribbon in "Grandma Moses" from Ornamentea.com, green, faceted Czech glass beads, Irish Waxed Linen in "Dark Forest Green" from Jewelry Accord and a matte gold button from the fabric store.
In this palette, I did want to match up with as many of the green colors as I could. The hand-painted shimmer floss helps me pull quite a few of the green
tones in the palette with just that one element. I'll pull in the
darkest green color with the waxed linen cord. Then, I'll pair the
fibers with the contrasting finish of the faceted Czech glass beads and
the button for balance and interest in the piece.
The
third theme for Spring 2014 is "Monochromatic". (The following
description is taken from the guidelines on the magazine's website.)
Here are some beads I pulled from my stash for this category: 
Seed beads from ShipWreckBeads.com and a handmade ceramic bead set by Keith O'Connor.
One hank of "All Mixed Up" size 8 Czech seed beads from Shipwreck Beads
and a graduated ceramic bead set from ceramic artist, Keith O'Connor. I
can't think of a better way to get more colors in than these fantastic
seed bead mixes! They remind me a lot of the African "Christmas" or
"Love" trade beads, which would also be a great choice for this theme.
If you take a look at the Pinterest board for this category above, there
are images of African beadwork. So, obviously those would be an ideal
selection!I hope you've enjoyed following along with me on my journey to creating jewelry for the Spring 2014 issue of Jewelry Stringing magazine. I want to inspire you with ideas that you can use in your own jewelry. If you'd like to try submitting your designs, here is the deadline information and submission guidelines you'll need to know: E-mailed pre-submissions are due September 26th, 2013; physical submissions are due October 10th, 2013. For the rest of the submissions instructions and specifics, please read through the Contributor Guidelines in their entirety here.
Do you submit your jewelry to any beading magazines?
Would you like to see your designs published?
Why or why not?
 Leave a comment answering any of the above questions and you will be entered for a chance to win an Irish Waxed Linen Cord Color Mix courtesy of the Jewelry Accord shop on Etsy! By the way, this green color cord mix from Jewelry Accord would be an excellent material choice for jewelry project submissions to the "Spring Greens" color palette shown above! Happy Beading! Erin Siegel is a jewelry designer, beading instructor and co-author of the jewelry book, Bohemian-Inspired Jewelry: 50 Designs Using Leather, Ribbon and Cords. To find out more, visit her blog: Erin Siegel Jewelry. |

Showing posts with label Erin Siegel. Show all posts
Showing posts with label Erin Siegel. Show all posts
Saturday, September 14, 2013
Studio Saturday with Erin Siegel


Tuesday, August 13, 2013
Fiber Findings and Finishing Techniques for Jewelry WEBINAR

Enhance your knowledge and understanding of how to use the findings available on the market today that can be used with fibers. Add wire-wrapping and knotting techniques to your jewelry-making repertoire that you can use to finish off fibers in your projects with full color, step by step photos and thorough explanations. Follow along with me live as I take you through an in-depth look at all the methods and techniques I use to finish off leather, ribbons and cords cleanly and professionally. After the presentation, you will get a chance to ask me any questions you like and I will do my very best to answer them!
With Fiber Findings and Finishing Techniques for Jewelry, you will...
- Get a list of essential tools for making jewelry with fibers including an explanation of each tool, what I use it for and why I like it.
- Take a close look at my favorite findings to use with fibers. Get an explanation of each one, the types to buy and why I like them. Get my suggestions for which fibers to use with which findings and learn how to properly use each one with clear, step-by-step photo tutorials.
- Learn my favorite wire-working and knotting techniques to finish off fibers with step-by-step photos and detailed instructions.
- Get answers to any questions you have on the subject!
I hope you can join me for my live webinar on August 15th, but if you can't make it, don't worry! You can still purchase the full presentation at the Interweave store and access it at anytime after the webinar goes live on the 15th.Thank you and hope to see you there!
Erin Siegel is a jewelry designer, beading instructor and co-author of the jewelry book, Bohemian-Inspired Jewelry: 50 Designs Using Leather, Ribbon and Cords. To find out more, visit her blog: Erin Siegel Jewelry.
Saturday, July 20, 2013
Studio Saturday with Erin Siegel
Welcome to Studio
Saturday! Each week one of our contributors gives you a sneak peek into
their studio, creative process or inspirations. We ask a related
question of our readers and hope you'll leave comments! As an incentive
we offer a free prize each week to bribe you to use that keyboard.
The following week we choose a random winner.
The following week we choose a random winner.
This week's winner is Erin S.
Congratulations, Erin! You have won a hydrangea pendant from Heather Powers of Humble Beads.
Send Heather an email with your address and she will get your prize out to you soon.
Send Heather an email with your address and she will get your prize out to you soon.
~~~~~~~~~~~~~~~~~~~~~~~~~~~~~~~~~~~~~~~~~~
This week we visit the studio of
Erin Siegel of Erin Siegel Jewelry
Erin Siegel of Erin Siegel Jewelry
~~~~~~~~~~~~~~~~~~~~~~~~~~~~~~~~~~~~~~~~~~

As long as I can remember, I’ve always been fascinated by the Native American culture. From their deep respect and reverence for nature, to their great spiritual teachings, to their beautiful handcrafts and beadwork. One Native American tradition I have always loved and gravitated towards is the dream catcher.
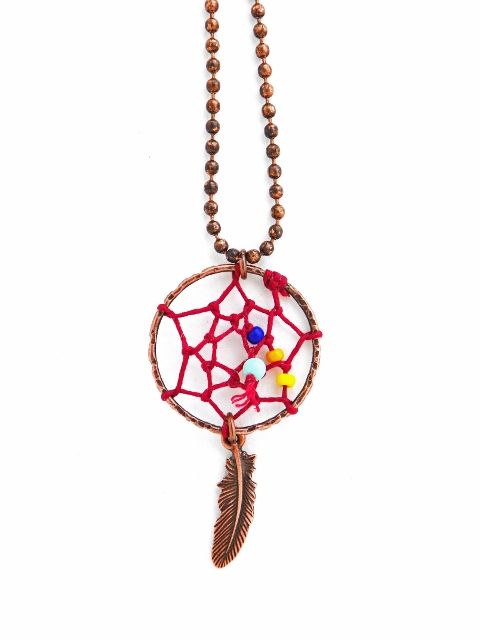
Today, I’m going to be sharing with you how to make your own dream catcher-inspired pendant to capture the dreams, goals and positivity you want to bring into your life! You will learn the traditional weave to make the web of the dream catcher, then you can embellish your pendant with a variety of beads, feathers and/or charms to represent those dreams, hopes and wishes you want to catch. The finished pendant can be worn on it's own or you can incorporate it into your own beaded jewelry design. The act of making this pendant is a hands-on, creative way to realize your dreams, while making a keepsake with special meaning that you can wear and keep as a reminder of the things that are important to you. But, before I get into showing you how to make your pendant, I want to share with you a little bit about the origins of the dream catcher and a Native American dream catcher legend. I hope you will find this to be fun, informative and inspiring!
Origins of the Dream Catcher:
The Ojibaway or Chippewa were the first to design these decorations to protect their babies against bad dreams that might come along in the night. Both good and bad dreams would be caught by the web, but only good dreams could find their way through the hole and slide down the feather to the baby’s head. The bad dreams, not knowing the way, would get caught in the web and dissipate with the first rays of morning light.
Since the beginning, many Native American tribes have adopted the dream catcher and incorporated it into their heritage. The Lakota are one such group that have done this. The following is their story of the dream catcher:

Next weekend I'm taking my 2 1/2 year old daughter to her first Native
American Pow Wow. I hope she enjoys the flute music, drumming, dancing,
storytelling and crafts. She's already familiar with dream catchers.
Before she was born, I was gifted a beautiful dream catcher handmade by a
Native American woman I know. It hangs above her bed now.
As long as I can remember, I’ve always been fascinated by the Native American culture. From their deep respect and reverence for nature, to their great spiritual teachings, to their beautiful handcrafts and beadwork. One Native American tradition I have always loved and gravitated towards is the dream catcher.
Today, I’m going to be sharing with you how to make your own dream catcher-inspired pendant to capture the dreams, goals and positivity you want to bring into your life! You will learn the traditional weave to make the web of the dream catcher, then you can embellish your pendant with a variety of beads, feathers and/or charms to represent those dreams, hopes and wishes you want to catch. The finished pendant can be worn on it's own or you can incorporate it into your own beaded jewelry design. The act of making this pendant is a hands-on, creative way to realize your dreams, while making a keepsake with special meaning that you can wear and keep as a reminder of the things that are important to you. But, before I get into showing you how to make your pendant, I want to share with you a little bit about the origins of the dream catcher and a Native American dream catcher legend. I hope you will find this to be fun, informative and inspiring!
Origins of the Dream Catcher:
The Ojibaway or Chippewa were the first to design these decorations to protect their babies against bad dreams that might come along in the night. Both good and bad dreams would be caught by the web, but only good dreams could find their way through the hole and slide down the feather to the baby’s head. The bad dreams, not knowing the way, would get caught in the web and dissipate with the first rays of morning light.
Since the beginning, many Native American tribes have adopted the dream catcher and incorporated it into their heritage. The Lakota are one such group that have done this. The following is their story of the dream catcher:
Legend of the Dream Catcher (Lakota)
Long ago an old spiritual leader was high on a mountain and had a vision. A teacher of wisdom appeared in the form of a spider. The spider picked up the elder’s willow hoop and began to spin a web. She spoke to the elder about the cycles of life. She said, “In each time of life there are many forces, some positive and some negative. If you listen to the positive forces, they will steer you in the right direction. If you listen to the negative forces, they will lead you astray.”
When the spider finished speaking, she gave the elder the web and said. “The web is a perfect circle with a hole in the center. Use the web to help your people reach their goals, making good use of their ideas, dreams and visions. If you believe in the Great Spirit, the web will catch your good ideas, let them float through the hole and down the feather upon you.” The elder passed on the vision to the people. Now, many hang a dream catcher above their bed to sift their dreams and visions. The good thoughts are captured in the web of life and dropped down to the person, the negative thoughts are caught in the web and perish at daybreak, never to be a part of their lives.
Now, I don’t know about you, but I would really like to adopt this concept! Who’s with me? Okay, let’s make some dream catcher pendants to wear to catch those good dreams from the air and let them float down into our hearts!

Tools:
Instructions:
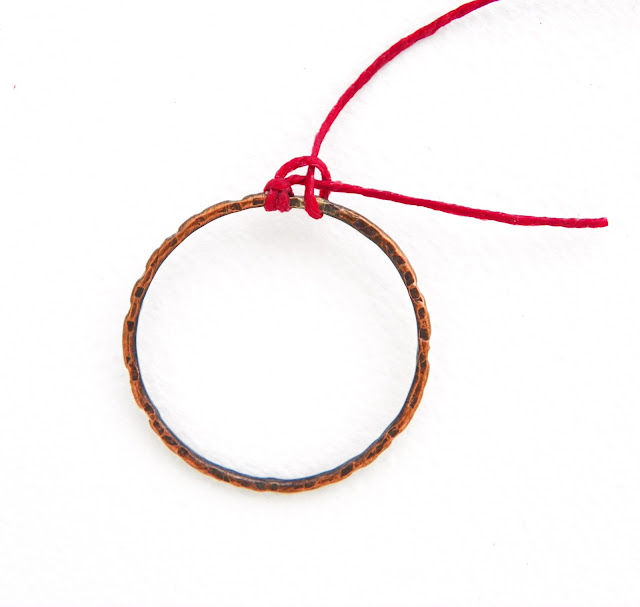
1. Use the cord to make a 1” fold at one end. Use the folded end to form a lark’s head knot around the copper ring as shown in photo 1.

3. Trim the tail. Pull the cord down so that it sits on the inside of the copper ring as shown in photo3.


5. Bring the cord around the first loop created in step 4 and through the loop as shown in photo 5.
 6. Continue looping in the same matter adding seed beads as shown in photo 6. Loop around the inner diameter of the ring twice.

7. Use the cord to string one 4mm bead; tie and overhand knot and trim cord as shown in photo 7.

 How about you?
Do you feel inspired by the dream catcher? or Do you find inspiration in the traditions of another culture other than your own?
Please share and tell me all about it. I want to know!
.jpg)
Long ago an old spiritual leader was high on a mountain and had a vision. A teacher of wisdom appeared in the form of a spider. The spider picked up the elder’s willow hoop and began to spin a web. She spoke to the elder about the cycles of life. She said, “In each time of life there are many forces, some positive and some negative. If you listen to the positive forces, they will steer you in the right direction. If you listen to the negative forces, they will lead you astray.”
When the spider finished speaking, she gave the elder the web and said. “The web is a perfect circle with a hole in the center. Use the web to help your people reach their goals, making good use of their ideas, dreams and visions. If you believe in the Great Spirit, the web will catch your good ideas, let them float through the hole and down the feather upon you.” The elder passed on the vision to the people. Now, many hang a dream catcher above their bed to sift their dreams and visions. The good thoughts are captured in the web of life and dropped down to the person, the negative thoughts are caught in the web and perish at daybreak, never to be a part of their lives.
Now, I don’t know about you, but I would really like to adopt this concept! Who’s with me? Okay, let’s make some dream catcher pendants to wear to catch those good dreams from the air and let them float down into our hearts!
Materials needed:
3 size 8 seed beads in assorted colors
1 feather charm
2 metal 4mm jump rings
18” of 4ply Irish waxed linen cord (color of your choice)
A kit containing all the materials needed and instructions can be found in my Etsy shop here.
Tools:
Scissors
A pair of chain nose pliers (to attach the jump rings)
Instructions:
1. Use the cord to make a 1” fold at one end. Use the folded end to form a lark’s head knot around the copper ring as shown in photo 1.

2. Using the long end of the cord, form a half-hitch knot around the copper ring and the 1” tail as shown in photo 2.

3. Trim the tail. Pull the cord down so that it sits on the inside of the copper ring as shown in photo3.

4. Bring the cord around the copper ring and through the loop as shown
in photo 4. This is called looping. Continue making loops around the
ring 5 more times. Add seed beads as desired.

5. Bring the cord around the first loop created in step 4 and through the loop as shown in photo 5.


7. Use the cord to string one 4mm bead; tie and overhand knot and trim cord as shown in photo 7.

8. Use 1 jump ring to attach a feather charm to the pendant. Use another
jump ring to attach a chain or necklace cord to the pendant and enjoy!
Do you feel inspired by the dream catcher? or Do you find inspiration in the traditions of another culture other than your own?
Please share and tell me all about it. I want to know!
Leave
a comment answering any of the above questions and you will be entered for a
chance to win one of my Dream Catcher Pendant Kits!
Thanks for joining me today!
Erin Siegel is a jewelry designer, beading instructor and co-author of
the jewelry book, Bohemian-Inspired Jewelry: 50 Designs Using Leather,
Ribbon and Cords. To find out more, visit her blog: Erin Siegel Jewelry.
Saturday, May 25, 2013
Studio Saturday with Erin Siegel
Welcome to Studio
Saturday! Each week one of our contributors gives you a sneak peek into
their studio, creative process or inspirations. We ask a related
question of our readers and hope you'll leave comments! As an incentive
we offer a free prize each week to bribe you to use that keyboard.
The following week we choose a random winner.
The following week we choose a random winner.
This week's winner is Pam of Klassy Joolz!
Congratulations, Pam! You have won your choice of a mushroom pendant or a pair of yellow tulip charms from Erin Prais-Hintz of Tesori Trovati Jewelry!
Send Erin PH an email with your address and she will get your prize out to you soon!
Send Erin PH an email with your address and she will get your prize out to you soon!
~~~~~~~~~~~~~~~~~~~~~~~~~~~~~~~~~~~~~~~~~~
This week we visit the studio of
Erin Siegel of Erin Siegel Jewelry
~~~~~~~~~~~~~~~~~~~~~~~~~~~~~~~~~~~~~~~~~~

Here is my current studio space!
I realized I've never ever shared my actual jewelry studio here on Studio Saturday! Mainly,
that's because it is usually in such a disastrous state that I wouldn't
wish to show anyone on a good day. Recently, I received a much
needed reprieve when the grandparents took my 2 1/2 year old daughter, Nora off my hands for a weekend. What
did I do with my rare freedom from motherly duties? I cleaned out my
whole studio from top to bottom. Obviously, you can clearly see where my
priorities lie. As soon as I get a moment to myself, I go straight to
fixing up my studio! Oh, and deciding to take on that task was not that
fun, mind you. There were huge boxes upon boxes of stuff piled up under
the desk, items and paperwork that I had been avoiding dealing with for
over a year and a mish-mash of beads and findings in every corner that
had been thrown every which way. In my defense, I did have some help
with the beads going everywhere part. There's a 2 1/2 year old cutie pie around here
that loves to play with Mama's beads. ;) Even with all that work, there
is plenty more I would love to do with my space, but at least it is
clean, the top of the desk is clear and I can work in there once again.
It was all well worth the effort. So, let me take you on a mini tour!
In the top picture above, you see my main work surface where I create my pieces. Here is where I keep some of my finished jewelry
and favorite displays, a few bead storage units, my essential
jewelry-making tools and some bead bowls and baskets. I love the colorful art
piece on my wall. It makes me happy to look at it. I would love to hang more art on the walls soon!

This wall is directly behind the desk and chair. The pegboard expands across almost the entire length of the wall. Over the years of making jewelry, I've learned I work most efficiently when I have my supplies out where I can see them all the time and can get to them quickly and easily.
My pegboard wall holds materials and tools I use on a regular basis:
metal gauge wire and beading wires, rulers and measuring tapes,
scissors, hammer, metal and leather punches, bead stops and misc. tools,
silk knotting cords, leather cords, suede lace, hemp, cotton and Irish
waxed linen cord, silk cords, dupioni ribbon, sari ribbon and fibers,
glass beads, gemstones and wood beads.
I've had a few people ask me where I have acquired some of the items I have in my studio space. In case you are wondering, too, I have provided the following handy list of resources! I hope you enjoy the links and information. If you'd like to know about something that is not on this list, just ask me in the comments!
Clear-front Multi-Drawer storage unit: The Container Store
Small Ceramic and Metal bowls: Sur La Table
Handcrafted Driftwood Necklace and Bracelet Displays: Miss Fickle Media on Etsy
Woven Silk Easel Necklace stands: Fire Mountain Gems
Hemp Pedestal Necklace stands: Michaels Arts & Crafts Stores
Natural Linen Earring displays: Rio Grande
White Pegboard, pegs, hooks and accessories: Amazon.com
Clear Plastic boxes for bead storage on pegboard: Fire Mountain Gems
Studios and organization is such an interesting topic for jewelry makers because anyone who works with beads knows the dilemma of bead storage and setting up a creative space that works. It is the bane of our existence! Isn't it? There seems to be no easy answer or solution for most of us. Ideally, I'd love to have absolutely every bead and finding visible at a glance. Just like when you walk into a bead shop, everything is out where you can see it!
How about you?
How do you like to organize your work space?
Do you have any tips or tricks you are willing to share?
Know of any resources for great bead storage ideas?
Help us get organized! Please share in the comments! I'd love to hear your thoughts on studios and organization.

20-piece storage container from Ornamentea.com
Leave a comment answering any of the above questions and you will be entered for a chance to win this 20-piece, aluminum storage container from Ornamentea.com to organize your beads or findings!
Leave a comment answering any of the above questions and you will be entered for a chance to win this 20-piece, aluminum storage container from Ornamentea.com to organize your beads or findings!
Thanks for joining me today. Happy creating and organizing!
Erin Siegel is a jewelry designer, beading instructor and co-author of
the jewelry book, Bohemian-Inspired Jewelry: 50 Designs Using Leather,
Ribbon and Cords. To find out more, visit her blog: Erin Siegel Jewelry.
Tuesday, May 14, 2013
Color Cord Mixes and a Free Bracelet Project
.jpg)
Color Cord Mixes from the Jewelry Accord Shop
Need a jumping off point for your next jewelry design? Try a color cord mix from the Jewelry Accord Shop on Etsy. Lori Eurto does a fantastic job of creating pretty bundles of inspiration with her colorful Irish waxed linen cord palettes. I love the alluring combinations she puts together and I enjoy the fun names she dons them, too!

Are you looking for a place to start on a jewelry design to enter into our Art Bead Scene Monthly Challenges? Lori has been creating color cord combinations inspired by the art piece chosen by the Art Bead Scene team. Look to the Jewelry Accord shop each month to be inspired and pick up a few cord bundles to get creating. You can also request a custom color cord mix to be made in any palette you choose. She may even name a new color mix in her shop after you!

My friend Lori and I share a passion for Irish waxed linen cord. It's one of our favorite materials to work with. She invited me to design a special jewelry project and tutorial to post on her blog highlighting our beloved waxed linen cording. I'm thrilled to share the project here. I created a simple bracelet. The materials may be humble, but the design is one I would wear on a daily basis. Those are the kind of pieces I love to make the most. The everyday jewelry. I love the texture and look of the knotted multiple gemstone strands, the joyful colors of the waxed linen cord and the gorgeous, hand-crafted copper button by Barbara Bechtel of Second Surf Studio on Etsy. The techniques are easy. These simple, tried and true knotting techniques I use over and over in my jewelry. This basic bracelet project is a great example of how easy it is to incorporate Lori's color cord mixes featured in her Jewelry Accord Shop in a jewelry design!

Fortuneteller’s Bracelet
.jpg)
.jpg)
.jpg)
.jpg)

Fortuneteller’s Bracelet
Erin Siegel
Sodalite is said to be the
stone of “insight”. The bright, colorful threads of waxed linen cord remind me
of a long, flowing gypsy skirt that a fortuneteller might wear.
Materials
72 Sodalite 6mm rounds
1 copper 20mm artisan button
by Second Surf Studio
4’feet EACH of 4ply Irish
waxed linen cord in the following colors: Plum, Fuchsia, Red and Sage
Tools
Scissors
Ruler
Finished size: 7 ½”
.jpg)
1: Hold the four pieces of
linen cord together at their centers. Tightly twist the centers of the 4 cords
together for 2”. Fold the cords in half and form an overhand knot, leaving a ¾”
loop of twisted cord.
.jpg)
2: Separate 2 cords. Use 1
cord to string 1 Sodalite round. Use both cords to form an overhand knot after
the bead. Repeat 17 times. Repeat entire step for remaining cords.
.jpg)
3: Use all 8 cords to form an
overhand knot. Separate cords in half and form 3 square knots.
.jpg)
4: Use 4 cords to string one
buttonhole. Repeat for the other buttonhole. Form a square knot on top of the
button. Trim cords to ¼”.
Resources:
Sodalite rounds: FireMountain Gems. Waxed linen cord: Jewelry Accord on Etsy. Copper button: Second SurfStudio on Etsy.
Erin Siegel is a jewelry designer, beading instructor and co-author of
the jewelry book, Bohemian-Inspired Jewelry: 50 Designs Using Leather,
Ribbon and Cords. To find out more, visit her blog: Erin Siegel Jewelry.
Saturday, February 23, 2013
Studio Saturday with Erin Siegel
Welcome to Studio
Saturday! Each week one of our contributors gives you a sneak peek into
their studio, creative process or inspirations. We ask a related
question of our readers and hope you'll leave comments! As an incentive
we offer a free prize each week to bribe you to use that keyboard.
The following week we choose a random winner.
The following week we choose a random winner.
This week's winner is Cheri of Creative Designs by Cheri! Congratulations, Cheri! You have won Ephemera Pendants from Marie-Noel Voyer-Cramp of Skye Jewels! Send Marie an email with your address and she will get your prize out to you soon!
~~~~~~~~~~~~~~~~~~~~~~~~~~~~~~~~~~~~~~~~~~
This week we visit the studio of
Erin Siegel of Erin Siegel Jewelry
~~~~~~~~~~~~~~~~~~~~~~~~~~~~~~~~~~~~~~~~~~

www.beadcruise.com
I'm preparing for a trip of a lifetime aboard a luxury cruise liner! I have dreamed of this since I first heard it even existed. Yep, I'm going on the Bead Cruise 2013, March 1st - March 9th hosted by our fearless leader in the bead community, the gracious, Heather Powers. I jumped at the chance to be apart of her Bead Cruise. Perfect combination of a little bit of business with a whole LOT of pleasure. Plus, it's amazing opportunity for me to do something I have never done before. It's my very first cruise ever and really this will be my first trip outside the US, besides Canada. Geesh, I'm 35. I think it's about time I saw the world a little! I had to rush and get my passport for the first time, too and everything. Well, I got my passport in plenty of time and I'm ready to get away on this cruise!

.jpg)
In fact, I've already been inspired by the cruise before even stepping onto the boat. I made myself these Reggae-Inspired color block earrings to wear on the beach in Jamaica!


Bohemian Knotted Earring Kits
available for purchase in my Etsy Shop


Not only am I teaching a class, but I'll have the opportunity to take two of the classes offered on the cruise. Ronna Weltman's Go Organic With Polymer Clay and Kerry Bogert's Sweet Tweeter class. I'm very excited for both of these classes! I'm thrilled to have the time to connect and learn from these two amazing artists, authors and instructors.This is a rare opportunity because most times when you are teaching at an event, you won't have the chance to take any classes yourself or even just chat with the other instructors.

I can't wait for this journey to begin and I know it will not end once I step off the boat. I will forever hold the memories from the trip and the experience. The places we visit will influence and inspire my future jewelry designs for years to come, which leads me to my questions for you this week:
Have your travels influenced your jewelry designs? Where have you gone? How have those places inspired your creating?
.jpg)
Leave a comment answering any of these questions and you will be entered for a chance to win one of my new Dream Catcher Pendant Kits in my Etsy Shop.
Thank you for joining me today and Bon Voyage!
Erin Siegel is a jewelry designer, beading instructor and co-author of the jewelry book, Bohemian-Inspired Jewelry: 50 Designs Using Leather, Ribbon and Cords. To find out more, visit her blog: Erin Siegel Jewelry.
Saturday, January 5, 2013
Studio Saturday with Erin Siegel
Welcome to Studio
Saturday! Each week one of our contributors gives you a sneak peek into
their studio, creative process or inspirations. We ask a related
question of our readers and hope you'll leave comments! As an incentive
we offer a free prize each week to bribe you to use that keyboard.
The following week we choose a random winner.
The following week we choose a random winner.
This week's winner is Kathy Lindemer! Congratulations, Kathy! You have won a goodie bag from The Curious Bead Shop from Rebecca! Send Rebecca an email with your address and she will get your prize out to you soon!
~~~~~~~~~~~~~~~~~~~~~~~~~~~~~~~~~~~~~~~~~~
This week we visit the studio of
Erin Siegel of Erin Siegel Jewelry
~~~~~~~~~~~~~~~~~~~~~~~~~~~~~~~~~~~~~~~~~~
.jpg)
Yoga-Inspired Jewelry and Works-In-Progress in the Studio.
Buddha Head Pendant by Second Surf
Serenity Lotus Earrings in my shop
Namaste Bracelet in my shop
Lotus Pendant by Second Surf
Serenity Lotus Earrings in my shop
Namaste Bracelet in my shop
Lotus Pendant by Second Surf
My jewelry is very me. I use jewelry-making as my chosen medium to express myself. Most often, my pieces are a direct reflection of me, what's going on in my life at the time and what inspires me. I love to create jewelry that I'm excited about wearing each and everyday.
As the new year rolls around, I always find myself thinking about self-care and developing healthy habits. One of those things is starting a new yoga practice. One of the things I can do to make that more fun and easier to incorporate into my life is to create yoga-inspired jewelry! Not only is it fun but, creating and wearing yoga-inspired jewelry helps me keep my goals and good intentions at the forefront of my mind no matter what I'm doing though out the day. Whether I'm making a bracelet or wearing a necklace, I will keep my goals in mind and stay inspired and motivated. I love being able to use my creativity as an advantage to better myself in this kind of way.
Also, bringing yoga into my jewelry helps me to integrate my creative life with the rest of my life goals. Something I've had trouble doing in the past. Many of us tend to compartmentalize our lives into separate categories that don't necessarily mix. I'm trying to remind myself that my life is a whole and all the facets of it are connected. There may be multiple facets, but they are all on one beautiful jewel!
Do you think of your life as a whole? How do you meld your creative life with the rest of your life? Do you have trouble fitting all the pieces together to work as one? What ways do you use your jewelry and creativity to help or enhance other areas of your life?
Leave
a comment answering any of these questions and you will be entered for a
chance to win a polymer clay Buddha Pendant from Barbara of SecondSurf.com.
.jpg)
Erin Siegel is a jewelry designer, beading instructor and co-author of
the jewelry book, Bohemian-Inspired Jewelry: 50 Designs Using Leather,
Ribbon and Cords. To find out more, visit her blog: Erin Siegel Jewelry.
Thursday, January 3, 2013
January Monthly Challenge Sponsor + Prizes
Our wonderful sponsors for the January Monthly Challenge.
We will have 2 lucky winners this month.
.jpg)
Erin Siegel designs jewelry, is an instructor and book author. She creates bohemian style jewelry using different types of beads and jewelry finding. Erin incorporates art beads into many of her designs. Catch her on the Bead Cruise!
: : :


Sarah Hornik of Glass by Sarah is a lampwork bead artist living in Tel Aviv, Israel. My favorite beads of Sarah are the multi-color, non traditional shapes with lots of bumps. She also is an instructor teaching her craft locally and in other countries.
Visit Sarah on their website, blog, Etsy (beads and eBooks), Etsy (jewelry), eBay and Facebook.
: : :
: : :
Submit photos of your wonderful creations using one or more Art Beads.
Black Peacocks with Japanese Persimmons by Jessie Arms Botke has with many different elements that can be used for inspiration: trees, persimmons, peacocks, teal green, golds, eyes and foliage.
We can't wait to see where your creativity takes you with the art for this months challenge!
Please remember to put JAN ABS in the title or tag of your submission(s).
Provide us with the artist of the Art Beads used and we always love to know all the materials you used.
Art Beads MUST be used in your entry.
Art Beads MUST be used in your entry.
Subscribe to:
Posts (Atom)