Showing posts with label bracelet tutorial. Show all posts

Thursday, January 14, 2016

Easy Heart Charm Bracelet by Michelle McCarthy

Here's a new twist on a bracelet clasp....a heart charm!  I have made this fun and easy waxed linen bracelet with buttons, 12mm round beads and toggles, but never a charm.  I think it's a cute option from the others.  I love the way it dangles down instead of lining up with the gemstone beads.  Here's what you need to make your own version:


You need 30" of 3 ply waxed linen, 8" of 1mm leather, a closed metal ring, gemstone strand and a heart charm.  I handmade my heart charm out of ceramic clay, but choose colors and shapes that you love!

Here's the finished design:


Start your overhand knotting at the closed metal ring by folding the waxed linen in half and pushing the knot tight up to the ring.  You can put both strands through the gemstone bead or 1 strand and leave 1 strand behind the bead.  Make another overhand knot and push it tight up to the bead.  Continue this pattern for 6 1/2" and then attach the charm by making another knot through the wire loop.  I made 4 extra knots before I attached the charm so the charm would not be too tight up against the last gemstone.  Fold the leather piece in half and attach it to the closed metal ring with another overhand knot.  Measure how big you need the leather loop to be so the charm freely can pass through it.  Close the leather loop with another overhand knot.  I used GS Hypo Cement glue to secure the leather knots.

Have fun making a charm clasp bracelet of your own!

Thursday, January 22, 2015

Irish waxed linen macrame button loop clasp tutorial

Hello and happy Thursday everyone! Today, I'm bringing you a tutorial which I shared on my own blog last year. We are mid-January right now and for most of us that means chilliness, darkness and a long, long month post-Christmas. However, I'm sure I'm not the only one looking ahead to the warmer months (hurry up Spring!) and thinking of lighter, brighter and more playful styles and designs. For me, that very much means reaching for the Irish waxed linen cording, and some of my favourite art beads. I hope you enjoy this wee tutorial! 

I've always been a little unhappy with linen cord loops, worrying that they weren't quite sturdy enough, even covered with beads, to really work as a clasp. Last year, I had a brainwave whilst making a knotted bracelet - I had two really long tails left, and I came up with the idea of half-hitching one cord onto another to see what would happen. I am sure that many, many people have done this before me, and I'm certainly not claiming this as my own - but it was definitely a lightbulb moment for me! I thought I'd share what I did with you here. I've used 7ply Irish waxed linen cording in Lilac - 7ply is a great choice for bracelets (which need to stand up to a bit more rough and tumble than earrings or necklaces) because it's almost twice as thick as 4ply, but still goes through most beads with a little practice.

1. Finish knotting the main part of your bracelet, ending with two loooong cord ends. If you like, you can leave one much longer than the other so as not to waste too much. You do need a lot of cord to knot with for this! I'm not a measurer, but you may want to work out exactly how much cord you'll need after you've made a couple. My brain just doesn't work like that! 

2. Bring one cord (the working cord) over the other to make a u-shaped loop. 

3. Bring the working cord back through the loop. 

4. Pull snug to form a half-hitch knot. 

5. Repeat these half-hitch knots, using the same working cord, to form this spiralling rope. 

6. Tie the working cord around the base of the rope to form a loop. I tie a double knot and then added a few beads to the tails, crimping them on. 

7. Here's the finished bracelet! And another one with different cord/beads below:


Pressed glass, 7ply Irish waxed linen cord and Vintaj brass crimps from - 


 Rebecca is a Scottish jewellery designer; currently living in Edinburgh, capital of her native land. You can read more about her and her work at her blog, songbeads.blogspot.com and see more of her jewellery at songbead.etsy.com. She also has a supplies shop at thecuriousbeadshop.etsy.com.

Tuesday, January 6, 2015

Tutorial Tuesday: Tree of Life Layered Bracelet


Hello Art Bead Scene friends! Happy 2015! 

It's Tutorial Tuesday and I'm kicking off the new year with a layered, cuff-like bracelet design.

This design is fun and fabulous for using up short pieces of chain you might have hanging around in your stash.
I chose to use sterling silver and silver filled components in my design but it works well with any choice of metals.


Materials:
size 8 Miyuki glass seed beads - I used my own custom mix in blues
18 - 25 4 mm Lapis rounds
28 - 35 4 mm Czech glass beads - navy blue         
5 - 10   6 mm Czech glass beads - white
3 lengths of sterling silver chain
Variety of sterling silver beads
      1- 2x2 big hole bead
      1- 2x4 big hole bead
      2- 2x2 textured crimp beads
      1 big hole bali bead
      5 bali spacer beads
      3 - 7  4 mm sterling rounds
1 pair of 3 to 1 connector
1 embossed tree of life toggle clasp
9 - 6 mm jump rings

Determine the length of your finished bracelet. Subtract 1.25 in. to account for the toggle clasp and the 3 to 1 connectors. The result is the length of strung beads and/or chain needed in each layer.

Each layer will consist of one section of strung beads and one section of chain connected to a jump ring.


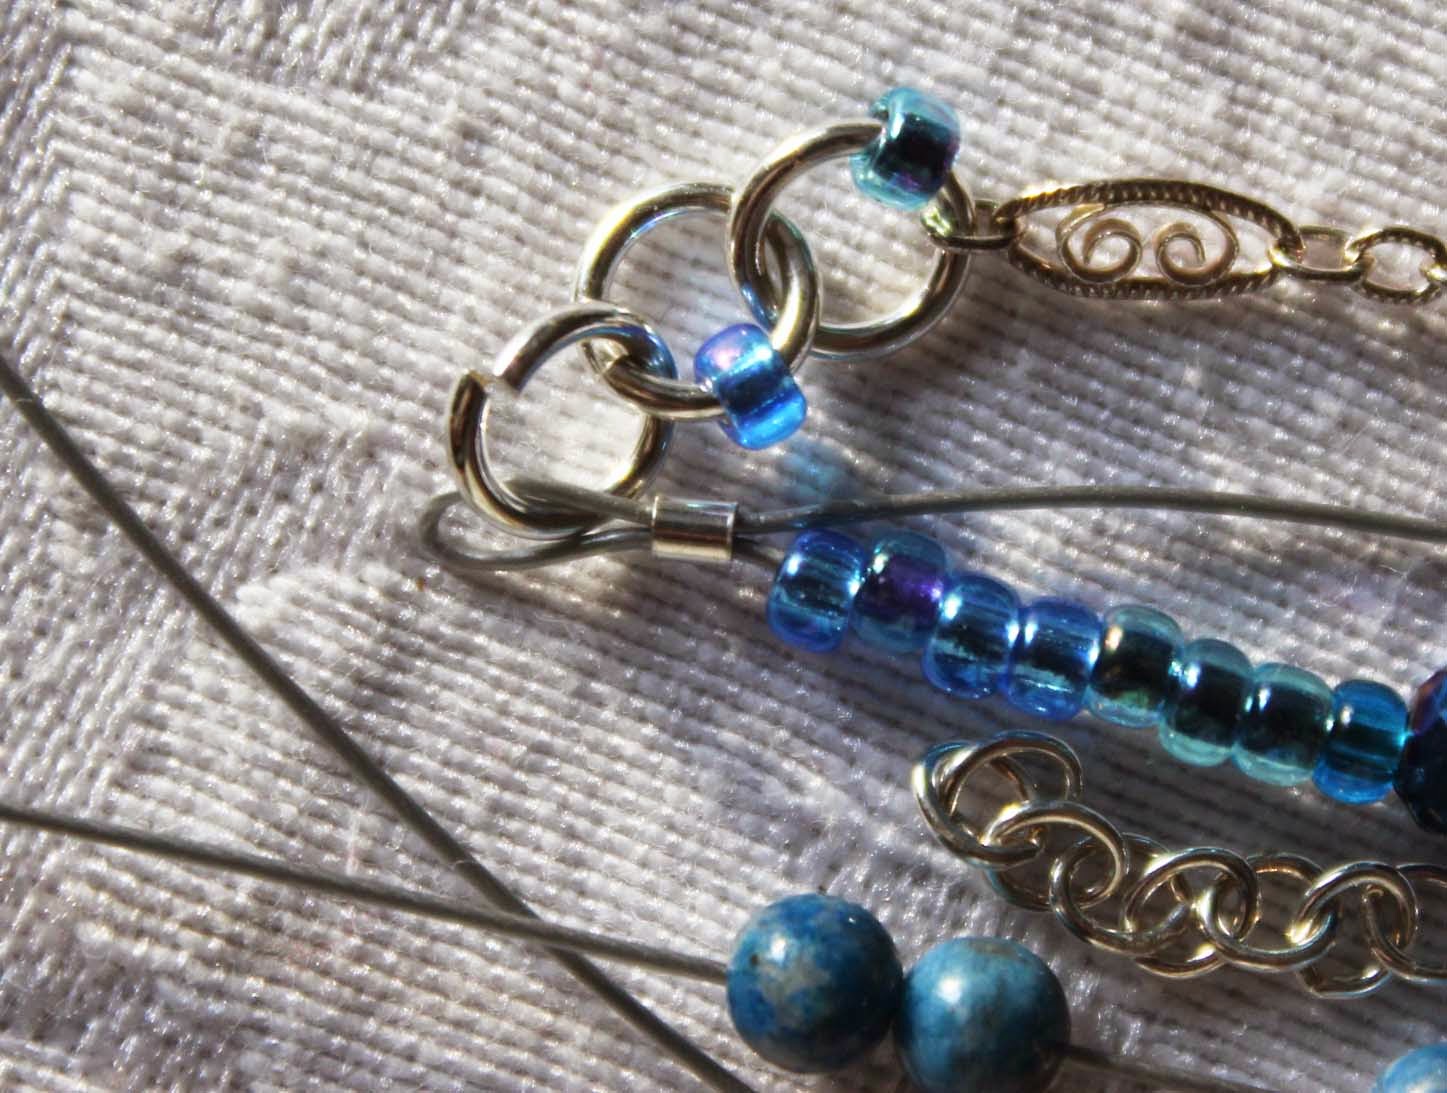
Begin the design by adding one length of chain and one length of stringing wire to a jump ring.


The first length of strung beads will consist of mostly seed beads with a couple of different design elements for interest. 

String on 9 seed beads, 1- 6 mm czech glass bead (to be used a stop bead), 13 seed beads, add one sterling large hole bead over the seed beads, 1-6 mm czech glass bead (to be used as a stop bead).


 The large hole sterling bead will float freely over the seed beads, between the czech beads for interest and movement in the piece.


Add 12 seed beads, 1-4 mm czech glass, 1 sterling spacer, repeat pattern ending with a czech glass bead. Continue stringing seed beads until desired length is reached. I added another czech glass in amongst the seed beads.

Attach the end of the strung beads to a jumpring using a crimp tube and snug up the string. I recommend leaving the crimp bead in an uncrimped state until you've completed all your layers. 


Once the first section is complete layout your design ideas to get an idea of the direction of the piece. When I'm creating a layered piece I aim for variety and an overall balance in placement of the beads. 


To begin the second layer attach a chain and a stringing wire to a jump ring (as in step 1 above).


 String on 12 round lapis beads, 1- 6 mm czech glass ( to be used as a stop bead), 16 seed beads, 1- 6 mm czech glass (to be used as a stop bead), 6 round lapis beads to complete the stringing.

Roughly finish the end of the stringing wire with a crimp bead (as stated in the first layer) and attach this section and a chain to a jump ring.


For the third and final layer in this bracelet we'll begin in the same manner as in step 1 above by attaching the stringing wire and chain to a jump ring.

String on 3 czech glass, 1 sterling tube bead, 1 sterling bali bead, 1 tube bead, 1-4 mm czech glass, 1-6 mm czech glass, 1- 4 mm czech glass, a sterling round, repeat this pattern two more times, 14 - 4 mm czech glass beads, 3 sterling spacer beads and finish to desired length with the czech glass beads.


Finish the end in the same manner as the previous layers by loosely securing the ends.


I'm taking one final look at the overall design. I decided I was happy and went ahead and finished each section by crimping the ends and trimming the stringing wires.


I found a couple of my chain lengths were a bit shorter than I needed them to be. I solved this by adding a jump ring (or two) with a seed bead for fun.


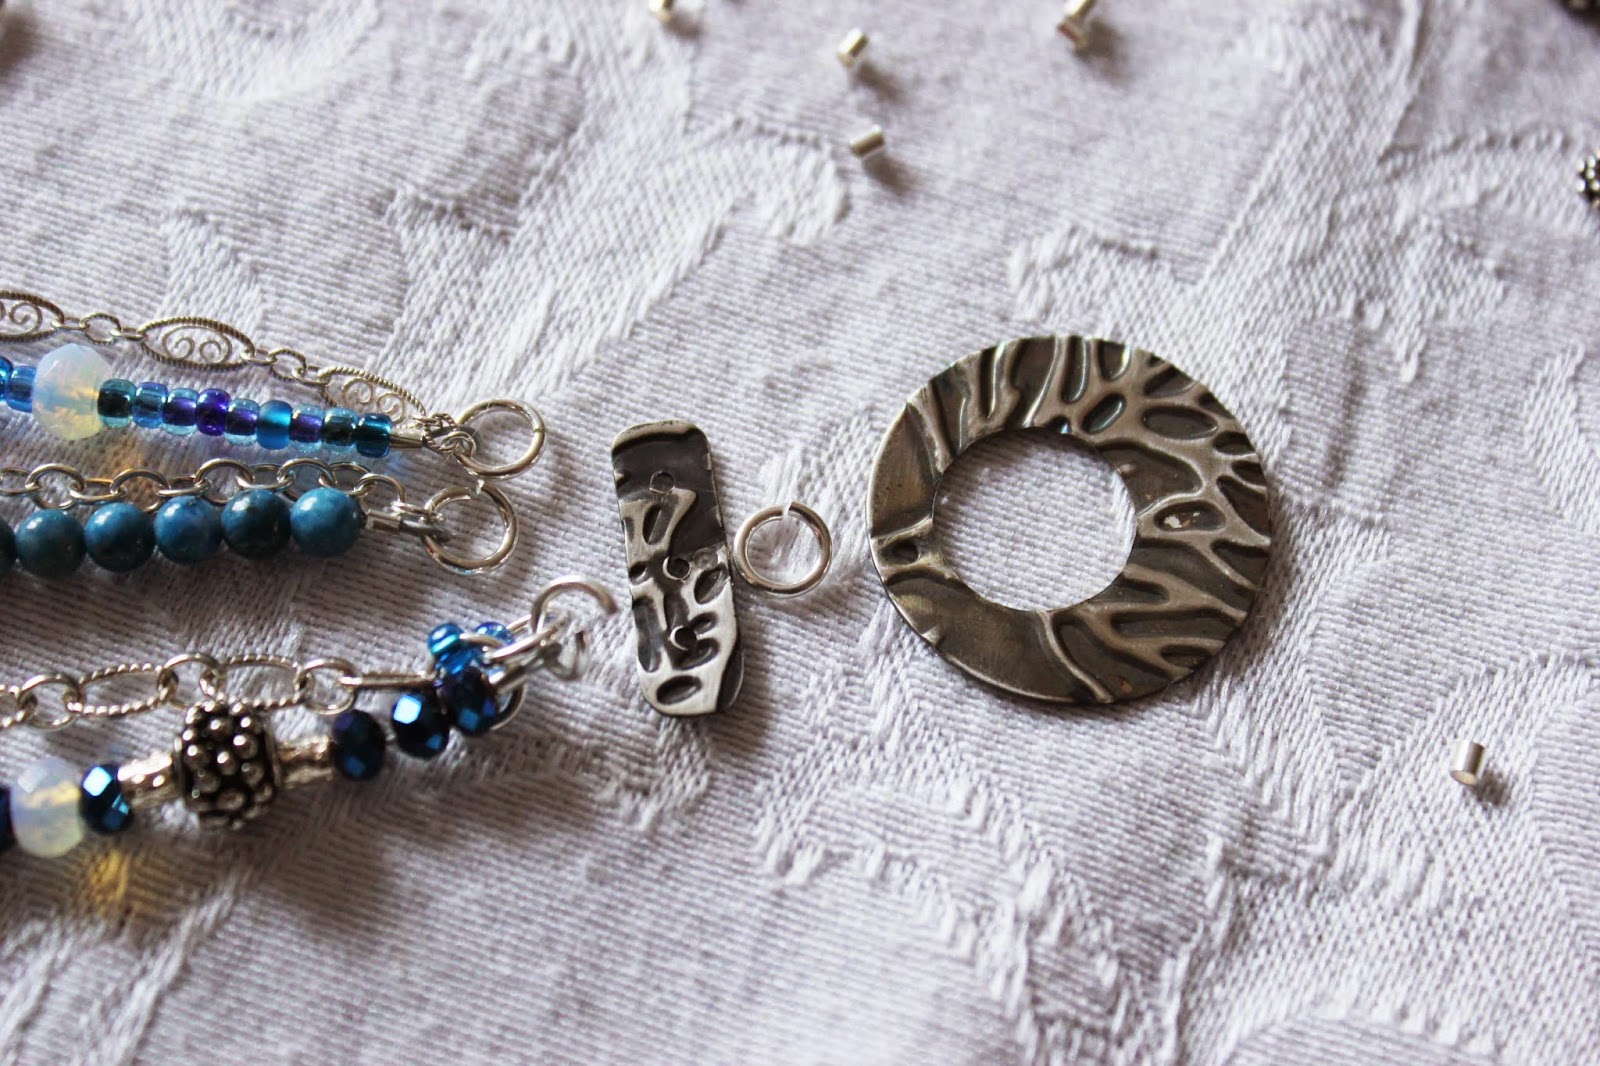
Add each layer to the 3 to 1 connector by opening the jump ring, attaching to the connector and closing the jump ring. Do this for both ends of the bracelet and attach the clasp.


Your bracelet is finished!


I don't even mind if my bracelet flips around. This way I get to show off the tree of life clasp. This design has so many possibilites. I've included materials and instructions for a bracelet which fits my (crazy, small) wrist. You may have to add design elements to create a larger bracelet but it's easy to do. Add a bead here, throw in some beads there and you've got it done.


I created a second bracelet using the same basic design with a slight difference. I used 5 to 1 connectors and I had a couple very small lengths of chain that I connected by adding a section of wire wrapped beads to the middle of the chain.

Enjoy!

Ema Kilroy is a lampworker and metalsmith living and working in Central Massachusetts. 

Tuesday, August 26, 2014

Tutorial Tuesday - Super Simple Button Bracelet

This tutorial is for a very simple design, but I though it might be handy if you have any lovely handmade buttons that you're unsure how to use, or that you want to use as a bracelet focal. I love to incorporate buttons in my work, most frequently as a closure, combined with a beaded loop. This can really make the button a focal feature in your design. However, I have heard some people say they struggle making beaded loops - my guess is it must be something to do with the knotting. So, this design may get around some of the problems you might have experienced. As I say, it really is a doddle to make.


The ingredients list is also fairly basic. Along with your button (mine is from Bo Hulley Beads), you'll need seed beads (around 4mm), approximately 40cm of 4ply Irish waxed linen, and a wire figure-of-eight link. I've used the eye link from a Vintaj hook and eye clasp (like this one) but you could always form your own from some wire. To start, thread enough beads to loop around your button onto the cord and move them to the centre of the cord. Next, thread each of the ends of your cord through the two holes of your figure-of-eight link.  Then, continue threading beads onto both ends of the cord until you have enough length to fit round the wrist.


Next, thread your two cord ends in opposing directions through the holes in your button. Then take both threads together and tie an overhand knot that sits snugly against the back of the button.


Finally, make beaded tassels on the ends of your cord. I've knotted at the top and bottom of my tassel beads so they stay neatly in place and are kept out of the way of the loop. Then you just need to trim your ends about 5mm below the beads.


And that's it!


Easy peasy!

Bye for now, Claire 

Tuesday, April 29, 2014

Tutorial Tuesday: A Layered Bracelet Design

As promised I have a tutorial to share with you, a bracelet tutorial. With the warmer weather comes bare arms and the chance to show off gorgeous bracelets. I like bracelets that have the stacked look built into them so I designed this bracelet with layered strands to work with the focal toggle clasps from my Natural Impressions line. I am having so much fun designing around the toggle as a focal. I'm also finding a new love in Czech glass beads. Just look at those scrumptious rondelles and leaves!


Materials:
Copper Focal Clasp from Ema's Natural Impressions Line
8 - 12 mmCzech glass rondelles
7 - 10 mm Czech glass leaves
31- 4 mm Czech glass rondelles
22 - 4 mm copper rounds
13 - 5 mm copper rounds
17 - 8/0 Miyuki glass seed beads
6 - 2x2 copper tube crimps
Stringing wire
Jewelry making pliers
tape measure
Optional:
6 - 3.5 inch lengths of 22 or 24 guage wire

The measurements in this tutorial create a 7 and 1/2 inch bracelet. If you're creating a different size bracelet adjustments to materials will have to be made. I'd also like to mention that I am a big fan of Soft Flex beading wires. I've had problems with other stringing wires slipping out of the crimp tubes rather easily. I never have that problem with Soft Flex. This is a just my personal opinion so please feel free to use the stringing wire you prefer.

So let's get started by gathering your supplies.


Cut three lengths of your stringing wire, 9.5 to 10 inches. Add one strand of the stringing wire to the focal portion (I'm using a 1.5 inch round focal clasp for this tutorial) of the clasp, use a crimp tube and crimping pliers to secure the wire to the jumpring. Repeat for the other two stringing wires. 


On the first wire, string one 5mm copper round, 12 mm glass rondelle, 4 mm copper round, 8 mm glass rondelle, 4 mm copper round. Continue the pattern from the 12 mm rondelle.


Continue stringing until your desired length is reached. Finish with a 5 mm copper round. Add a crimp tube. String on the toggle portion of the clasp and bring the stringing wire back through the crimp tube (and a couple of the other beads if you can). 
*(Don't be confused by the measurements on the tape...I use a scrap piece of measuring tape that has been cut up. I'm not making a 48 inch bracelet.)*


Crimp the tube to finish this strand.


Trim the excess stringing wire as close as you can to the beads.


Begin your second strand with a 5 mm copper round. Add 3 - 8 mm glass rondelles, 5 mm copper round, 3 - 8 mm glass rondelles, 5 mm copper round, 3 - 8 mm glass rondelles. Continue the pattern for the desired length of the wire.


Add a crimp tube, string wire through the toggle portion of the clasp. Using the same jumpring the first strand is going through. String around the jumpring, back into crimp tube and through a couple of beads if you can. Use crimping pliers to crimp the tube. Trim the excess wire.


Here's what your piece should look like so far. Two strands done. One to go.


For the third and final strand we're going to string on a 5 mm copper round. Followed by a 4 mm copper round, 2 - 8/0 seed beads, a czech glass leaf (aren't these just precious?), 1 seed bead, 1 - 4 mm copper round, 1 seed bead, continuing the pattern with the czech glass leaf bead for the length.


Finish the end of the third strand in the same manner as the other two strands. I tried to begin and end each strand with a 5 mm copper round if I could manage it.


And drum roll please.... 
Your piece is finished. That is if you want to be finished.


You can add crimp covers to cover the crimp beads if you wish or you could continue on with the optional portion of this tutorial. I have taken to adding wrapped wire to the ends of my pieces. I like the look it gives to the piece.


I find that adding wrapped wire to the crimp covers tend to tighten the stringing wire, making the strands a bit stiff. Almost as if I had used actual wire to string the beads. Just something you should keep in mind if you are going to try this. It may also shorten your bracelet up a tad. So if you're bracelet is fitting you perfectly you may want to skip this step.

Bend the end of the 3.5 inch copper wire up about a half inch.


Put the crimped tube into the crook of the bent wire. Starting at the end of the copper round bead. Hold the wire tail with a pair of pliers and begin wrapping the wire around the crimp. I tend to wrap around the crimp in a neat fashion and then wrap back to where I started the wrap.


Trim the excess wires.


Tuck the cut ends neatly so they bury under the wrap. I start and end at the copper round to give the cut ends a place to hide. 


You'll have to complete this process six times. One time for each crimp tube.

The finished layers and those delicious czech glass beads.


A final look at the finished piece. 


Additional options:
I used a large, 1.5 inch clasp from my Etsy shop. You can easily use a smaller clasp and/or make less strands to suite your own personal taste.

I purchased my Czech glass beads from my local bead shop. If you can't find the exact beads in the materials list you can peruse, our own, Rebecca Anderson's Etsy shop, The Curious Bead shop. Rebecca has a lovely assortment of Czech glass beads.

Thanks for visiting with me today. I hope you've enjoyed the tutorial and I look forward to seeing your creations.