Welcome to Studio
Saturday! Each week one of our contributors gives you a sneak peek into
their studio, creative process or inspirations. We ask a related
question of our readers and hope you'll leave comments! As an incentive
we offer a free prize each week to bribe you to use that keyboard.
The following week we choose a random winner.
This week's winner is Kayz Kreationz.
Congratulations! You have won a set of bittersweet disk beads from Heather Powers of Humble Beads.
Send Heather an email with your address and she will get your prize out to you soon.
~~~~~~~~~~~~~~~~~~~~~~~~~~~~~~~~~~~~~~~~~~
This week we visit the studio of
Erin Siegel of Erin Siegel Jewelry
~~~~~~~~~~~~~~~~~~~~~~~~~~~~~~~~~~~~~~~~~~
Hello! Right now, I'm working on magazine submissions. Today, I invite you inside my studio to take a sneak peek at the materials I'm creating with for the Spring 2014 issue of Jewelry Stringing Magazine! It's time to submit jewelry designs for next year's Spring issue, now. And yep, I'm actually sharing with you exactly what I'm working on for the pieces I plan to submit to the magazine. That might seem kinda crazy, but I embrace the idea of freely sharing information that might help someone else find success in getting published. I thought it'd be fun to do a little show and tell to give you a glimpse of my process. I hope this information will help other designers feel more confident about creating jewelry for publication. Getting your jewelry published can be a tricky thing. Personally, I find that challenge fun! There's absolutely no guarantee that anything I make will be selected. All I can do is try my best to follow the magazine's guidelines, let the themes and color palettes provided inspire ideas for my designs and stay true to my own style, esthetic and creative process. Jewelry Stringing is one of my all-time favorite beading magazines. I'm intrigued and captivated by the themes and color palettes the editors come up with to inspire their contributing designers. Come join me now and get a taste for what I'm working on and my process for creating jewelry pieces for this particular magazine. I hope to inspire you to work on your own creations as well and submit your designs.
Jewelry Stringing
provides guidelines, themes and color palettes for each one of their
upcoming issues. You can find the full details and guidelines for
submission here. I've provided some of the information for the Spring 2014 issue here in this post.
The
first theme and color palette for Spring 2014 is "Soft Jewelry". (The
following description is taken from the guidelines on the magazine's
website.)
Soft Jewelry
 | ||||||||||||
| Leather,
ribbon, cord, thread, embroidery floss, and fabric are most commonly used as
stringing materials and structural components in jewelry pieces, but they also
lend themselves to creative and compelling focal elements. Submissions in this
category will range in style, but they should all include fibers, textiles, or
leather as a prominent design feature. Consider highlighting these materials
through techniques like knotting, braiding, and wrapping, or incorporating
current trends like fringe or tassels into your designs. See their Pinterest inspiration board for this palette at: http://pinterest.com/stringingmag/soft-jewelry-spring-2014/ | ||||||||||||
So, here's what I've chosen to work with for this theme: The second theme and color palette for Spring 2014 is "Spring Greens". (The following description is taken from the guidelines on the magazine's website.) | ||||||||||||
Spring Greens
 | ||||||||||||
| If there is one color that ubiquitously
represents springtime, it has to be green. Fresh leaves sprout from the trees,
grass peeks out from beneath snowdrifts, and budding shoots speckle our garden
beds. From subdued mossy shades to high-energy lime tones, each piece in this
category will celebrate spring in all its green glory. See their Pinterest inspiration board for this palette at: http://pinterest.com/stringingmag/spring-greens-spring-2014/ Here are some materials I've chosen to use for this palette and theme: 
Shimmer Floss Ribbon, Czech glass beads, Irish waxed linen and a gold button.
I've got some hand-painted Shimmer Floss ribbon in "Grandma Moses" from Ornamentea.com, green, faceted Czech glass beads, Irish Waxed Linen in "Dark Forest Green" from Jewelry Accord and a matte gold button from the fabric store.
In this palette, I did want to match up with as many of the green colors as I could. The hand-painted shimmer floss helps me pull quite a few of the green
tones in the palette with just that one element. I'll pull in the
darkest green color with the waxed linen cord. Then, I'll pair the
fibers with the contrasting finish of the faceted Czech glass beads and
the button for balance and interest in the piece.
The
third theme for Spring 2014 is "Monochromatic". (The following
description is taken from the guidelines on the magazine's website.)
Here are some beads I pulled from my stash for this category: 
Seed beads from ShipWreckBeads.com and a handmade ceramic bead set by Keith O'Connor.
One hank of "All Mixed Up" size 8 Czech seed beads from Shipwreck Beads
and a graduated ceramic bead set from ceramic artist, Keith O'Connor. I
can't think of a better way to get more colors in than these fantastic
seed bead mixes! They remind me a lot of the African "Christmas" or
"Love" trade beads, which would also be a great choice for this theme.
If you take a look at the Pinterest board for this category above, there
are images of African beadwork. So, obviously those would be an ideal
selection!I hope you've enjoyed following along with me on my journey to creating jewelry for the Spring 2014 issue of Jewelry Stringing magazine. I want to inspire you with ideas that you can use in your own jewelry. If you'd like to try submitting your designs, here is the deadline information and submission guidelines you'll need to know: E-mailed pre-submissions are due September 26th, 2013; physical submissions are due October 10th, 2013. For the rest of the submissions instructions and specifics, please read through the Contributor Guidelines in their entirety here.
Do you submit your jewelry to any beading magazines?
Would you like to see your designs published?
Why or why not?
 Leave a comment answering any of the above questions and you will be entered for a chance to win an Irish Waxed Linen Cord Color Mix courtesy of the Jewelry Accord shop on Etsy! By the way, this green color cord mix from Jewelry Accord would be an excellent material choice for jewelry project submissions to the "Spring Greens" color palette shown above! Happy Beading! Erin Siegel is a jewelry designer, beading instructor and co-author of the jewelry book, Bohemian-Inspired Jewelry: 50 Designs Using Leather, Ribbon and Cords. To find out more, visit her blog: Erin Siegel Jewelry. |

Showing posts with label Studio Saturday. Show all posts
Showing posts with label Studio Saturday. Show all posts
Saturday, September 14, 2013
Studio Saturday with Erin Siegel


Saturday, September 7, 2013
Studio Saturday: Humblebeads
Welcome to Studio Saturday! Each week one of our contributors gives you a sneak peek into their studio, creative process or inspirations. We ask a related question of our readers and hope you'll leave comments! As an incentive we offer a free prize each week to bribe you to use that keyboard. The following week we choose a random winner.
Welcome to the Humblebeads Studio today!


20 Sales in 20 Days Challenge - Totally free, no strings attached 20 days of challenges to help you sell your jewelry! The challenge starts at the end of the month, but I would sign up today so you don't forget!

I have been busy designing and debuting a new collection of autumn inspired jewelry. I work in series with pieces that can mix and match together. This line of jewelry is one that I created to wholesale so they are pieces that can be created over and over again.
Some designers do like the process of production work, I don't mind it. It's much easier to design once and recreate the same pieces over and over again. I like to do a mix of both one-of-a-kind pieces with the production work. Mainly because I have an awesome stash of art beads that can only be one-of-a-kind designs.
I have been taking a class with the Flourish & Thrive Academy on Ramping up Your Holiday Sales. This is pushing me to reach out of my comfort zone and stretch myself to be completely prepared for the holiday season. (Stop giggling at me, I'm almost there!)
Ideally I should have had the fall pieces ready to go by the beginning of August but working that far ahead is something I'm learning to do, it doesn't come naturally to me! I love creating designs inspired by the current season, but as a professional designer that doesn't work. Unless one day I'm so far ahead of the game that I'm working a year head.
Ha, that will NEVER happen!
The Flourish & Thrive Academy have two free resources I would like to recommend to you. The first I have shared here before - but it's worth sharing again.
151 Ways to Boost Your Holiday Sales - Just the like title says, this list is jam packed with great ideas to get a jump on your holiday sales. Use the list to make and work a plan for your best sales season yet!
20 Sales in 20 Days Challenge - Totally free, no strings attached 20 days of challenges to help you sell your jewelry! The challenge starts at the end of the month, but I would sign up today so you don't forget!

So now the fun part - FREE BEADS!!! One lucky winner will be chosen by random to receive a set of my Bittersweet Disk Beads - one of my favorites for fall!
My question for your this week - Are you selling your jewelry this holiday season?
If yes, do you do craft shows, trunk shows, home shows or sell to stores? Do you have an usual event or place you sell your jewelry? Share your story this week!
Saturday, August 17, 2013
Studio Saturday with Erin Prais-Hintz of Tesori Trovati Jewelry
Welcome
to Studio Saturday! Each week one of our contributors gives you a sneak
peek into their studio, creative process or inspirations. We ask a
related question of our readers and hope you'll leave comments! As an
incentive we offer a free prize each week to bribe you to use that keyboard. The following week we choose a random winner.
This weeks winner is Ann Schroeder of Bead Love. Congratulations!
You have won a Pendant, a Button and a Cabochon from Tari Sasser at Creative Impressions In Clay.
You have won a Pendant, a Button and a Cabochon from Tari Sasser at Creative Impressions In Clay.
Send Tari an email with your address and she will get them right out to you.
This week we visit the studio of
Erin Prais-Hintz at Tesori Trovati.
Erin Prais-Hintz at Tesori Trovati.
• • • • • • • • • • • • • •
"Don't listen to those
who would give you reasons
why you can't succeed.
You're a child of God
and with credentials like that
you can do anything."
~ Linda Lee Elrod
I truly believe that we are all called by a higher power to be creative.
The act of making something new and valuable is the driving force behind the tallest buildings, the tastiest meals, the most vibrant paintings, the most heart-wrenching lyrics, that is what it means to be creative.
People frequently tell me they are not creative. Does that ever happen to you? Usually this occurs in response to seeing some sort of art that I have created. At that point, I tell them that they are indeed creative. I will argue with them, passionately, if need be.
We are each creative in our own way. My creativity comes through in my art, in pushing beads around and wrangling them into something more beautiful together than they might be by themselves, in seeing the possibility in things that are not even typically used for making adornments, in telling the story of the person who is wearing a personal talisman that I will manifest just for them.
It doesn't mean that other people are not creative, it just means that they are not creative in the same way as I am. That sort of negative comparison is so detrimental. But we all do it. We look at our friend who is an amazing scrapbooker and takes the time to document her children's life story so beautifully and we find fault in our own inability to even put one picture in a frame, despite the fact that we have all the paper and embellishments in the world (maybe even a mini scrapbook store in their basement... ahem!). We see those who have a perfectly ordered household with beautiful art on the walls, a place for everything, a knack for arranging furniture in such a way that is is so welcoming and think that we don't measure up because the dust bunnies in our own house compete with the spiders weaving fortresses and the piles are threatening to topple over and bury you under an avalanche.
(Or is that just me?)
We are all called to be creative, whether that creativity comes through in making the world's best creme brulee, or raising really compassionate children, or painting portraits, or coaxing gardens into bloom, or making beads that tell a story and jewelry that makes people happy.

And that last line, about being a child of God really resonated with me. So of course it came through in my creative way as a new Story Tube bead in my Simple Truths line.
YOU are achild of GOD &with credentialslike that you canDO ANYTHING
Soon I will be offering these in my Etsy Shop, but as a belated birthday gift from me to you, I would like to give away one of them. (I am also giving away two more, for a total of three, through my blog: Treasures Found. Feel free to enter there as well. But there will only be three individual winners total.)
 |
| [NOT the new beads, but these are other Story Beads so you get the idea ;-)] |
But here is the twist... if you win, you have to agree to do a little blog reveal with me in a few weeks, on Friday, September 20th. I want to see how this message and this bead inspire you!
So, who is with me?
Just leave a comment on this post answering the following:
If you are a Child of God and you can do anything,
what is that anything that you are called to do?
what is that anything that you are called to do?

Sunday, August 11, 2013
Studio Saturday...Ehem...Sunday-Creative Impressions In Clay
Welcome to Studio Saturday Sunday! Each week one of our contributors gives you a sneak peek into their studio, creative process or inspirations. We ask a related question of our readers and hope you'll leave comments! As an incentive we offer a free prize each week to bribe you to use that keyboard. The following week we choose a random winner.
This weeks winner is Kathy Lindemer, Congratulations!
You have won a Dream Catcher Pendant Kits Erin Siegel!
You have won a Dream Catcher Pendant Kits Erin Siegel!
Bok Bok! I was working yesterday and missed my Studio Saturday. So today we have Studio Sunday!

I have been in a creative funk for so long, I have nothing new to show. It's sad and tiresome.
Today I just feel like crying about it.
I need to make stuff for a show next month and my "Get up and Go has Got up and Went!" as my dad would say.

Mom collects Chickens. The inspiration for the mug.

Bok bok is what my kids would say what a chicken sounded like when they were little.
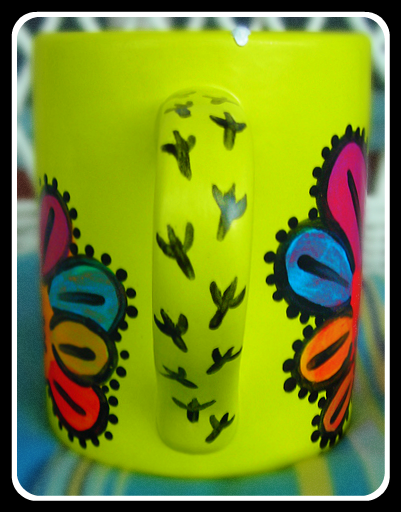

"Oh Crap!" Something my dad says.
It was hard to photograph but I layered a pile of underglaze in the bottom of the mug + down the side to look like chicken crap. Yes, I have a warped sense of humor but then so does my family! Mom loved it.
Wish me luck on getting ready for my show next month. I'm hoping to unslump my creative slump.
My question today is:
Have you been in a creative slump? How did you get out?
Leave a comment answering the question and you could win a Pendant, a Button and a Cabochon.

Have a great day!!

Feeling Sassy as usual!
Tari Sasser
Saturday, July 20, 2013
Studio Saturday with Erin Siegel
Welcome to Studio
Saturday! Each week one of our contributors gives you a sneak peek into
their studio, creative process or inspirations. We ask a related
question of our readers and hope you'll leave comments! As an incentive
we offer a free prize each week to bribe you to use that keyboard.
The following week we choose a random winner.
The following week we choose a random winner.
This week's winner is Erin S.
Congratulations, Erin! You have won a hydrangea pendant from Heather Powers of Humble Beads.
Send Heather an email with your address and she will get your prize out to you soon.
Send Heather an email with your address and she will get your prize out to you soon.
~~~~~~~~~~~~~~~~~~~~~~~~~~~~~~~~~~~~~~~~~~
This week we visit the studio of
Erin Siegel of Erin Siegel Jewelry
Erin Siegel of Erin Siegel Jewelry
~~~~~~~~~~~~~~~~~~~~~~~~~~~~~~~~~~~~~~~~~~

As long as I can remember, I’ve always been fascinated by the Native American culture. From their deep respect and reverence for nature, to their great spiritual teachings, to their beautiful handcrafts and beadwork. One Native American tradition I have always loved and gravitated towards is the dream catcher.
Today, I’m going to be sharing with you how to make your own dream catcher-inspired pendant to capture the dreams, goals and positivity you want to bring into your life! You will learn the traditional weave to make the web of the dream catcher, then you can embellish your pendant with a variety of beads, feathers and/or charms to represent those dreams, hopes and wishes you want to catch. The finished pendant can be worn on it's own or you can incorporate it into your own beaded jewelry design. The act of making this pendant is a hands-on, creative way to realize your dreams, while making a keepsake with special meaning that you can wear and keep as a reminder of the things that are important to you. But, before I get into showing you how to make your pendant, I want to share with you a little bit about the origins of the dream catcher and a Native American dream catcher legend. I hope you will find this to be fun, informative and inspiring!
Origins of the Dream Catcher:
The Ojibaway or Chippewa were the first to design these decorations to protect their babies against bad dreams that might come along in the night. Both good and bad dreams would be caught by the web, but only good dreams could find their way through the hole and slide down the feather to the baby’s head. The bad dreams, not knowing the way, would get caught in the web and dissipate with the first rays of morning light.
Since the beginning, many Native American tribes have adopted the dream catcher and incorporated it into their heritage. The Lakota are one such group that have done this. The following is their story of the dream catcher:

Next weekend I'm taking my 2 1/2 year old daughter to her first Native
American Pow Wow. I hope she enjoys the flute music, drumming, dancing,
storytelling and crafts. She's already familiar with dream catchers.
Before she was born, I was gifted a beautiful dream catcher handmade by a
Native American woman I know. It hangs above her bed now.
As long as I can remember, I’ve always been fascinated by the Native American culture. From their deep respect and reverence for nature, to their great spiritual teachings, to their beautiful handcrafts and beadwork. One Native American tradition I have always loved and gravitated towards is the dream catcher.
Today, I’m going to be sharing with you how to make your own dream catcher-inspired pendant to capture the dreams, goals and positivity you want to bring into your life! You will learn the traditional weave to make the web of the dream catcher, then you can embellish your pendant with a variety of beads, feathers and/or charms to represent those dreams, hopes and wishes you want to catch. The finished pendant can be worn on it's own or you can incorporate it into your own beaded jewelry design. The act of making this pendant is a hands-on, creative way to realize your dreams, while making a keepsake with special meaning that you can wear and keep as a reminder of the things that are important to you. But, before I get into showing you how to make your pendant, I want to share with you a little bit about the origins of the dream catcher and a Native American dream catcher legend. I hope you will find this to be fun, informative and inspiring!
Origins of the Dream Catcher:
The Ojibaway or Chippewa were the first to design these decorations to protect their babies against bad dreams that might come along in the night. Both good and bad dreams would be caught by the web, but only good dreams could find their way through the hole and slide down the feather to the baby’s head. The bad dreams, not knowing the way, would get caught in the web and dissipate with the first rays of morning light.
Since the beginning, many Native American tribes have adopted the dream catcher and incorporated it into their heritage. The Lakota are one such group that have done this. The following is their story of the dream catcher:
Legend of the Dream Catcher (Lakota)
Long ago an old spiritual leader was high on a mountain and had a vision. A teacher of wisdom appeared in the form of a spider. The spider picked up the elder’s willow hoop and began to spin a web. She spoke to the elder about the cycles of life. She said, “In each time of life there are many forces, some positive and some negative. If you listen to the positive forces, they will steer you in the right direction. If you listen to the negative forces, they will lead you astray.”
When the spider finished speaking, she gave the elder the web and said. “The web is a perfect circle with a hole in the center. Use the web to help your people reach their goals, making good use of their ideas, dreams and visions. If you believe in the Great Spirit, the web will catch your good ideas, let them float through the hole and down the feather upon you.” The elder passed on the vision to the people. Now, many hang a dream catcher above their bed to sift their dreams and visions. The good thoughts are captured in the web of life and dropped down to the person, the negative thoughts are caught in the web and perish at daybreak, never to be a part of their lives.
Now, I don’t know about you, but I would really like to adopt this concept! Who’s with me? Okay, let’s make some dream catcher pendants to wear to catch those good dreams from the air and let them float down into our hearts!

Tools:
Instructions:
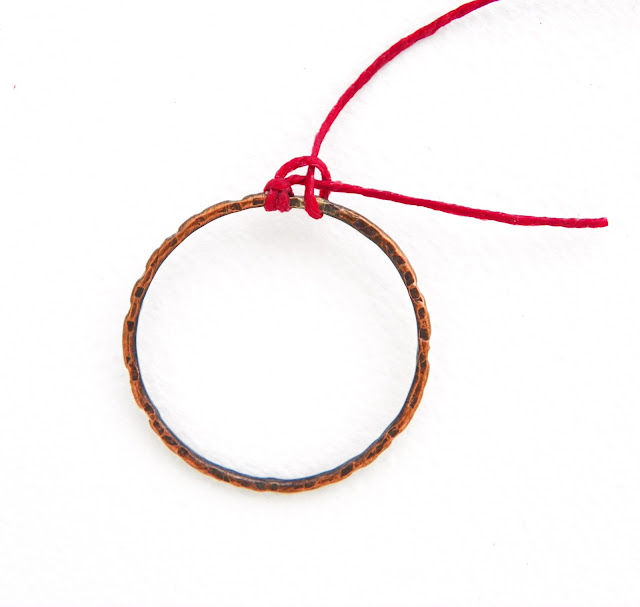
1. Use the cord to make a 1” fold at one end. Use the folded end to form a lark’s head knot around the copper ring as shown in photo 1.

3. Trim the tail. Pull the cord down so that it sits on the inside of the copper ring as shown in photo3.


5. Bring the cord around the first loop created in step 4 and through the loop as shown in photo 5.
 6. Continue looping in the same matter adding seed beads as shown in photo 6. Loop around the inner diameter of the ring twice.

7. Use the cord to string one 4mm bead; tie and overhand knot and trim cord as shown in photo 7.

 How about you?
Do you feel inspired by the dream catcher? or Do you find inspiration in the traditions of another culture other than your own?
Please share and tell me all about it. I want to know!
.jpg)
Long ago an old spiritual leader was high on a mountain and had a vision. A teacher of wisdom appeared in the form of a spider. The spider picked up the elder’s willow hoop and began to spin a web. She spoke to the elder about the cycles of life. She said, “In each time of life there are many forces, some positive and some negative. If you listen to the positive forces, they will steer you in the right direction. If you listen to the negative forces, they will lead you astray.”
When the spider finished speaking, she gave the elder the web and said. “The web is a perfect circle with a hole in the center. Use the web to help your people reach their goals, making good use of their ideas, dreams and visions. If you believe in the Great Spirit, the web will catch your good ideas, let them float through the hole and down the feather upon you.” The elder passed on the vision to the people. Now, many hang a dream catcher above their bed to sift their dreams and visions. The good thoughts are captured in the web of life and dropped down to the person, the negative thoughts are caught in the web and perish at daybreak, never to be a part of their lives.
Now, I don’t know about you, but I would really like to adopt this concept! Who’s with me? Okay, let’s make some dream catcher pendants to wear to catch those good dreams from the air and let them float down into our hearts!
Materials needed:
3 size 8 seed beads in assorted colors
1 feather charm
2 metal 4mm jump rings
18” of 4ply Irish waxed linen cord (color of your choice)
A kit containing all the materials needed and instructions can be found in my Etsy shop here.
Tools:
Scissors
A pair of chain nose pliers (to attach the jump rings)
Instructions:
1. Use the cord to make a 1” fold at one end. Use the folded end to form a lark’s head knot around the copper ring as shown in photo 1.

2. Using the long end of the cord, form a half-hitch knot around the copper ring and the 1” tail as shown in photo 2.

3. Trim the tail. Pull the cord down so that it sits on the inside of the copper ring as shown in photo3.

4. Bring the cord around the copper ring and through the loop as shown
in photo 4. This is called looping. Continue making loops around the
ring 5 more times. Add seed beads as desired.

5. Bring the cord around the first loop created in step 4 and through the loop as shown in photo 5.


7. Use the cord to string one 4mm bead; tie and overhand knot and trim cord as shown in photo 7.

8. Use 1 jump ring to attach a feather charm to the pendant. Use another
jump ring to attach a chain or necklace cord to the pendant and enjoy!
Do you feel inspired by the dream catcher? or Do you find inspiration in the traditions of another culture other than your own?
Please share and tell me all about it. I want to know!
Leave
a comment answering any of the above questions and you will be entered for a
chance to win one of my Dream Catcher Pendant Kits!
Thanks for joining me today!
Erin Siegel is a jewelry designer, beading instructor and co-author of
the jewelry book, Bohemian-Inspired Jewelry: 50 Designs Using Leather,
Ribbon and Cords. To find out more, visit her blog: Erin Siegel Jewelry.
Saturday, July 13, 2013
Studio Saturday with Humblebeads
Welcome to Studio Saturday! Each week one of our contributors gives you a sneak peek into their studio, creative process or inspirations. We ask a related question of our readers and hope you'll leave comments! As an incentive we offer a free prize each week to bribe you to use that keyboard. The following week we choose a random winner.
This weeks winner is Ellen Lambrix. Congratulations! You have won a beautiful collection of copper findings from the Curious Bead Shop.
Send Rebecca an email with your address and she will get them right out to you.
This week we are stopping in for a late night visit in the Humblebeads Studio with Heather Powers.

I thought I would share a few booth tricks with you this week. My #1 booth secret is to use PVC pipes to create a tall counter out of a regular folding table. You can have the pipe cut to size at the hardware store or use a saw to do the job at home. Alternatively, you can pick up a set of bed risers to do the same job.
I pin a table skirt made of a fabric panel that is the height of the extended table and wraps around to the back. I pin the skirt to a regular table cloth with straight pins.

I never lay anything directly on the table. We had some particle board squares that we covered in fabric like a canvas and glued it with a glue gun. You could do the same with foam core board for a lighter option. Think layers and textures when displaying your jewelry. Go for neutral fabrics that don't compete with your wares.

A banner really makes a nice impression. I love Vista Print for banners - you can upload your own images, they are inexpensive and the quality of the outdoor ones are really nice. You can have several printed with different images of your jewelry and one with your logo for maximum impact. Use metal shower curtain rings to attach the banner to your tent.

Share your favorite booth display idea or just leave a comment this week for a chance to win one of my Hydrangea Pendants. One random winner will be picked next Saturday.
Saturday, July 6, 2013
Studio Saturday with Rebecca of Songbead and The Curious Bead Shop
Welcome to Studio Saturday! Each week one of our contributors gives you a sneak peek into their studio, creative process or inspirations. We ask a related question of our readers and hope you'll leave comments! As an incentive we offer a free prize each week to bribe you to use that keyboard. The following week we choose a random winner.
This weeks winner is Monique of A Half-Baked Notion. Congratulations!
You have won three copper frames from Gaea.
You have won three copper frames from Gaea.
Send Gaea an email with your address and she will get them right out to you.
• • • • • • • • • • • • • •
This week we visit the studio of Rebecca Anderson of Songbead and The Curious Bead Shop.
Right now, I am poised at the very beginning of a hugely busy summer for me and Songbead jewellery.

I've got that feeling of nervous anticipation - the calm before the storm, so to speak. But not actually so calm! Here's what the next two months hold for me, jewellery-wise:
20th/21st July - The Folk Forest Fair, Endcliffe Park, Sheffield
3rd August - 25th August - The West End Fair, St John's, Edinburgh
Added to that, with my other hat on as a classical singer, they also hold this:
10th July - rehearsal in London for Re:Sound's Battles Within And Without
22nd July - 1st August - rehearsals daily in London for Re:Sound's Battles Within and Without
2nd - 4th August - performances of Re:Sound's Battles Within and Without
Can you do the maths.....? I am going to be one busy bee! And you may notice that the timings with all of my engagements are pretty tight.....including an overlap of the 2nd - 4th August......eek! Thankfully, I have a very, VERY kind partner who is going to travel up to Edinburgh and set and start up the fair for me. HUGELY grateful doesn't even begin to cover it!
 |
| Gardenia |
This is definitely the busiest summer I will ever have had with jewellery. A 23-day craft fair......I have got to tell you, I am a little intimidated by just how much stock I will have to make! The West End Fair takes place in the very centre of Edinburgh, during the Festival period. If you are lucky enough to have ever visited my home city of Edinburgh during the month of August, you will know just what an awesome atmosphere the place has at that time, and how very, very busy it is!
 |
| Pacific Heather |
I count myself as very lucky to come from such a wonderful place, and am looking forward to spending almost a month there this summer. A rare treat, even if I will be working there every single day! I have been to this particular fair countless times as a customer - I always make several trips, however long I am in Edinburgh whilst it is on, and I am extremely chuffed that I will be a part of it this year. Anyone who has done super-long events like this before - any tips gratefully received!
 |
| Flying Through Fire |
Although I know that I will need a LOT of stock, guessing exactly what I will need is hard. The pictures here are some of my new pieces that I've been working on. I find I am making up two or three versions of each design where I can....I don't always do this but I figure this will be a more efficient way of working for these events.
 |
| Buttercup |
Despite this, I anticipate that many of my evenings during the fair will be spent making, however much stock I have made up beforehand. I find that you can never guess what is going to be popular at any single event! I've been buying up art beads from some of my favourite makers. I got a fresh set of my signature tags made up too - big thanks to D'Arsie Manzella for these beauties! Look how teeny they are....

Despite any trepidation however, overall I am extremely excited about this summer and all it holds. I think I will definitely be due a good rest come September!

My question for you this week is, what is your number one tip in preparing for craft fairs? Leave your answer in the comments below to be in with the chance of winning a set of handmade copper findings from The Curious Bead Shop, worth £15.50!

Rebecca is a Scottish jewellery designer, currently living in Manchester, England. You can read more about her and her work at her blog, songbeads.blogspot.com and see more of her jewellery at songbead.etsy.com. She also has a supplies shop at thecuriousbeadshop.etsy.com.
Saturday, June 15, 2013
Studio Saturday with Creative Impressions In Clay
Welcome to Studio Saturday! Each week one of our contributors gives you a sneak peek into their studio, creative process or inspirations. We ask a related question of our readers and hope you'll leave comments! As an incentive we offer a free prize each week to bribe you to use that keyboard. The following week we choose a random winner.
This weeks winner is Jamie, Congratulations!
You have won 20-piece storage container from Erin Siegel and Ornamentea.com.
You have won 20-piece storage container from Erin Siegel and Ornamentea.com.
Note: Ignore the black borders. Not sure what the technical issue was upon export.

I had a lovely lady contact me to put together jewelry that was purchased as a kit.
Keep in mind there were no directions or illustrations as to the finished look of the jewelry.
She had asked other artists to make her jewelry, she did not have the skills, only to be turned down.
Her now deceased husband had purchased these kits for her at a show. He was under the impressions he was buying finished jewelry. Having been widowed myself, I understood and agreed to make her jewelry.
Above is my interpretation of the necklace.
The kit came with 3 strands of gemstones, 1 top drilled agate, memory wire and a few findings.
I glued Vintaj filigree to both sides of the agate. I felt the the piece would look best with raw brass.
Strung the strands of gemstones in graduated lengths with memory wire, covered the connection with crimp covers and connected with brass jump rings. Unfortunately the one thing I didn't have was a clasp in brass. Fortunately Vintaj findings are sold at Hobby Lobby where I could buy a clasp.
I was really happy with the results.

Rummaging through my studio, I found a forgotten stash of brass necklaces I bought years ago from Rishashay.
It was simply hung with a jump ring.


You might recognize the filigree from the necklace above. I took the same filigree and cut off the outer frame, filed down the edges, formed and glued to the back.
Attached Vintaj earwires and voila. A pair of earrings that look as pretty from the front as the back.
My question today is:
Have you helped someone with a jewelry predicament before?
Leave a comment answering the question and you could win Coin Buttons.

Have a great day!!
Feeling Sassy as usual!
Tari Sasser
Subscribe to:
Posts (Atom)