
 Bracelets are the accessory item of the year and nothing is hotter right now than bracelets made with cording. You can create hip, chic bracelets with a few art beads, some accent beads and cotton cord. These are quick and easy to make and oh-so-cute! I'm going to be showing you step-by-step how to create a sliding knot adjustable closure that can be used for a bracelet or even a necklace, if you so choose. My version shown here is a slight variation of the sliding knot technique you typically see. This one is much simpler! You can make these bracelets with any beads you like.
Sweet Slide bracelets
Here's what you need for the Sweet Slide bracelets:
To make your bracelet, cut a piece of cord about 24 inches long. String and/or knot your beads on as desired, making sure to leave at least a 4 inch tail on each end of your bracelet.
Now, you're ready to create your sliding closure!

1. Cut a separate 12" piece of cord and fold the cord back onto itself about 4". This will be your "working" cord.


4. Loosely wrap the working cord around the bracelet cords and the tail of the working cord.
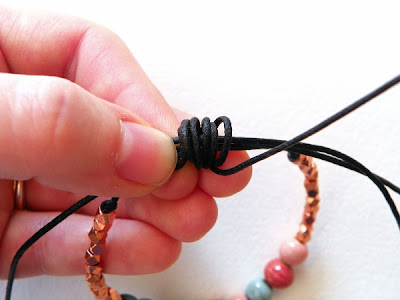
5. Make 5 wraps, moving towards the tail end of your working cord.

6. Insert the working cord through the wraps you just made, exiting the folded end.

7. Pull the ends of your working cord tight, but not super tight or you won't be able to move your bracelet cords back and forth. If desired, add some beads to the working cord tails and trim.

8. Add a few more beads to the bracelet cords, knot, trim and you're done! Be sure to leave the bracelet tails long enough to slip your hand through when the bracelet is all the way open.
I hope you enjoy the tutorial!
Erin Siegel is a jewelry designer, beading instructor and co-author of the forth-coming jewelry book, Bohemian-Inspired Jewelry: 50 Designs Using Leather, Ribbon and Cords.
To find out more, visit her blog, Erin Siegel Jewelry.
Erin Siegel is a jewelry designer, beading instructor and co-author of the forth-coming jewelry book, Bohemian-Inspired Jewelry: 50 Designs Using Leather, Ribbon and Cords.
To find out more, visit her blog, Erin Siegel Jewelry.


