

Supplies:
4.5" 18 gauge brass color wire
11 3" lengths of 24 gauge brass color wire
5 polymer clay disk beads
1 arte metal name plate
3 brass maple leaves
2 brass slender leaves
2 brass woodland leaf pendants
2 brass fern charms
2 brass filigree leaf charms
1 brass trailing leaf
3 arte metal keys
5 6mm flat copper spacers
5 3" copper headpins
2 1" copper headpins
8" silk ribbon
Acrylic Paint Dabber
Renaissance wax
Steel wool
Tools: bench block, letter stamps, ball peen hammer, rivet hammer, Phillips head screw driver, brass texture plates, round and flat nose pliers, wire cutters.
Directions:
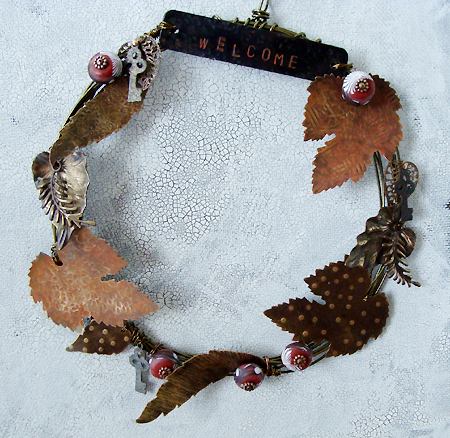
1. Create the wreath by wrapping the wire into a large loop, approximately 5 1/2" wide. Wrap the wire in into a large loop 9 times around. Create a wrapped loop at the top of the wreath and wrap the ends of the wire around several times for a secure finish.

2. Texture the leaves with the hammers, texture plates and screw driver. (Watch this video for several techniques.) Highlight the textures with the steel wool.

3. Stamp "welcome" into the arte metal name plate with the letter stamps. Use the ball peen hammer to texture the blank. Use the acrylic dabber to add paint, rub off the excess with a paper towel. After the paint has dried rub a light coat of wax to protect the color. Paint two of the large leaves in the same way.

4. Place the leaf pendant on the bench block and strike the center with the round end of the ball peen hammer to shape the leaf in the concave form. Repeat with the other leaf and the two filigree leaves.

5. Attach the welcome name plate to the wreath by wrapping it the 24 gauge wire.

6. Attach the leaves to the wreath by wrapping them with the 24 gauge wire, securing them to the wreath. I found that wrapping the wire criss-cross over itself helps the leaves stay in place on the wreath. Layer some of the leaves together for an interesting texture. There is no right or wrong way to the attach the elements, whatever holds them most secure when wrapping the wire around the wreath will work.
7. String a key and a filigree wreath onto a 1" headpin and from a loop. Attach to the wreath.

8. String a flat spacer and polymer clay disk bead unto a 3" headpin. Attach the headpin to the wreath by wrapping it around the wire several times.

9. Add the ribbon to the top loop on the wreath, tie a simple knot at the top of the ribbon.
Resources: Disk Beads, Humblebeads. All brass and wire from Vintaj - retail at Bello Modo. Silk Cord, Angela Brittain. Copper findings, Rings & Things.
17 comments:
This is positively the most beautiful wreath I have EVER seen.
this is such a cool project. what great ideas! thanks for the tutorial!
Erin S
Heather,
This is just a wonderful piece. What better gift than personalizing the plate and adding beads that match a decor.
It's always amazing to see the outcome of hammering metal; so much fun.
Thanks!!
sandi
This is just beautiful, Heather. Brilliant idea!
Really sweet! Thanks for sharing...you make it seem so easy!
Betty
Completely blown away!
Thank you for sharing that!
Enjoy the day.
Erin
Very pretty!
Love it...Maria
Breathless I say! Just beautiful Heather..
It's beautiful! I'll bet the homeowner was over the moon for it. Thanks for some great inspiration!
Oh wow! Beautiful! Thank-you for the tutorial!
Wow, Wow, Wow, Heather you have outdone yourself! I love it so, I wanna wear it in a mini version! This is just fabulous and has me wanting to grab some copper and my texturizing hammers!
I love this non-jewelry project! It's gorgeous!
Bead Happy!
Michelle
absolutely wonderful! thanks.
Heather you have outdone yourself!!! This project is exceptional, one of my absolute favorites! Thanks for the tutorial, I shared the project photo today on the Vintaj blog and sent everyone over here for the details. I need to make one for my house, and maybe even a few gifts for next year! Thanks for the inspiration :)
Beautiful!
Excellent, just excellent. Such a pleasure to be privy to your cool ideas, Heather!
Dave at Rings & Things
Absolutely stunning Heather - just beautiful!
Post a Comment