Showing posts with label Buttons. Show all posts

Sunday, November 2, 2014

Amuse the Muse - Buttons - Tari of Claybuttons

I dropped the ball on the post this past Monday. I thought I would post this Sunday instead.
There weren't any links left in the comments to post, so I will show an assortment of buttons.

Rebecca will be back from her Holiday for the next Amuse the Muse post.

Our own Mary Harding.

Glass Buttons by Leah Pellegrini of LeahGlass.

Kylie Perry Studios

Earthenwood Studio

Buttons by McAnaraks

Elsa Mora

Lisa Peters Art

Suburban Girl Studio

Moving Mud

Be sure to add the link to your favorite buttons in the comments!!

:::
And now for the BeadBlogger Links. See you on next Monday!

Check out what Andrew and other participants of the Inspired by Reading Book Club made in response to "The Ocean at the End of the Lane" by Neil Gaiman.

Carmi's Art/Life World
Have you had a craft fail? If you have and could laugh about it, you will love this new book.


Make cute Halloween treat baskets using Eileen's Bat Out o' Hell basket template and design.

October Monthly Challenge recap of Entries.
 
Facebook Me!
Keep up on all the latest updates and more at the Crafty Princess Diaries' Facebook page. Like it, and make sure to click on the drop down notifications menu when you do.

Beading Arts 
Have you seen Michelle Mach's new book, "Unexpected Findings"? It's a lot of fun...

Cherie contemplates hope and failure with her latest print.
:::

Tari makes Handmade Ceramic Buttons...Fun, Funky&Functional!
Uniquely different, every piece of art is an original.
Visit Tari's website ClayButtons.com, browse more than 20 Collections of Buttons.
Remember every button can be a Pendant or Jewelry Component!

Monday, October 20, 2014

Amuse the Muse - Buttons - with Tari of ClayButtons.com

We are inching closer and closer to Halloween. I see more people decorating for Halloween than ever before. The only items I make that would qualify for this holiday are my Oz pendants, which are buttons also and my Wicked Earrings.
Leave links to your favorite buttons in the comments!

These are the single sided Oz pendants that come hung on a simple cord with a pewter charm.

These are double sided Oz Pendants on a swivel bail (not shown) with pewter charms. 


Great shank back buttons from Lisa Peters Art.


Gaea Skull Beads/Buttons. Most ceramic artists can make any bead a button.

Round Rabbit Earrings in fall colors. Go to her Facebook page so you can see shop updates

Be sure to add the link to your favorite buttons in the comments!!
And now for the BeadBlogger Links. See you on next Monday!

Think it's okay to go crazy with sparkle? Lisa does too! Stop by A Bead A Day to see her latest find!

Carmi's Art/Life World
Fun saying in resin filled bottle caps will make you smile today.

Homemade Halloween Cupcake Topper
Make these darling Halloween cupcake toppers to delight the kids. Just grab the free printable and have fun.

Art Bead Scene 
Art Bead Scene Editors take the October Monthly Challenge using Milton Avery's painting Autumn as inspiration. 

Focus, Focus, Focus! 
Can there be too many works in progress for any crafter?

Beading Arts 
Learn how to make the very popular wrap-style bracelets that you see everywhere these days!

Taking a Fall Drive
Cherie uses the colors of fall as inspiration for some new pictures.

Tari makes Handmade Ceramic Buttons...Fun, Funky&Functional!
Uniquely different, every piece of art is an original.
Visit Tari's website ClayButtons.com, browse more than 20 Collections of Buttons.
Remember every button can be a Pendant or Jewelry Component!

Monday, October 6, 2014

Amuse the Muse - Buttons - with Rebecca of Songbead

Happy October everyone! You're not going to be seeing a lot of me this month....because next weekend, I am off to Florida, USA - where (looking at Art Bead Scene's stats!) most of you good folk are from. It's my third trip to America, something which I can't quite believe - my first to Chicago was a decade ago with the National Youth Choir of Scotland, the second was to California for my partner's work, and this time around it's for my brother-in-law's wedding in Florida (although we are sneaking in a wee trip back to California to see our good friend Patina Queen!). I'm excited! And have no doubt that the California leg at least will contain at least one bead shop...

Anyway, due to all this travelling I'm not sure of when I will be touching base with the internet, so the wonderful Tari will be taking over my Muse posts for the next few weeks. I thought I'd leave her with a topic which I think is right up her street - buttons! Who doesn't love a button? I know I do. 

And seeing as Tari is taking over from me, I thought I would share some of her very awesome buttons with you today.

Perusing Tari's site, over at Clay Buttons, these super-cool jigsaw buttons immediately jumped out at me. My favourite shape is the top one - they look like someone just took a bite out of them!


I adore Tari's branch buttons, and this is one of my favourite of her branch button styles. Wouldn't this look awesome as a clasp in a Autumnal-styled bracelet? 


You can't beat spots at any time of year, and even though the saying goes that 'blue and green should never be seen', I am a great believer in these two colours together.

These textural toggle buttons would look awesome in jewellery for these chillier months - or for those of you who work with fibres too, they would look fab on a knitted clutch or purse.

Feeling spicy, anyone? This chilli pepper button would definitely add a touch of whimsy as a clasp or layered focal.

Take a stroll round Tari's comprehensive website - there are so many more handmade art bead and button treats there for you to see.

And now for the BeadBlogger Links. See you on my return!


Rebecca is a Scottish jewellery designer, based in her country's capital, Edinburgh. You can read more about her and her work at her blog, songbeads.blogspot.com and see more of her jewellery at songbead.etsy.com. She also has a supplies shop at thecuriousbeadshop.etsy.com.

Tuesday, August 26, 2014

Tutorial Tuesday - Super Simple Button Bracelet

This tutorial is for a very simple design, but I though it might be handy if you have any lovely handmade buttons that you're unsure how to use, or that you want to use as a bracelet focal. I love to incorporate buttons in my work, most frequently as a closure, combined with a beaded loop. This can really make the button a focal feature in your design. However, I have heard some people say they struggle making beaded loops - my guess is it must be something to do with the knotting. So, this design may get around some of the problems you might have experienced. As I say, it really is a doddle to make.


The ingredients list is also fairly basic. Along with your button (mine is from Bo Hulley Beads), you'll need seed beads (around 4mm), approximately 40cm of 4ply Irish waxed linen, and a wire figure-of-eight link. I've used the eye link from a Vintaj hook and eye clasp (like this one) but you could always form your own from some wire. To start, thread enough beads to loop around your button onto the cord and move them to the centre of the cord. Next, thread each of the ends of your cord through the two holes of your figure-of-eight link.  Then, continue threading beads onto both ends of the cord until you have enough length to fit round the wrist.


Next, thread your two cord ends in opposing directions through the holes in your button. Then take both threads together and tie an overhand knot that sits snugly against the back of the button.


Finally, make beaded tassels on the ends of your cord. I've knotted at the top and bottom of my tassel beads so they stay neatly in place and are kept out of the way of the loop. Then you just need to trim your ends about 5mm below the beads.


And that's it!


Easy peasy!

Bye for now, Claire 

Saturday, January 26, 2013

Studio Saturday with Creative Impressions In Clay


Welcome to Studio Saturday! Each week one of our contributors gives you a sneak peek into their studio, creative process or inspirations. We ask a related question of our readers and hope you'll leave comments! As an incentive we offer a free prize each week to bribe you to use that keyboard. The following week we choose a random winner.
This weeks winner is Meadowland DesignsCongratulations! You have won Peacock Pendant. 
Send Erin an e-mail with your email address and she will get it right out to you.
This week we visit the studio of Tari Sasser at 
Creative Impressions In Clay.

I wanted to show you buttons that have yet to make it to my website. Why haven't they made it there, you say? It takes time and usually updating my website is at the bottom of the list because it's so very time consuming. Granted it needs a major overhaul but there are certain things you dread, and for me, that is one of them.
One of my favorite customers is a wholesale customer. Lucy at the Cheshire Cat in Vermont. Lucy has been designing her own line of clothing for many years, starting out with a children's clothing. She and I have been working together for maybe 6 years. OK, I can't remember how long, I've slept since then. Sometimes she chooses buttons from my existing button collections and other times I create new ones. The next three photos are of new ones I designed for her. She gives me a color palette to use and I go from there. I glazed the bees originally with eyes and that didn't fly so we went with them being implied and a brighter yellow. The Birds and the Bees and it's all Rosy...or something like that. 

There's no place like home. The original design is the round bottom button. Instead the final version is a more childlike interpretation. The house has since been made as an ornament in the size shown and a super size version as well.


I love to travel! The travel collection of buttons. I am missing one that I couldn't find, it's a Route 66 Sign button. We have an old suitcase with all the travel stickers, a License Plate with LUV2TRVL and a Stamp. The stamp is a combination piece. She wanted a car and a stamp so I found an old stamp design that combined both. As you can imagine carving some of these designs take a lot of time. You then hope your mold pouring skills are up to par the day you make the mold and you don't get any bubbles so you then have to repair the mold. Next is glazing the color combinations and applying them. On the dimensional buttons can be not only a challenge but time consuming. Efficiency counts to make a profit. For some of my design they just take time and there isn't a way around it.


These were made for one of Art Bead Scene's Monthly Challenges. Based on Kandinsky's Farbstudie Quadrate. I believe there were 6 originally. I love the art of Kandinsky.


Since I make buttons, I attend fiber shows. A lot of my items are geared towards the Needle Arts Community. Above is a two-sided magnetic item. Trying not to call it a needleminder since the name is copyrighted. One part goes on the back of your canvas or quilt and the other goes on the front. It stays put along with your pins and needles. Or it can be set next to you as you work and still minds your pins and needles.


These were a custom order from early in my button making. A woman in California who made hats needed specialized designs that became pins. Along with shells was an Octopus and a Mermaid. I still have the molds but these will most likely never be made again except for the Mermaid. She appears these days as an ornament.


It's a cabochon of a different color. Special order for a beading artist. Lots of cabs in many colors and designs.
If you didn't know all of my buttons can be made as cabs, pins, pendants or with as many holes or loops in any place on the button. Since each is made individually these options are possible.


My question today is:
What do you want to see for Studio Saturday?

Do you like Studio Saturdays? Should we continue? Are we doing it right or wrong? Do you only want tutorials? Not of interest you? 
I ask this because when you only get 5-10 comments for Studio Saturday you wonder if its you or the content.

Leave a comment answering the question and you could win 3 Cabochons. 


Feeling Sassy as usual!
Tari Sasser
Creative Impressions In Clay

Thursday, May 17, 2012

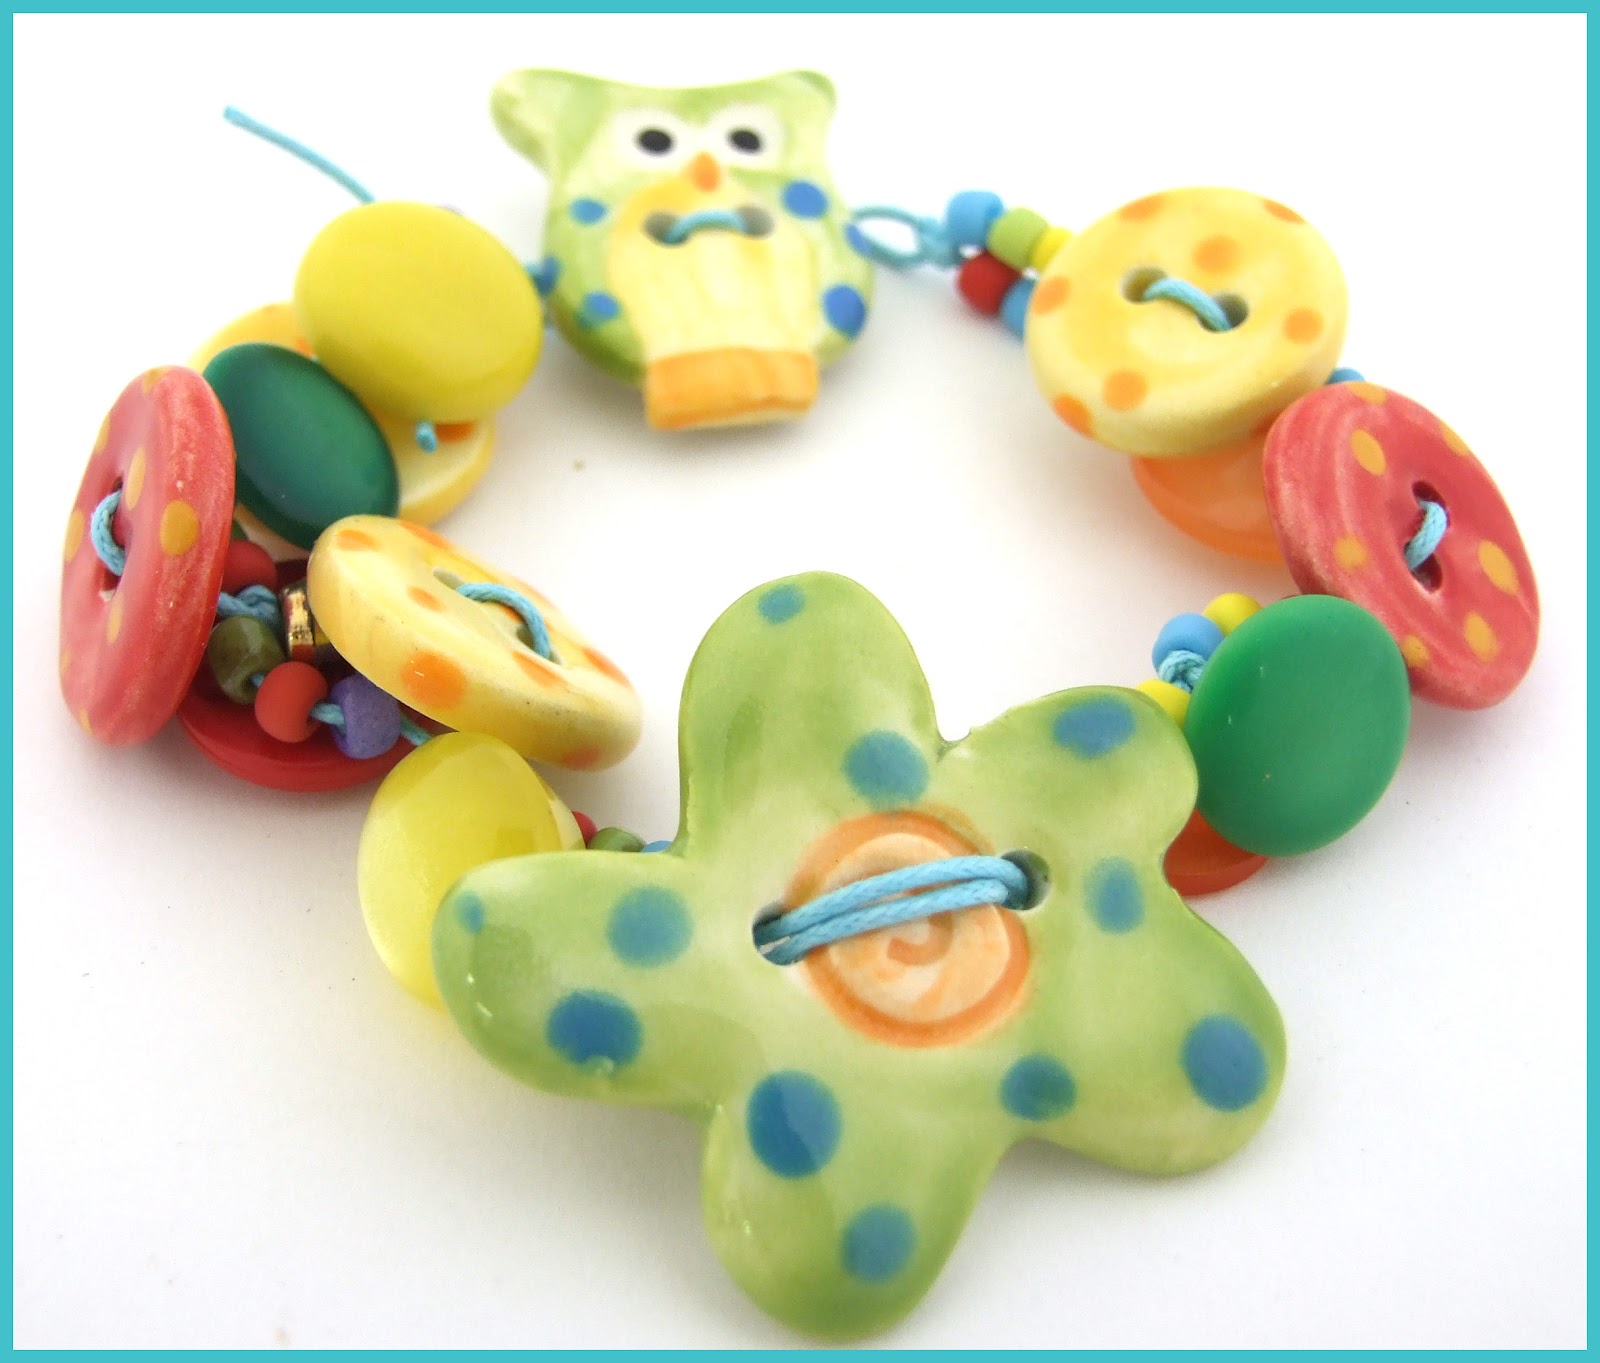
Colorful Button Bracelet

Button Bracelet


  Supplies Needed:
1mm cotton cording 20" in length, 1" ceramic owl button, 1 large ceramic flower button, 5 assorted 3/4" ceramic buttons, 6-8 asst. vintage buttons with shanks, approximately 30 asst color size 6 seed beads

 Start by threading the cording through the button so there is an equal amount of cording on each side of the holes.

Tie a knot just behind the button holes. Approximately and inch after the button, tie a second knot. Thread a button onto one cord and tie a knot directly behind it.

Note about knots: I used whatever type of knot seemed to fit the situation, there's no right or wrong knot.

On the opposite cord of the first button, string on a ceramic button. To do this slide the cord through the back of the button and then back through the front. Tie a knot. On one cord string a few seed beads. String a vintage button on the remaining cord.

Continue stringing buttons and seed beads, making sure to tie knots in between adding items. When you are about to reach the halfway point in the bracelet, even up the stringing on the cords buy adding seed beads and then tying a knot. This time string both cords through the back of the flower, out the front, and back through to the back.

Continue stringing the bracelet as you did the first half of the bracelet until you reach the desired length. Tie the two ends together.

Tie a second knot approximately and inch further down. Before pulling the knot snug, be sure the owl button will fit through the hole.


String a bead on each cord and secure with a knot. Trim the excess cording.


 Enjoy your bracelet!

Thursday, April 21, 2011

Artist Made Buttons

Michelle Mach is hosting a fun Button Swap blog hop today.  Love how creative some of the participants were with incorporating buttons into their jewelry.  Buttons can be used as clasps, pendants and even earrings.  Get creative with wire and jump rings to turn them into unique findings and focals. 

Here are a few collections of artist made beads to help inspire you today. Click on the links below for more information about the buttons.

Above:


Saturday, July 31, 2010

Studio Saturday with Shannon LeVart

 Welcome to Studio Saturday! Each week one of our contributors gives you a sneak peek into their studio, creative process or inspirations. We ask a related question of our readers and hope you'll leave comments!     As an incentive we offer a free prize each week to bribe you to use that keyboard. The following week we choose a random winner.
  This weeks winner is Alice with The Bliss Guild! Congratulations! 
You have won a LUV2TRVL button from the studio of Tari Sasser with Creative Impressions in Clay
Send Tari an e-mail with your address and she will get that super fun button shipped out to you.

 This week we visit the studio of Shannon LeVart at missficklemedia.com.

I'm making buttons. 
Fine silver buttons that look ancient, as if they were dug up from an archeological dig or tumbled through the sea.
  I love antiqued metal; the subtle shine, the durability, the "go with anything" aspect of it. While I was wishing to be working with copper or bronze clay, I already had a pack of fine silver precious metal clay unopened for months that I settled for. Using molds that I had made by hand, I began pressing small balls of pmc into each one, delighting in a deeply textured patty of fine silver clay. I was tired of making pendants and buttons have such versatile uses so I created simple shanks with 19 gauge wire and pressed them into the backs of the molded clay. Dried, sanded, fired and tumbled; these buttons turned out beautiful!

As soon as I had the chance, I designed several pieces with them. A wrap bracelet created from sari silk and a hand forged sterling clasp features the Shiva button;

And the Sea Urchin button created a rustic bracelet being used in conjunction with patina-ted brass chain and brown suede;


 And the Wild Horse button acts as the clasp and the focal in this simple leather choker;


 So how do you use buttons in your hand crafted jewelry?

Leave a comment below sharing your button technique and next Saturday one of our editors will draw a number. You could win this fine silver shell button!


Thank you for visiting us here at Art Bead Scene!
Much Love & Respect,
Shannon


missficklemedia.com