Monday, December 30, 2013

Amuse Your Muse Monday with Rebecca of Songbead

Penultimate day of 2013....hope it's been a good one for you.....


See you in 2014.


Rebecca is a Scottish jewellery designer, currently living in Belfast, Northern Ireland. You can read more about her and her work at her blog, songbeads.blogspot.com and see more of her jewellery at songbead.etsy.com. She also has a supplies shop at thecuriousbeadshop.etsy.com.


Monday, December 23, 2013

Amuse your Muse Monday with Rebecca of Songbead

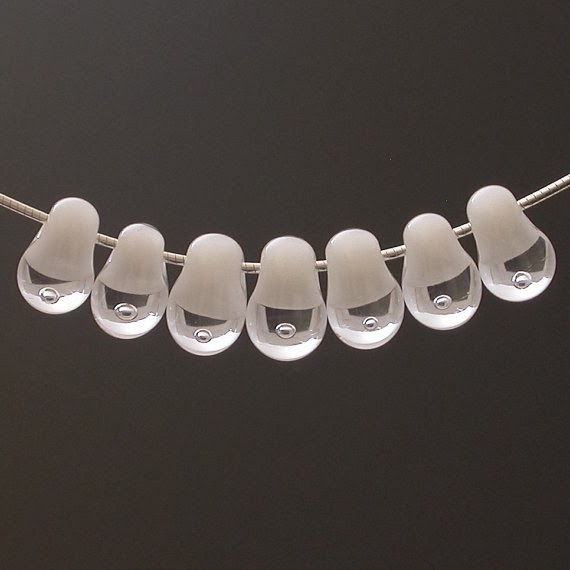
Happy, happy December folks! Not many days to go now. Without further ado, here are some snowy, icy beads! Glass is the perfect medium for capturing the magic and sparkle of ice, as you will see below...


And now for the BeadBlogger Links. Have an absolutely wonderful Christmas, or however you spend the next few days!


Rebecca is a Scottish jewellery designer, currently living in Belfast, Northern Ireland. You can read more about her and her work at her blog, songbeads.blogspot.com and see more of her jewellery at songbead.etsy.com. She also has a supplies shop at thecuriousbeadshop.etsy.com.

Saturday, December 21, 2013

Jazzed up Joy Juice - Tutorial

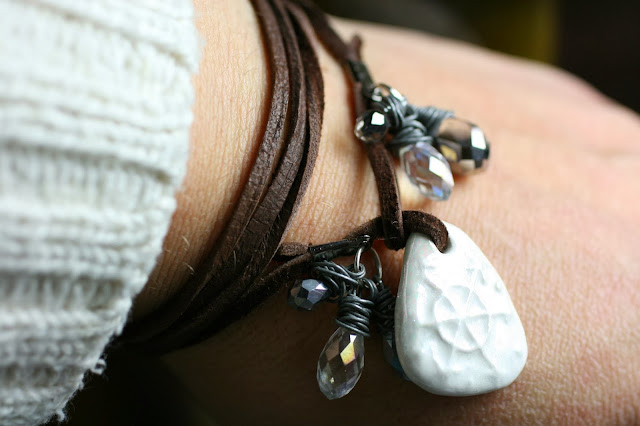
Are you planning on bringing a little bottle of bubbly or your favorite Pinot Grigio to a holiday party? While that is a perfectly acceptable hostess gift, you know that everyone will be doing the same. Make your bottle stand out with a little sparkle and charm and a gift that will last longer than the wine! This quick and easy wrap works as a pretty package detail and also a bracelet (or even a lariat necklace!) the hostess can wear to remember the fun of the event! I whipped this up in less time than it took me to photograph and write this blog post, and I bet you have the materials just scattered on your bead table like I did!

 Gather your supplies... smooth as buttah chocolate deerskin lace (~32"), two foldover crimps, several crystal briolettes and wire, and an artisan created charm (this porcelain snowflake from Lisa Boucher of ClayworksNH. Miss Lisa is having a 40% off sale on her holiday items, including these sweet little charms! Rush over there and check them out!)

 Thread the lace through the charm and secure with the foldover crimp. Leave about 1/2" of a loop above the charm and point the loop on the crimp toward the charm.

 Wrap up a bunch of sparkly briolettes or crystals. (I think I am loving my brand new macro lens. What do you think?)

 Attach the crystals to the crimp loop with a jump ring.

 Measure the other side of the lace in a loop to be sure that it will fit snugly over the widest part of the charm. Don't do like I did and eyeball it! My first attempt was too tight and it was a b*tch to get that crimp un-crimped! (Oy! Excuse the ratty nails!)

 Attach a few more wrapped briolettes to the other side of the leather.

 Wrap around your favorite joy juice for some extra holiday cheer! 

How cute is that?

You are sure to be invited back now! ;-)

Merry Christmas to one and all!

P.S. I will be sharing a matching pair of earrings to this wrap bracelet in Tuesday's Earrings Everyday post. Please come back and check it out!


Friday, December 20, 2013

Inside the Studio with Humblebeads: Rustic Bird Ornament Tutorial

Each week one of our contributors gives you a sneak peek into their studio, creative process or inspirations. We ask a related question of our readers and hope you'll leave comments! As an incentive we offer a free prize each week to bribe you to use that keyboard. The following week we choose a random winner.

Linda Landig is our very lucky winner this week and will receive a Peace Bird Pendant from Gaea.  Linda send Gaea an email and she will get that right out to you!

Inside the Humblebeads Studio:
Welcome, welcome - please ignore the beads scattered over all the table from late night creative sessions, the pile of containers and boxes from my recent shows and that mound of paper work surrounding my desk that needs to be filed away and taken care of before the New Year.  It's a few days before Christmas and like most creatives who own their own business, it gets a little hairy trying to juggle business, celebrating the holidays and making time for family.

I have had a few things happen this year that have made me slow down.  It's been a year of trials.  And right looking at my self-imposed to do list and what is really important to me, I'd decided to stop right now with unrealistic expectations.  And I give you permission to do the same.  Take a few days off, enjoy the sights and sounds of the season.  Spend time with family and not making things.  You can do it.  Put down those pliers and step away from the table.

Here on the ABS we are going to take a break for a few days and offer you a review of the Best of the ABS from 2013.  This is my last holiday tutorial, the 12 Days of Christmas have become a scant 6 Days of Christmas.  But I know you'd rather see me spending time with my family than toiling away at tutorials, because I'd wish the same for you!

Rustic Bird Ornament

Supplies:
Bird Pendant - Lipstick Ranch
Tree House Bead - Humblebeads
Waxed Irish Linen
8 glass size 11/0 seed beads
6mm brass spacer

(Resources: Bird, linen and seed beads: Lima Beads. House: Humblebeads. Spacer: Hobby Lobby.)

Directions:
1. Cut a two 10" pieces of linen cord, string the cords through the pendant to the center of the cord and tie a knot.

1. One one strand of the cord, string on the spacer and house bead.  Tie a large knot with all four strands above the bead. 

3. One on strand leave a 1/4" gap and tie a knot, slide on a seed bead and tie another knot. Repeat with two seed beads on each strand, staggering the knots and beads.

4. Tie all four strands in a large knot at the top, trim cord if needed.

_____________________________________________________________

The Art Bead Scene is planning out 2014 - tell me what would you like to see on the ABS in the coming year?  We'll choose one commenter next week to win a $25 gift certificate from Humblebeads.com.   

Wednesday, December 18, 2013

Perfect Pairings :: Ann Schroeder + Jubilee + Gaea

 
I do so love the little house in this month's painting. I think that is was drew me to it when I picked it out. And that is exactly what drew me to this week's featured designer, Ann Schroeder of BeadLove. Ann tells us that the colors at first felt discordant to her, but upon further reflection, she found them to be full of life. Energizing. That is exactly what I would say about this palette! I witnessed a sky just like this one just this morning. The frosty air makes the colors shimmer, don't you think? Kandinsky sure captured the majesty of a wintery morning sunrise/sunset. And this necklace from Miss Ann puts a smile on my face with the sunny yellows and the crisp blues and the soft and fuzzy pinks.

Featured Designer :: Ann of BeadLove

Featured Art Beads :: Jubilee + Gaea
 
Cozy up to your bead table and get your creative juices flowing! 
Still time to enter your creation.
Join me here on Tuesday, December 31st for the Monthly Challenge Recap
with a picture gallery and InLinkz blog hop!

Tuesday, December 17, 2013

On the 5th Day of Christmas: Woodland Ring Pendant

A trio of autumn leaves floats below a sweet little bird in a beaded wire nest.  This is a simple project that is a great way to use up related theme charms that you have in your bead stash. You could leaves, or flowers, or woodland creatures or sea themes.  Go dig around and see what you have on hand!

Supplies
Ceramic leaf pendant (Gaea)
Polymer clay leaf charm (Humblebeads)
Lampwork leaf headpin (Thornburg Bead Studio)
30mm patina copper ring (Miss Fickle Media)
Pewter sparrow bird bead (Green Girl Studio)
15mm brass jump ring
2 7mm gunmetal jump ring
1 gunmetal lobster claw clasp
24" gunmetal chain
10 4mm gunmetal jump rings
2 4mm brass jump rings
20 pewter color size 11/0 glass seed beads
15" 21 gauge steel wire

Directions: 
1. 3" from the end of the wire create a wrapped loop, wrapping the wire around several times under the loop to form a messy wrap.
2. String on the bird bead, create a large loop under the bird. Open the loop and string on the large copper hoop. Close the loop and form a wrapped loop.  Continue wrapping the wire under the bead to create a nest, adding seed beads on the wire at every pass in the front and back of the bird. Use approximately 10 seed beads.
3.  Add a pewter glass seed bead to a 4mm jump ring, close the ring and set aside. Repeat 9 times.  On the 12mm jump ring, string 5 of the beaded jump rings, add the bird pendant, string on the other 5 beaded jump rings. Set aside.
4. Cut the chain into two 12" lengths, attach 4mm brass jump rings to the end of each chain and thread through the 12mm jump ring.  Close the 12mm jump ring.
4. Attach the clasp to one end of the chain with a 4mm gunmetal jump ring and a 7mm jump ring on the other chain.

3. Create a wrapped loop with the glass headpin. Attach the headpin and ceramic charm with 4mm jump rings.  Attach the polymer clay charm with a 7mm jump ring.

Resources: See links above for the art beads.  Findings and seed beads: Micheal's.  Chain: Hobby Lobby.

Monday, December 16, 2013

Amuse Your Muse Mondays with Rebecca of Songbead

Hello! Can you believe we are now more than halfway through December? Scary thought! If you are anything like me, you will still have a lot to do before you can relax…..

So, without further ado, onto our Snow and Ice art beads…..

First up, these beautiful Fir Tree charms from Mary Harding:


I just love the painterly quality that all of Mary's work has. You can practically reach out and touch the snow on these! They remind me of Narnia somehow - that moment where Lucy first makes her way through the wardrobe and the fur coats, to the snow….magical and wintery. 


Next up, Fulgorine shared her 'Arctic Necklace', complete with her own handmade polymer beads. The pendant reminds me of shattered ice…..beautiful! 

And I found this beautiful icicle lampwork bead on etsy, from My Happy Hobby in Russia:


It's a big-hole bead, so could fit a 'you-know-what' bracelet - but wouldn't it be just a fabulous pendant to a necklace? I love the texture to it - it doesn't just look like an icicle, but like melting ice - absolutely stunning work!


And now for the BeadBlogger Links:


Rebecca is a Scottish jewellery designer, currently living in Belfast, Northern Ireland. You can read more about her and her work at her blog, songbeads.blogspot.com and see more of her jewellery at songbead.etsy.com. She also has a supplies shop at thecuriousbeadshop.etsy.com.

On the 4Th Day of Christmas: Book Bead Bookmarks Holiday Gift Tutorial


I would be very happy to be receive a handmade bookmark since I love to READ and to BEAD.  So I am thinking you might be also.  For a simple and quick to make Holiday gift, I came up with this tutorial for a bookmark using art beads and  Kraft card stock.


Antique book with bookmark   Art Beads:  book beads Mary Harding;
white spiral imprinted glass and small glass beads by Genea beads; green oval bead with surface texture by  Natalie of NKP beads. small colored porcelain beads by Mary Harding 


Supplies
Card Stock  I used a Kraft color  from JoAnn's and other craft supply stores
Copper washer size 1/4 inch  (hardware store or Harbor Freight)
Waxed Linen  Jewelry Accord and White Clover Kiln
Elmer's Glue stick ( it is drier than liquid Elmer's and doesn't warp the paper as much)
Artist beads
Book Beads
Small 4 mm metal beads  mine came from Ornamentea
Package Tags available at craft stores like Michaels and JoAnn Fabrics
E6000 glue
Krylon Acrylic Spray

Tools
Hole punch the kind used to put holes into notebook paper
scissors


1.  Cut out two pieces of Kraft card  2 and 1/4 inches wide and 6 and 1/2 inches long.  


2.  Glue them together.


3.  Using a Package Tag as a model, mark the top edges and hole placement at the top of the glued together strips.


4.  Clip the top edges where you marked them.

5. Use the paper hole punch to make the center hole.


6.  Apply E6000 glue to the copper washer with a toothpick

7.Attach the copper washer to the center top hole that you punched to reinforce it.


8.Choose an image for your bookmark .  I photographed a stack of books that I would like to read.  If you belong to a book group you could  make a photo of books you will be reading. (You can also purchase printed tags with images and then follow along with the tutorial using them. If you choose that option I recommend gluing two together to make them more durable.)
Glue your image to your book mark.  Use a glue stick. Be generous.  Place the bookmark under several heavy books to dry so it will lie nice and flat.


9  Once it is dry, cut a 30 inch piece of waxed cord, fold it in half and and make a Lark's Head knot through the copper washer reinforced hole going from the front to the back of the book mark.


10. Make a mark on you waxed linen at least 2 inches from the top of your bookmark.  Undo your Lark's head knot and begin stringing beads on the folded edge of your doubled waxed linen being sure to leave at least the 3 inches( longer now that it is not on the bookmark)  you marked off  without beads at the beginning so that your book mark can be soft and supple when it goes over the book's spine or cover .It is much easier to string your small hole beads using the the folded end of you waxed linen than trying to fit the two lengths together through the small beads.You can also bead from the two strand cut end and put on your bigger art beads and work from both the bottom and the top.
In addition to the book bead and the artist beads, I used 4mm beads with holes that are large enough to go over the waxed linen. I knotted both strands of the waxed linen below the book bead and then added a few more small beads to each strand of the linen and tied one knot in each.

11.Reattach your string of beads through the copper reinforced hole by making a Lark's Head knot from front to back as before.   Check to make sure you left enough room for your string of beads to gently flow over the book's spine or cover.  Try it out on a book to be sure.  If you need more room you can easily remove extra beads by undoing the Lark's Head knot and taking them off.  To preserve your bookmark you can use an acrylic spray like Krylon Workable Fixatif.


12.  Enjoy giving your art beads bookmark gift.
                           

Posted by Mary Harding

Saturday, December 14, 2013

On the 3rd Day of Christmas: Holly Ornament by Jennifer Jangles


You will Need:

1 Ceramic Holly Leaf
1 Ceramic Round Bead Red
10" Gingham Ribbon
12" of 18 gauge Silver Craft Wire

Instructions:
1. Make a simple wire loop and connect it to the loop of the holly piece and close. Trim the excess wire.
2. Slide the round bead onto the wire and make a second simple wire loop just above the bead. Trim the excess wire.
3. With the remaining wire (approximately 6-8 inches), make an ornament hook.
4. Tie a bow with the ribbon onto the ornament hook and trim any excess ribbon.

If you need help with simple wire loops or ornament hooks here are my Pinterest Friendly Instructions.


Happy Holidays!