Showing posts with label charms. Show all posts

Thursday, January 14, 2016

Easy Heart Charm Bracelet by Michelle McCarthy

Here's a new twist on a bracelet clasp....a heart charm!  I have made this fun and easy waxed linen bracelet with buttons, 12mm round beads and toggles, but never a charm.  I think it's a cute option from the others.  I love the way it dangles down instead of lining up with the gemstone beads.  Here's what you need to make your own version:


You need 30" of 3 ply waxed linen, 8" of 1mm leather, a closed metal ring, gemstone strand and a heart charm.  I handmade my heart charm out of ceramic clay, but choose colors and shapes that you love!

Here's the finished design:


Start your overhand knotting at the closed metal ring by folding the waxed linen in half and pushing the knot tight up to the ring.  You can put both strands through the gemstone bead or 1 strand and leave 1 strand behind the bead.  Make another overhand knot and push it tight up to the bead.  Continue this pattern for 6 1/2" and then attach the charm by making another knot through the wire loop.  I made 4 extra knots before I attached the charm so the charm would not be too tight up against the last gemstone.  Fold the leather piece in half and attach it to the closed metal ring with another overhand knot.  Measure how big you need the leather loop to be so the charm freely can pass through it.  Close the leather loop with another overhand knot.  I used GS Hypo Cement glue to secure the leather knots.

Have fun making a charm clasp bracelet of your own!

Tuesday, October 27, 2015

Extending the Inspiration of this Month's Challenge: Faience and Amulets


Ma'at from Tomb of the Queen Nerfertari

1255BC

Valley of the Queens

This month's challenge art work, pictured above, got me thinking about Egyptian art and their very early use of glazed ceramic material which is known as Faience.   It was unique in its time as it was a self glazing kind of clay.  It was composed of chemicals that would drift to the surface of a piece while the clay dried and when fired would give the piece a glassy colored finish.  Egyptians thought the bright shiny faience glistened with a light symbolic of life, rebirth and immortality. According to my research, a very popular color at the time was a Lapis Lazuli blue.  I  recently tried making pieces with a modern version of the clay called Egyptian paste. (You can find this kind of paste clay from Laguna Clay or at  Seattle Pottery where they make it themselves.  It only comes in two colors from Laguna Clay:  White which you can add color to or Copper Blue  and many colors from Seattle Pottery.  The clay I used was from Amaco and has been discontinued.  Below is a picture of the package which assures you it is like "the real thing."

                                 Egyptian Paste in a commercial package.  Add water into the plastic bag and knead until fully absorbed and smooth. 

In the picture below you can see the pieces drying and crystals forming on the surface which will melt in the kiiln and become the "glaze."
                                 picture of crystals forming on the Egyptian paste

Once dry, I fired them in my kiln without any glaze or coloring.  I used some kiln paper that works with fused glass so they would not stick to my kiln shelf.  I think that they came out a lovely shade of blue that might be somewhat like what the Egyptians favored.

                    Small pendants and charms made with Egyptian Paste Blue color

About the same time I was thinking about Egyptian Paste,  I became aware that Andi Fasimpaur, ceramic artist and one of the co founders of the Beads of Clay, had hand carved a series of molds of Egyptian artifacts. Andi made these molds to share with her daughter's social studies class.  She has generously given me permission to use some of her photos for today's post.
                                       Push molds hand carved by Andi Fasimpaur
mold of the wedjet-eye --a powerful charm for protection against evil happenings-hand carved by Andi Fasimpaur


                             Ceramic push molds and artifacts made  by Andi Fasimpaur
                       Finished pieces made from Andi Fasimpaur's hand carved ceramic push                                 molds

All of these molds made by Andi Fasimpaur would be great to use with ceramic clay and with Egyptian paste. I found that the Egyptian paste is quite hard to work with.  It crumbles and breaks apart easily.  That is why push molds and stamps like Andi's are perfect for it.  When I went looking on Amazon for a book I once had on making egyptian amulets, I was quite fortunate to find that it is once again available.  It is called Fun with Amulets by Diana Craig Patch, published by the Metropolitan Museum of Art.  It is  not only a book but a kit which includes a mold with 24 different amulet forms.  Each one is modeled from an actual Egyptian amulet or amulet mold-- quite incredible!!  It comes with a small book that explains the function and meaning of each of the molds and  how they were used in their time and how they can be used in the present for amulets and charms as well.  The kit was originally designed as an education product for children and also comes with several blocks of polymer clay.

                                      photo of the cover of the book Fun With Amulets


                                                  photo of the silcon push molds of the amulets and charms

I had better luck using modern ceramic clay with these molds than the Egyptian paste.  Some of my results are pictured below.  The scarbs are made with the Eqyptian paste and the rest are made with a Terra Cotta ceramic clay.
                                       Several charms and amulets based on ancient Egyptian molds

To round out this tour of possible extentions of this month's challenge art, I did a search on Etsy to to find some modern art beads made from Egyptian paste and found the following:
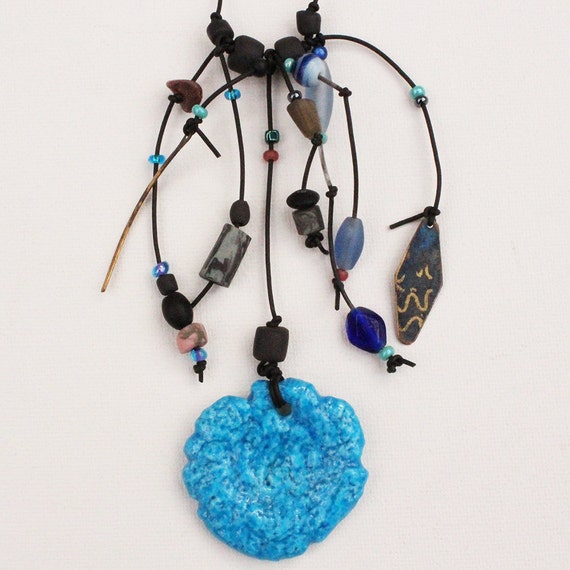

Necklace from Hooked Wear on Etsy made with a handmade Egyptian Paste pendant
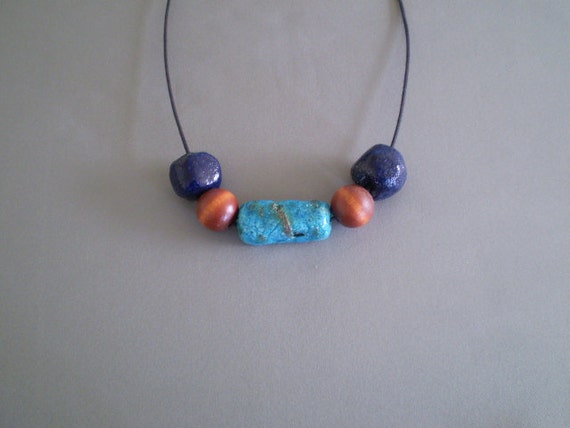
Faience or Egyptian Paste & Wood Beads 23-inch Necklace
Strung Egyptian paste and wood beads by Gaynells on Etsy
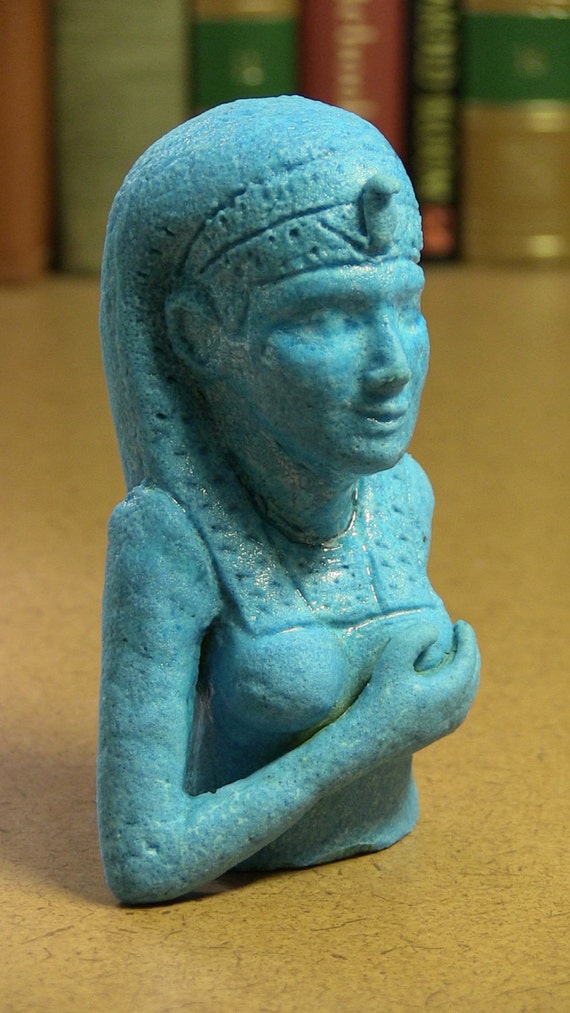

Custom Order, Egyptian artifact replica, Isis Figure, Egyptian Paste (fired ceramic).
Egyptian Artifact Isis Figure made from Egyptian Faience by Ceramicland on Etsy

I hope this look at Egyptian Faience and its present day applications will inspire you to continue on with the many aspects of Egyptian art that can inform our creations and our art beads.
Thanks so much for stopping by.
Mary

www.maryhardingjewelry.etsy.com
www.maryhardingjewelry.com


Friday, February 13, 2015

Inside the Studio :: Creative Impressions In Clay

Welcome to Inside the Studio!

Each week one of our contributors gives you a sneak peek into their studio, creative process or inspirations. We ask a related question of our readers and hope you'll leave comments! As an incentive we offer a free prize each week to bribe you to use that keyboard. The following week we choose a random winner.

Congratulations to Linda Katz! 
You have won your choice of a Mended Heart Pendant or Artfully Worded Quote. 
Please send Erin an e-mail with your information.
________________________________________________________________________________
House Heart Charms

My recent project was making the charms shown above for the Bead Cruise.
I have been a sponsor for the cruise every year except two. Job got in the way.
70 items were needed for the Goody Bag that go to each Cruise participant. The theme for the cruise is Hearts or Alice in Wonderland. You don't have to make something to go with the theme, it is optional, this year I chose to go with the theme. As you can see I went with hearts.
I'm going to show you how the charms came to life!
I extrude a clay coil from my clay gun. Pretty cool toy! I cropped out the huge mess that was in the photo...a little is still there but I was unwilling to Photoshop it out.

I straighten the coil out and measure it putting tick marks where they will be sliced. This makes it so they are close to the same size. Not that my slicing is perfect.

I take one of the clay slices and hand form to look like a house. Smoothing edges and flattening as I go. Put the loop in the top of the house and clean up the insertion point with a wet paintbrush.


I stamped the Heart into the clay. The heart shape was made by carving the end of a dowel. The dots were made using a stylis. They are set aside to dry as I continuing making lots more. Ignore the dry clay hands.

Underglaze colors on and getting ready to go in the kiln for the first firing.

All the glaze colors are on and ready to be dipped with the clear glaze and fired once again.

Out of the kiln! It's a party of color. I love color!

Carded and ready to be shipped to go on a Cruise.

As you can see there are many steps to get to a final product.

*Remember any button can be a pendant or jewelry component.*

My Question is: 
Where is your heart these days?
Mines not always into clay. See below.

This is my most recent project that I just shipped today to my grandson in Norway for his Birthday.
Yes, it is adorned with buttons!

Leave your answer to the question in the comments 
and you could win 2 House Heart Charms.

Have a great day and Happy Valentines Day!!
Feeling Sassy as usual!
Tari Sasser

Wednesday, September 19, 2012

Ravens

Over the last few months I have had more and more request for Ravens! So finally here we are! I have created a series of Ephemera pendants for you to use in your jewelry creations that include these fabulous Ravens! These are in an unfinished stage, I have a lot left to do on these to make them listing ready, but this week is magic week! The week where things happen!

I could not resist these awesome images! I worked with Ella of Calico Collage to get this idea together. She makes about 75% of the images I use to create my charms and pendants. These of course I wanted to have in time for Halloween! I will be listing them in the next couple of days.

I want to remind you of all the wonderful ways you can use these. To start, I sell them un-drilled. This allows you to use your creative imagination to it's full potential! Some of you will choose to use them as they are and just add a magnet to the back or even add them to your scrapbooking pages! Very versatile!

My favorite way to use them is with Vintaj filigree! This adds a certain "je ne sais quois" to the pieces of jewelry I create. It gives a touch of romance and mystery! Perfect for these Ravens! The dark laciness of it...I love it! 

I have even seen some of you wrap them in wire! What a creative use of these small pieces! 

At anytime of course you can have them custom drilled at no extra cost to you. There is the simple top drill. Just look at the image to see if that is where you want the hole. You can also top and bottom drill to add dangles! What about each corner for a bracelet maybe? Or a little lower on the sides... I can even do three strand bracelet drill for some of these! 

One of the most used drilling options is the two top corners and bottom center. This makes the piece a focal with the possibility of endless dangles!

So many ways to use these! So look for them in the Skye Jewels Supply shop this week...

Thanks so much for another fun visit!

Marie

**Speaking of Vintaj, October's challenge just happens to be "Radiant Raven" what a coincidence! Maybe some of you will want to use these in your design?**