Showing posts with label pendant. Show all posts

Tuesday, March 15, 2016

Sign of Spring


I love this still life painting by Taisia Afonina! It has a real old-world charm about it, when a tea party was a normal everyday occurrence. I can feel the breeze fluttering through the window, ruffling the soft sheers, causing the light to glint off the silver tea service. I can smell the fresh flowers in the glass, as if they were just picked by the roadside. I love the way the the cobalt blue cups rimmed in gold give this an air of formality, even though they are more haphazardly arranged, as if someone was just setting up the table.

But what attracted me most was the profusion of pussy willows in the tall vase.

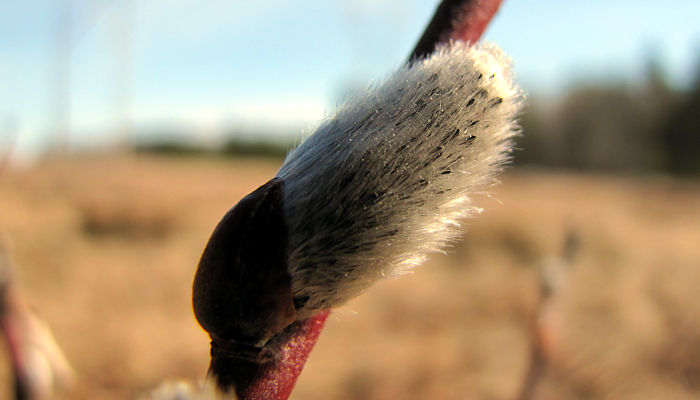
I love pussy willows. I have a similar tall vase of them in my house all year round. I love their fuzzy little buds and the straight, dark branches. It brings to mind when I was a child and I would walk 10 blocks to my elementary school. Along the way I would find bushes of these tiny treasures in very early spring and swipe a few branches to carry to my teacher wrapped in water soaked paper towels. So pussy willows always remind me that spring is coming!

Here is what I learned about my favorite furry buds:

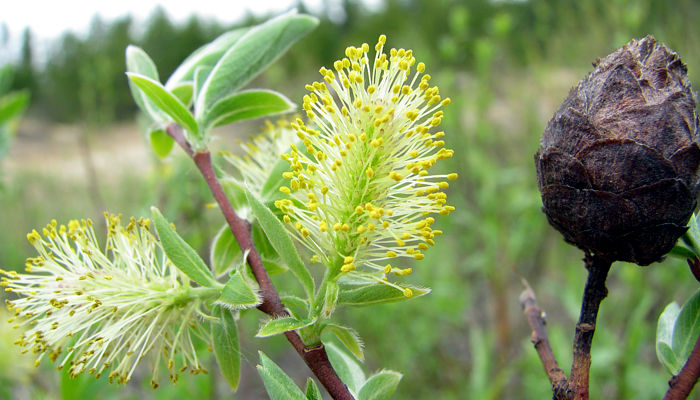
Most of what people see and think of as pussy willows are, in fact, the male flowering parts, or male catkins. The female catkins tend to develop and open a little later than the males, but they can form attractive pussy willows, too. And what, to us, is the most attractive stage in the pussy willow is actually very early on in the emergence of the catkin. The soft, silvery hairs that we see are the "fur coat" that helps to keep the developing reproductive parts warm. Remember, pussy willows emerge in early spring when it's still quite cold. But when the sun shines, the temperature of the center of the catkin can rise above air temperatures by trapping the heat from the sun with it’s insulating hairs. This additional warming aids in the development of the pollen within the anthers and of the ovules within the carpels. The willow flowers are fully "open" when the yellow pollen-bearing anthers are protruding and the stigmas are visible.
OLD pussy willow stick pendant, circa 2013
A few years ago I tested out carving on scratch foam and came up with a pussy willow pendant (it was featured in Stringing, Fall 2013). As you can see, from the stamp I carved on the foam that resulted in an "inny" for the image, something I wasn't quite pleased with, although I loved the colors and the soft pearl catkins. But after awhile it was impossible to get a good impression with the foam so I had to discontinue making them.

I knew that I wanted to revisit that image, but with a twist… I was following a tutorial on how to make a sort of faux ceramic look with polymer clay using inclusions in the clay, chalk pastels and a crackle medium. It called for making your own mold of sorts, so I carved a piece of scrap clay and baked it. That way I would be able to replicate this look. Impressing the mold onto the clay in the bezels resulted in the "outy" look that I was hoping for. I colored the clay with the chalks and used a little bit of Lumiere pearl paint to make those catkins glow. 

NEW pussy willow pendant, circa 2016

Then I baked the clay in my favorite long rectangle bezels, as they are long and lean in that tall crystal vase. 
After they were done baking, I brushed a layer of crackle medium onto them. As the medium dries it makes all these great fissures. But you don’t really see them. So I added a little blend of some acrylic paint over the top to settle in those cracks, wiping off the excess. That was exactly the look I was going for!

before and after
I am quite pleased with the way they turned out and so happy to have my own hand-carved mold so I can continue to make them! I call this Sign of Spring as they remind me that the warmer days are coming and the return of the flowers is not far behind. These were made for my Simple Truths Sampler Club members, but I would love to make a limited edition one for you before spring turns into summer and they will disappear again! 
I also made one for two of my fellow ABS editors, Mary Harding and Michelle McCarthy. Check back on March 22nd for a reveal of how we used each other's components inspired by this month's painting inspiration!

Happy spring to you!

Friday, February 8, 2013

Until Next Time Wire Tutorial

I recently ran my first eCourse devoted to wire working, Aspire to WIRE. On the last day of class, I shared this tutorial as a how-to solution to show off the hole side of a disc bead. I thought y'all would like to try it out too.

One of my tips... sometimes your hands are the best tool when making handcrafted jewelry. Go figure!


Tools - 
wire cutters
mandrel

Materials - 
18g round dead soft silver wire
22g round dead soft silver wire
1 lampwork disc bead (or other art bead) you want to show off the hole side of

Instructions - 


One of the cool things about this pendant is that you need hardly any tools to make it. A round object the size of a pen, wire cutters, and your bare hands are all that are needed. And it takes just FIVE simple steps. This will work with any size disc bead and would even work with other shaped beads. You'll need to start with a piece of 18g silver wire that is 8" (20cm) long. Fold it about 3" (7.5cm) from one end and slide your bead onto the wire. Pinch the wire so that it hugs tight to the bead. 


Wrap the shorter length of wire around the longer one as you would for a wrapped loop. Trim the excess wrapping wire. 


Tightly coil 22g wire around the remaining wire until 3" (7.5cm) is covered in coil. Trim the coil wire ends and butt the coil up close to the wraps made in the previous step.


Wrap the coiled wire around a mandrel and treat it like a wrapped loop. Simply wrap the coiled wire around those starter wraps. You should have an area of the coiled wire that is bare core wire. Wrap that once around the link too. And then trim your excess wire.


And there you have it... a great bail for a disc bead that shows off the hole side of the bead! Pretty sweet, wouldn't you say? You can slip it onto a beautiful sterling chain or a strand of silk cording.

Please note: This tutorial is intended for personal use only. Please do not sell or distribute this as your own. You may sell work created with this tutorial, however, I ask that you please note on your product listing "Project Designed by Kerry Bogert".

Thursday, March 22, 2012

Berries and Leaves Pendant - Free Project

Need a splash of color and easy style?  Try a long pendant with a few art beads paired together. As you can imagine, my mind is still filled with tropical island inspiration and this pendant certainly fits that bill. 

14mm lampwork bead
15mm lampwork disks
5" blackened steel wire 22 gauge
28" gunmetal brass chain
1 5mm gunmetal brass jump ring
2 6mm gunmetal brass spacers

1. Create a large wrapped loop with the wire, adding the pendant unto the loop before closing and wrapping.
2. String on the lampwork bead, spacer, disk bead, spacer and disk bead.
3. Create a wrapped loop on top of the pendant, wrapping the wire several times under the loop.
4. Add the chain to the loop with small jump ring.

Sources: Lampwork disks: BlueSeraphim.  Lampwork bead: SueBeads. Spacers, chain, jump rings: Hobby Lobby.

Friday, November 4, 2011

Smarty Pants - Free Project

smartypants
This is such a cute gift idea featuring one of my new tiny charms!  These would be perfect for a stocking stuffers or holiday gifts.


Supplies:
25mm copper disk 
2 7.5mm copper jump rings
2 5mm copper jump rings
18" copper chain & clasp

Tools:
Hammer, texturing plates, letter stamps, dapping block & punch, metal hole punch and chain nose pliers. 

1. Stamp the words on the copper disk first.
2. Create texture by hammering the texture plate on the disk, avoiding the text.  (Here is a video showing you how.)
3. Use the hole punch to create a hole at the top of the pendant.
4. Dome the disk using the dapping block and punch.  (Antique the pendant with liver of sulfur for a darker finish.)
5. Attach the charm using a jump ring.
6. Attach another jump ring for the chain, slide the chain through, adding on the clasp.

pendants1
Offer pendants with inspirational words or a floral background for quick and easy impulse buys at your next show.  (Chain & copper disks from Ornamentea.)


I can't wait to whip up some with my tiny holiday charms with words like, "Jolly", "Peace" and "Merry".  For the holiday ones I would suggest using Vintaj's gunmetal blanks and chain.  They will buff with a silver finish that looks like darkened silver - lovely!


Tiny Disks can be found in my Etsy shop - use discount code HolidayPreview to save 20% off your order until Monday!

Saturday, October 29, 2011

Studio Saturday with Cindy Gimbrone

Welcome to Studio Saturday! Each week one of our contributors gives you a sneak peek into their studio, creative process or inspirations. We ask a related question of our readers and hope you'll leave comments! As an incentive we offer a free prize each week to bribe you to use that keyboard. The following week we choose a random winner.

The winner this week is Stephanie McGinley! - Congratulations, you have won one Heather's fall leaf pendants! Heather with your address, and she will send the pendant out to you.


Welcome to the studio of Cindy Gimbrone!
Time gets away from me. It's almost November and I've barely touched a glass rod. I've spent the fall immersed in another medium - metal clay. I even took a class in Mokume Gane. I've been blogging about my adventures so instead of words, I'd like to take you on a visual tour of some of the steps I've gone through in my studio this fall....

It ain't pretty but when it comes to all that metal clay dust, safety is important - studio exhaust fan on in the background.

Burnishing Mokume Gane metal clay pendant

Metal clay fresh from the kiln - crispy but fired to perfection!

Close up of polished Mokume Gane Pendant


Polished and Sealed Mokume Gane Mini-Pendants


I've got a few more pieces to fire from class. Next up will be white bronze. Attending a class filled me with ideas and excitement. I'm sure my glass misses me, but this hiatus is fueling my creative energies. I didn't intend to be away from the glass torch this long, time has gotten away from me but I'm realizing it's time well spent.

Has something re-energized you? It might be time away, a class or inspiration you found in the changing season. 

Share with me by leaving a comment and you'll be entered to win one of my Mokume Gane Mini-Pendants.
I look forward to reading your comments!

Friday, May 14, 2010

From the Beadmaker's Table: Miss Fickle Media

From One Little Piece of Coral
This is a piece of coral my son found on the beach in Florida in 2007. It is an extraordinary piece of coral in that it reminds me of that precious time and floods me with wonderful memories each time I look at it. I remember the feeling of contentment and peace of mind seeing my family enjoy the sand, sun and ocean.

I first used it to create a mold. Something I do with almost every 3D trinket I own cause you never know what is going to make a really cool clay thing-a-ma-bober. 

From that mold I created this simple but unique pendant;

But I also found that by just using the top section of the coral I could create this very interesting crackle effect in beads;

The sides of the coral added a nice texture to the edge of these clay discs;

And the back of the coral creates this texture;

I am thrilled to get so many uses out of one item! It has opened my eyes to looking at every little object with potential for so much more. A change of position and color of paint and I have a seemingly endless way to decorate polymer clay art beads!

Much Love & Respect,
Shannon
missficklemedia.com