Showing posts with label tutorial. Show all posts

Tuesday, December 27, 2016

12 Days of Christmas: Day 9 - Build a Ladder Art Bead Necklace

                      Southwestern Style Ladder Necklace by Mary Harding Jewelry
Introduction
Over time I have learned that I like necklaces with lots of stuff up front. By that I mean multiple strands, thick rows of large beads dripping with fringe , fiber and more. In fact , that is how I got into free form peyote stitch: it made it possible to put all sizes of beads together to create a wall of color to wear around your neck and over your chest.

In the last year or so I discovered the ladder necklace  and found that it too lets you create bands of color, texture and interest without out having to have statement size beads or complex seed beading skills.

So today I am going to share with you a basic ladder building necklace tutorial  with you. You can visit my Pinterest board of Ladder Necklaces for further inspiration HERE.

Essentials
Size: Overall 24 inches

Supplies:
24 inches of 6.5 mm etched brass or copper chain
1 Yard of waxed linen
Size 3 mm Toho Magatama seed beads—small package
2 flat disk beads
2 round beads
2 twisted disk art beads with floral texture
1 handmade brass and solder toggle clasp
1 handmade ceramic 2 hole art bead about 3 ½ inches in diameter
2 10 mm jump rings
3 5mm jump rings     
Glue                
                                                                              
My Version of a ladder necklace consists of several key components:

1. a  two hole or 2 loop pendant
                                            two hole pendants by MaryHardingJewelry

2. Thee rungs
       close up of the three rungs
3. Chain and  Toggle Clasp

close up of chain and toggle clasp

Next I have included a Fleshed out version of the  supplies which includes comments and info about these 3 components of the necklace as well as a few suggested suppliers.

Fleshed out version of Supplies ( including suppliers)
Chain: I used two packages of Vintaj 16 inch 6.5mm etched oval cable chain to create two pieces of 12 inches of chain. I like this size of chain because the links are large enough to count easily ( but not so large as to dominate the necklace), a necessary task to make sure that you ladder rungs are evenly spaced so t hat you central pendant hangs properly. You can get similar chain on line at Fusion Beads.com; Artbeads.com Bello Modo.com and most likely at your favorite craft supplier.

Waxed Linen: 1 yard. Pick a color that will go well with the other beads you will be using. There are many many colors available in most online and brick and mortar beading shops. I used 3 ply waxed linen and it fit easily thru the see beads I used to construct the ladder rungs. You can find different colors and thicknesses of waxed linen on Etsy and by searching with Google.

Seed Beads: I used TOHO Magatama seed beads for the ladder rungs and to attach the disk and round beads. They worked well with the waxed linen. The curved tear drop shape of these seed beads gives an organic look to the ladder rungs of this necklace. I picked a color that was a mix of brown and turquoise. A small 8 gram package of these Magatma beads will give you way more than you need but I am sure you find other uses for them. They are really wonderful beads to work with. Available online FusionBeads  and many other online stores and some brick and mortar craft and bead stores.

The disk and round  Beads: The flat and round ceramic beads are handmade by FireFlyDesign Studio.  They are very well made and her colors are wonderful and she always has the right size.  I made the twisted disk beads and they were raku fired last year at a community workshop I attended.

The Art Bead 2  hole Pendant  I did some searching on the internet for two hole art bead pendants and  found that they are not that plentiful but  here are some suggestions for where to find a few:
FireFlyDesign Studio; MaryHardingJewelry; Gaea Handmade, J.Davies Reazor, and HappyFishThings.
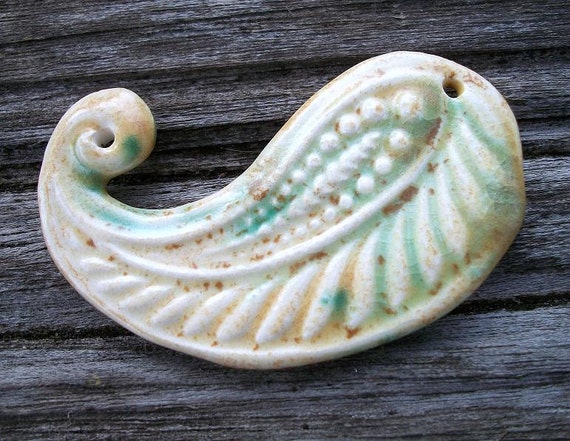
Handmade Ceramic Paisley Pendant in Shades of Beige and Green Bursts
                                    FireFlyDesignStudio 2 Hole  Paisley  Pendant
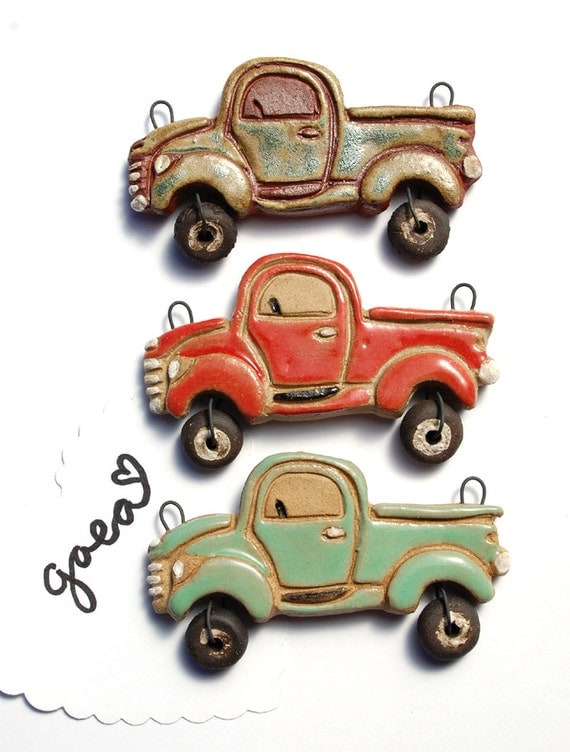
Pre-Order / On the Road / Vintage Ceramic Truck Pendant
                                                     Gaea 2 loop Pendant  On the Road
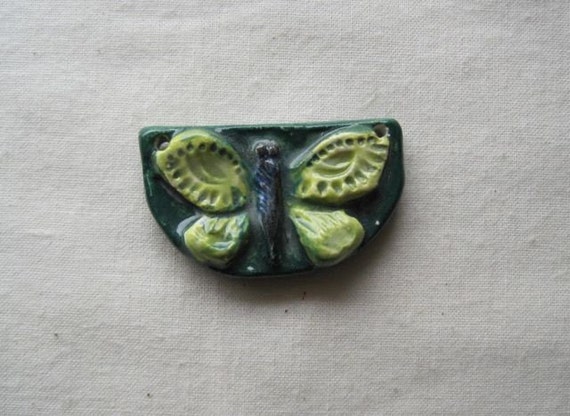
Spring butterfly - ceramic sculptural pendant
                                        jdaviesreazor Spring Butterfly 2 Hole Pendant
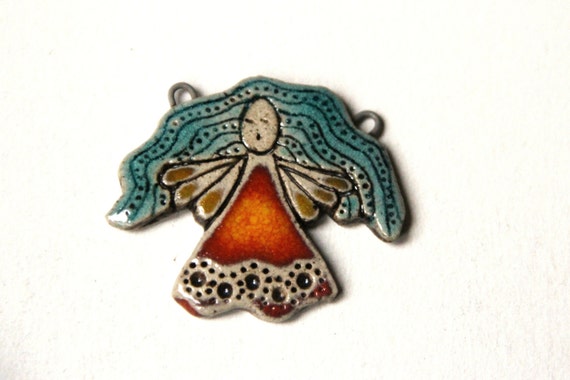
OOAK ANGEL PENDANT:  Rustic Stoneware Ceramic Pendant - handmade components for jewelry making
  HappyFishThings  OOAK Angel Pendant


And finally the directions for how to put this all together.
Steps
1.  Measure out 2 even pieces of chain i.e. they should each have the same number of links( I counted 47 links for each piece of chain- and measure about 11 1/2 inches for a 24 inch neclace considering that the toggle clasp will take up about 1 1/2-2 inches. ( 1 1/2 inches using the clasp pictured.)

2.  Attach one of the 10mm jump rings to each length of chain.

3.  Then attach your 2 hole pendant to the jump rings (see picture below)

                                            2 hole pendant attached to chain links with 10mm jump rings
4.  Making the rungs
Cut a 9 inch piece of the 3 ply waxed linen.  One for each rung.  The rungs gradually widen as you go up.

For the first run, string on  20 of  the Magatama seed beads. Use 24 on the 2nd rung and 32 on the third. For the first rung (lowest one) center the 20 Magatam seed beads on the 9 inch piece of waxed linen.  Tie the linen  to the inside of the 3rd link of each piece of your chain with an over hand knot.  Do not cut the tails.  Do the same for the 2nd rung on the inside of the 7th link and for the 3rd rung on the inside of the 11th link of each piece of chain.  Check to make sure that the rungs hang evenly and straight.

5.  Adding the Ceramic Beads
To attach the ceramic round and disk beads at the both sides of each rung  you are going to thread the long end of the waxed linen remaining from stringing on the seed beads, through the hole in your bead, add 3  Magatama seed beads and then go back through that hole and tie a slip knot around the threads.  See pictures below:
Attaching the disk and round beads with a picot and in the following picture securing with one or two slip knots.  Use a drop of glue to further secure.
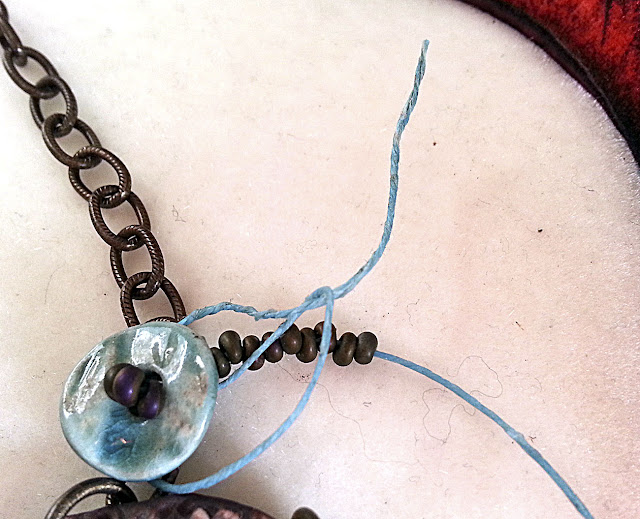
   Tying the slip knot around the attached round or disk bead at the side of each ladder rung

Close up of beads at end of rung attached.  Repeat procedure for each rung.

6.  Attaching the Toggle Clasp
Use the 5mm jump rings to attach the toggle clasp and its bar to the ends of the chain.
Now your necklace is finished!!!
I hope you will give the Ladder Necklace a try.  You can probably find most of these supplies in your stash and improvise for what you do not have. Or you could try your hand at one of the necklaces on my Pinterest Board.  Enjoy!!

Thanks so much for stopping by!!
Mary

Tuesday, January 12, 2016

Fun Connectors for Bracelet Making


                                     Bracelet Bar Stained in a dark brown

Lately I have been hungry for the color brown.  Maybe it is because winter has come to our area so late that the brownness of all the trees in the newly fallen snow just looks so pretty and rustic.
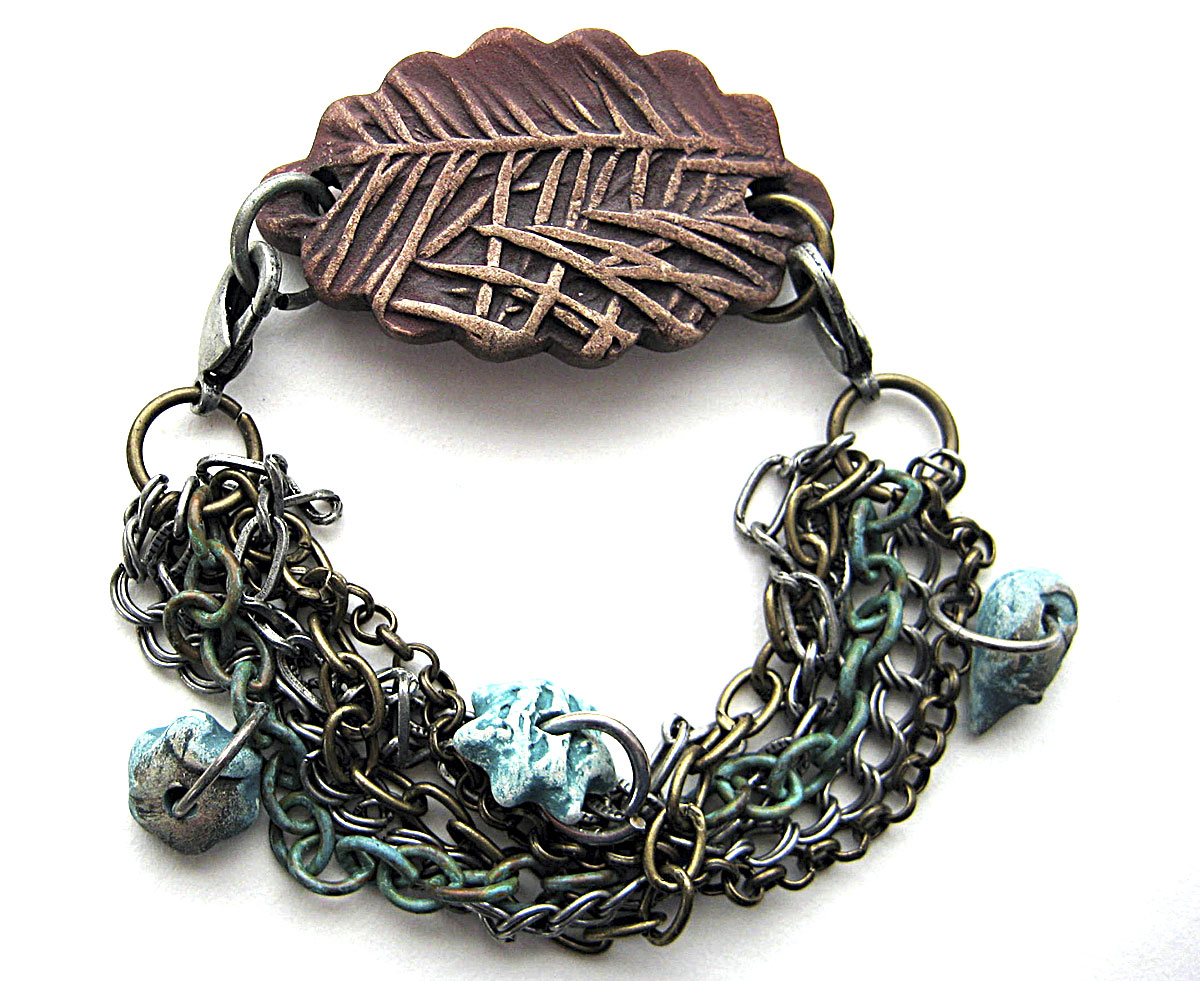
The bracelet bar pictured above is one of the  pieces I have made. You can see more pieces in my Etsy shop.  For today's post I thought I would try out some connectors that  have been calling my name for some time with this rustic bracelet bar.
They are called Short Cuts and that is just what they are.  I bought them some time ago at Michaels but have only tired out the thin bracelet connector above.  For today I am going to make a bracelet with the one with all the chains.( on the left in the picture above.) I will use it as a base and add on some pieces from my stash to personalize it a bit.

Supplies:
1. Multi chain connector from Micheals--Blue Moon Beads.  You can also purchase these online as I am doing now that the Lake Effect Snow Machine has me locked in away from the Big Box Stores like Michaels. Search Blue Moon Beads and they will pop up.
 2. a 6 inch piece of teal colored chain from Miss Ficklemedia--open link is best-- it is about 1 or so  inches too long.  Easy to shorten since the links are not soldered shut.


3.  several small ceramic charms and jump rings to fit--about 5mm


4. Art bead bracelet bar  this one is from my Etsy Shop

5. 2 Large 11mm jump rings to match the ones on the connector or you could connect the lobster claw clasps directly to your bracelet bar. I am using jump rings so that they move easily on the ceramic stringing holes.

Tools
2 pairs of chain nose pliers to open and close the jump rings.

Bracelet Assembly
1.  Use your chain nose pliers to open a chain link on each end of your chain and attach the chain to the jump rings that the other chains are attached to.  I suggest putting your chain piece in about the middle.
2.  Use your chain nose pliers to open the smaller jump rings to attach the small charms to different pieces of chain.  I suggest a total of 3 but you could use more.

3.  try on your bracelet and see how it fits.  It should fit a 6-8 inch wrist. If it is too big you could shorten all the chains by removing links.

  or as a wrap bracelet with a laser transfer poly clay bracelet

                                   leather bracelet wrap  art bead bar by Mary Harding

I hope this look at these Short Cut Chains and Wrap Connectors  have given you some  ideas for making some fun bracelets of your own using art beads.

Thanks so much for stopping by.
Mary

Saturday, December 19, 2015

9th Day of Christmas: Deck Your Lobes!

It's that perennial 'winterval' problem: how to make festive earrings that aren't too, er, festive. I know there are some who are happy to go for a splash of red, green and gold when celebrating on Christmas day or at a work's do. There is also the popular alternative of something more understated featuring symbols of the season - snowflakes, holly, stars.  But, what if you want something that is striking and (dare I say?) party-ready, while subtly seasonal, and suitable for year-round wear. That's a lot of boxes to tick! But the design I'm sharing today could be an answer. All you really need, aside from your art beads, is some short lengths of chain and some three-to-one connectors. There's a huge selection of the latter available out there - you can go as simple or as lavish as you like.


(l-r: The Paris Carousel; Finding Your Element; Legendary Beads)

You may well already have some in your stash. If you find the ones you have a little plain you could always try adding patina - to co-ordinate with the rest of the earring perhaps?

But what are we making? These...


As you can see, it's a relatively simple construction. I've grunged up my connectors which were some large vintage copper ones. But this is totally optional - you might prefer plain copper, for example. The only remaining consideration is what art what beads to use. Here I've used a pair of Linda Newnham's icicle-like, frosted lampwork headpins, topped with some spacers and tiny sparkly crystals. The size of connectors will determine how wide the central art bead(s) can be. You don't have to opt for long, thin focal beads. You could take some smaller art beads or charms and mix them with other beads to form stacks or columns in the centre. The chain and the centrepiece are all attached to the connector with 4-5mm jump rings. This first pair can serve here as a kind of blueprint. Once you have the basic idea you can be as elaborate as you like.


The connectors in this pair are some very unusual little vintage fairy/angel(?) figures that were linked together in a chain. There's a loop on each hand, but also another on the foot, from which I've hung a winter-y white Scorched Earth drop. I've added more vintage connectors at the bottom of the chain, wrapped round with some pearl-y seed beads, and I've hung a little faceted glass drop at the very bottom.

I think either of these pairs of earrings would be great for the holiday season, however you really could wear them all year round. Such earrings also make for great gifts: how much nicer to get someone something they can feel winter-y in, yet can be worn in all seasons!

Merry Christmas and a Happy New Year,
Claire

www.somethingtodo.etsy.com
www.somethingtodobeads.etsy.com
www.somethingtodowithyourhands.com


Tuesday, December 8, 2015

2nd Day of Christmas: Tree House Ladder Necklace


Tree House art bead by elukka

My inspiration for today's 2nd Day of Christmas tutorial is this art bead I purchased about a year ago from elukka   The moment I saw it I knew I had to have it.  I love the tiny steps going to the tiny house ensconced in that beautiful fir tree.  How perfect for this Holiday season.   If you are not familiar with the charming house beads and other wonders made by artist
 I call the necklace I am sharing with you today, Tree House Ladder. While I was making this necklace I was thinking its ladder structure goes well with the  idea of climbing up into the tree to the tree house.  And then I realized that when I am wearing this necklace, I am the tree.  Makes me think of the Yoga Tree Pose and wearing it gives me a sense of finding center and feeling balanced and well grounded.  Although you may not be able to find the exact same art beads I have used, the tutorial does show the basics of making a ladder style necklace with these wonderful curved multi loop connectors and develops the ladder theme for a necklace suitable for this time of year with many suggestions for sources of art beads.

                         Tree House Ladder Necklace by MaryHardingJewelry

                            Another View  Tree House Ladder necklace showing neckline

Supplies
3 Blue Moon Curved Multi Loop Connectors  in Antique Silver or Gold Color.  I used the gold color finish (JoAnn Fabrics)
25 ( includes a few extra)  7mm jump rings from JoAnn Fabrics. You need thin ones to fit thru the loops on the curved connectors. I used the gold color.  I had to ream out the holes on many of them anyway.
2 large 15mm jump rings gold color JoAnn Fabrics
2-6  16 gauge gold colored 8mm jump rings  Fire Mountain Beads
32  inches medium curb chain antique brass  Ornamentea
Toggle Clasp to go with your chain.  Lima Beads
10 size 8 seed beads in a dark transparent matte green Whimbeads
8   size 8 seed beads in a dark transparent red Whimbeads
3 yards  DMC #5 Cotton Perle to make the tassel. JoAnn Fabrics Directions available here
Various Art Beads:  Christmas tree charms, birds and leaves are by MaryHardingJewelry; heart flower is by Melanie Brooks of Earthenwood Studio; Tree House Tree by Elukka
2 brass balled end head pins--you can make these from 20 gauge brass wire or use headpins
2 silver or copper heishi beads  Micheals
Tools
2 pairs of chain nose pliers for attaching beads and charms to the curved connector bars
Round nose pliers for making wrapped loops for the bird charms
Flush cutters for cutting the wire for wire wrapping
Bead Reamer for enlarging holes on the curved multi loop connectors
Scissors for cutting the cotton yarn
A small piece of cardboard for wrapping your tassel

Directions
1.  Lay out the chain on your work surface so that both ends are even.  You will be counting links from these evenly placed ends to determine where to attach the curved multi looped connectors.
NOTE  keep your chain in one piece until you are completely finished assembling your necklace and then add the toggle clasp.  In between work sessions hang your necklace on a manikin or something else so that it does not get twisted and tangled.  Like the Yoga Tree Pose, this necklace is based on balance.
2.  Attach the three curved multi looped connectors.  To attach the first one count up 7 links and attach one of the 7mm jump rings to the inside of the 8th link and then to the connector.  Repeat this on the other end of the chain.
Attach the 2nd curved multi looped connector by counting up 14 links (from where the first connector is attached)  and attaching a 7 mm jump ring to the  inside of the 15th link.  Repeat for the other end of the curved connector.
Attach the 3rd curved multi looped connector by counting up 11 links from 2nd curved connector and attaching a 7mm jump ring to the inside of the 12th link.  Repeat this on the other half of the chain.
3.  Check and make sure that all three of your curved multi loop bars hang evenly before going on.
4.  Beginning from the lowest "rung" of your ladder begin attaching your art beads and art charms.
It is a good idea to start with the largest and heaviest bead first.  To find the middle of the curved connector count out 6 loops and attach your bead ( the colorful Fir Tree) to the 7th. Each bar has 13 loops.  Then attach your art bead charms to the 2nd and 12th loop.  You will probably need to use your bead reamer to enlarge these loops on the curved connector bar to get the jump rings to slide in easily.
5.  Still on the lowest "rung"  assemble 6 of the 7mm jump rings with one dark green transparent size 8 seed bead.  Hang these on loops 4,5,6 and 8,9,10 of the curved connector bar.
5. Hang one leaf charm with a 7mm jump ring on each of the loose ends of the chain that are  hanging below the first "rung."  These will help balance your necklace.
6.  Now we go the the 2nd rung of the ladder.  Hang your Tree House Art Bead or other large bead on the center loop, which is loop # 7 .  Attach it with a 7mm jump ring.
7.  Make wire wrapped loops for the two bird beads using head pins and heishi beads.  Attach the birds to the curved connectors on loops #3 and #11.
8.  Assemble 4  7mm jump rings with size 8 dark green transparent seed beads.  Attach these to loops 1,2 and 12, 13 on the curved connector bar.
9.  Assembling the 3rd and highest rung: Attach the fir tree charms to loops 3 and 13. Use the larger jump rings for these.
10.  Attach you Dark green tassel to loop # 7
11.  Assemble 4  7mm jump rings with the dark red transparent size 8 seed bead.    Attach them to to loops 5,6 and 8,9.
12.  Attaching the clasp. Use the sturdy 16 gauge 8mm jump rings to attach your clasp.   Find the center link of your chain, open that link and attach your toggle with one of the 16 gauge 8mm jump rings. On the other open end of your chain attach the toggle bar with a 16 mm jump ring.  Check to make sure that your necklace hangs well and that the "rungs" are centered.  If not add  8mm jump rings or subtract links from the chain until it hangs evenly.
Now you have finished your Ladder Necklace. Enjoy!!  Happy Holidays!!

Thanks so much for stopping by!!!
Mary

Saturday, September 19, 2015

Making Stacked Bead Pendants --a tuitorial in narratve form

Stacked Art Bead Pendants by MaryHardingJewelry and Lampwork spacers by Uglibeads

At the Ceramic Art Bead Market where I often participate as a seller,  it is usual to see offerings of bead sets.  I have recently been interpreting this trend by putting together beads that lend themselves to stacking.  For today's post I will be sharing some of my  ideas for how these stacks can be strung together to make a single long pendant.  The picture above has some recent examples.
Let's look at them one at a time as I share with you what I did to get them strung.  The first piece is a set of raku black sticks which I made.   They are simply strung on patinated 18 gauge copper wire.  I separated the sticks with some lovely  Weenie SHOUT lampwork beads from Julie Wong Sontag of Uglibeads.  These very small brightly colored spacers were the perfect addition to set off the gray black beads.  I began at the the bottom of the pendant where I  made a simple wire loop to hang one of my Soft Solder Feathers and keep the beads from slipping off the wire. Once all the beads were strung on the wire, I made a wrapped loop at the top that was big enough to accomodate the long ball chain from Ornamentea that I hung it from.  No clasp needed since it is long enough to slip on over my head.

Stacked Pendant with Raku black sticks and Soft Soldered Feather by Mary Harding Jewelry and UgliBeads lampwork separators

For this next pendant ( I am going in the order that they are in the picture at the beginning of this post), I used a very long and kind of wild bead I made from Tyvek based on a set of 2 Tutorials by Carolyn Saxby.  ( Part 2 is Here.) The wire scroll and wrapping of the center of the bead was done at that time.  Because I made this bead and several others in the depth of winter, and was working outside due to the unsafe fumes from the heated Tyvek, I used my micro torch rather than the soldering iron she suggests.  It was just too cold for the Tyvek to melt otherwise. I mention this because my results are a bit different than hers.
                               Tyvek Bead Stacked Pendant by MaryHarding Jewelry


For this pendant, I used one of my ceramic drop beads and attached it below the Tyvk Bead with a heavily wrapped loop using 18 gauge patinated  copper wire.  I started with a piece of wire that was about 15-18 inches long.  After the drop was attached I strung the wire through this very long bead and through the yellow ceramic raku fired bead.  Then made another wrapped loop to string the pendant and took the rest of the wire back over one side of the bead and around the neck of the pendant.  At this point I had run out of wire but thought the neck looked a little bare so I took a piece of copper wire--20 gauge--about 5 inches-- and balled both ends and then wrapped that around the bead by placing the middle of that wire in front and wrapping each end in opposite directions so that the little balls would come out in front.  For wearing I used a yellow ball chain from Ornamentea.

             Stacked Pendant with Ceramic and Roman Glass Beads by MaryHardingJewelry

Next I will talk about how I made the smallest of these stacked pendants.  I used 20 gauge patinated copper wire which I folded in half and strung on the drop bead and then sent both strands of the wire through that rustic brown ceramic bead leaving a little wiggle room for the drop to swing back and forth.  Once through the brown bead I added a piece of Roman glass and then made a wrapped loop with both strands of wire.  I could have separated the two strands of wire after stringing the blue roman glass and made the loop with one strand and then wrapped the other around it and snipped it and finished up with wrapping the other strand around.  But I though it would be stronger since it was 20 gauge wire to do it the way I did.  I like the idea of using folded wire to attach the drop but it had to be thin enough to fit through the other beads.
To cover up the stringing loop on the ceramic drop bead I wrapped a 5-6 inch piece of 18 gauge wire that had both ends balled through the loop and around it a couple of times.  It added a nice bit of color as well as complimenting the wire wrapping above it.  This pendant is on  unpatinated copper ball chain that I purchased from Rio Grande by the spool ( along with some connector links, as well.)


Stacked hollow ceramic flower and Bead Cap Pendant with Uglibeads lampwork separators

I think this pendant ( pictured above)  is my favorite of the bunch.  To make the stack, I used   12 inches of 4 ply dark brown waxed linen, folded in half, in much the way I used the wire in the piece above but started from the top with the little bead cap.  To hold the waxed linen in place and keep it from slipping through the hole in the bead cap, I attached a jump ring that would also serve as a way of adding the pendant to a chain when I was finished.  To stabilized the bead cap I put a bead inside of it and then for color I added two of Julie Wong Songtag's Shout Beads in colors that I think are  lovely and go well with my long hollow ceramic tube flower bead.  Luckily the holes were big enough for this rather heavy waxed linen.  Once through all of the beads, I had two nice long stands of the linen left which I wanted to put seed bead on for decorative reasons and also as a way to hold the whole pendant together.  I used some Fray Check from Joanne Fabrics to keep the linen strands together and stiff enough to push through the rather small holes of the size 8 seed beads I wanted to use.  It worked out but does take some patience to string them.  I had to push the beads up the linen inside of the tube flower bead.  I used a strong tooth pick for the job and it worked out great.  I kept pushing the beads along and pulling up on the jump ring to see how much was left to do.  Then I did the other strand and pulled on the jump ring some more to make sure there wasn't any slack.  Then I tied over hand knots about an inch from the ends of the strands. I slid the knots up the linen to meet the seed beads--again using that toothpick-- and snipped off some of the extra.  I used unpatinated copper ball chain to hang this one as well.  The red copper color compliments those orange and yellows in the tube bead and makes a nice finishing touch.

It seems that each of these pendants required different ways of stringing them.
I hope you found some helpful ideas here today and will try making your own stacked bead pendants.
Thanks so much for stopping by.
Mary


Friday, September 18, 2015

Best of the Art Bead Scene - Long Thin Lines Necklace Tutorial from Claire

It's the Best of the ABS today! We interrupt your regularly scheduled programme to bring you this cute necklace from Claire of Something to do from last year - whip yourself up an Autumn treat by following this tutorial. 

-----------------------------------------------------------------


I love long thin pendant necklaces. I often make shorter necklaces and, perhaps, I more frequently make shorter necklaces to sell. However, when it comes to the day-to-day designs that I find most comfortable to wear, I'll go for a piece where the focus is on a long pendant drop, rather than on the neckline. Unfortunately, such pieces are a huge pain to photograph.  Nevertheless, I do rather like this piece.


It's highly unlikely that you'll have everything I've used here in your stash! However, there are plenty of possibilities for substituting different items. It's just a case of bringing together like shapes to get a similarly cohesive look. You may want to go for a totally different colour scheme. The focal is an enamel plate from 4 Ophelia.  I've mixed it with semi-precious stones and some czech glass. Here are the steps to make it.


Thread a tektite drop an inch or so onto 10cm of 22 gauge hematite wire. Bend it round the top and wrap the shorter wire length round the longer and trim. Thread on a cream glass coin, a jasper coin, a pyrite rondelle, then make a wrapped loop. Attach this to the bottom of the enamel panel with a jump ring. Then add another jump ring to the top of the panel. 

In the next steps I've used a combination of 2mm, 4mm, and 6mm black agate rounds. 


Take about 30cm of beading thread and pass it through the jump ring. Thread a 6mm round on either side of the jump ring. Next add three 4mm beads on either side, then follow them with a 2mm round on each side. Take a two hole bead and take the two ends of your thread through either hole, then add a 2mm round on each thread. Repeat this until you have five of the two hole beads, finishing with 2mm rounds.  Then add a 4mm round on each side.


Up to this point, the design has been totally symmetrical. At this point I've added in a subtle bit of asymmetry to give some extra interest.  On the right side of your necklace add another two 4mm rounds. Take some moonstone rectangular stick beads of graduated sizes and sort them so that you have one set of seven pieces and one set of five pieces, each going from small to large then back to small.  The set of five will go on the side where you've added the extra 4mm rounds. Start adding the moonstone, interspersing them with 4mm rounds. However, on the side with seven moonstone beads, swap four of the agates for 4mm pyrite rounds, as shown in the image. If you are looking for an alternative, co-editor Rebecca stocks some faceted brass rounds in her supply shop which would be a great substitute here!

To finish, take about 30cm of chain and attach the ends of your thread to the ends of the chain using crimps and covers.  Finally, open your chain at the centre point and add in a hook and eye clasp. 


And your necklace is complete!

Bye for now,
Claire 


Thursday, April 23, 2015

Tutorial: Art Beads. Macrame and Leather

                           Leather and Macrame Bracelet Wrap by Mary Harding

Although I haven't done much macrame in the last 10-15 years, it was one of my favorite ways of beading when I first started making jewelry.  I give macrame credit for sending me in the direction of making ceramic beads when I could not find beads with large enough holes for my hemp macrame cord.
                                            Macrame necklace with added art beads

Although this original macrame necklace I make some time ago has no art beads, I lay some out on it to show how well they go with the hemp and with macrame designs  in general.  Art beads pictured include beads by HumblebeadsNKP Designs and Mary Harding Jewelry.


 For today's tutorial I had to brush up on the basic square knot and how to figure out how long a cord to begin with.  My first attempt ran a bit short!!  I still have my book, The New Macrame which gives excellent directions for making the knots and has lots of great projects.
                                      The New Macrame by Katie DuMont

For our  project you are going to need some hemp cord.

                                                Hemp cord very thin.

I chose the thinnest one I could find  at Walmart in their craft section, and I still had to enlarge some of the holes in Heather Power's beads.  Since my leather is only 10mm wide I wanted to keep the macrame part of the bracelet about the same size and that was the best option easily available.  I really like how it works up and the color.

The directions below are for a long version of this bracelet.  You can use the formula below to decide on a shorter version as seen in the picture at the beginning of this post.

Long versions of the Art Beads, Macrame and Leather Wrist Wrap--measures about 29  1/2 inches.  The shorter version is 21 1/2 inches.  Both are made with 14 inches of 10mm leather.

You will also need about 14 inches of 10mm flat leather cord.  I chose burgundy but it comes in lots of different colors.  I got mine from Bokamo Designs.  10 mm flat leather cord is readily available on Etsy and at many beading shops, as well.

                                                   Burgundy 10mm flat leather

I used 2 Tierra Cast Rock and Roll strap tips:  one brass and one copper;  and two Tierra  cast compression rivets (4mm) made to fit them--again from Bokamo Designs--but these are also available on Etsy and at many bead shops.

I  used a small magnetic clasp from Ornamentea which I attached to one of the strap tips with a 5mm jump ring and then macramed in the other half of the clasp at the end.

For the beads, I used quite small art beads from Humblebeads; small ceramic beads that I made, and some copper seed beads.
For a second bracelet that I plan to make, I have some small ceramic beads from NKP designs  and Humblebeads that I plan to use.


   Art Beads for a wrapped leather and macrame bracelet:  beads with the light tan sprigs are by NKP Designs; the turquoise and green beads are by Humblebeads and the brown disk bead and round solid turquoise bead are by Mary Harding.

Tools you will need:
Rivet setter
bench block
leather hole punch
2 pairs of chain nose pliers to adjust jump rings
Bead Reamer with diamond tips

Directions for the Macrame and Leather Bracelet Wrap
.
1.  Rivet a  strap tips to each end of your 14 inch flat leather. Full video instructions from You Tube for setting the rivets on this size flat leather:  ( see instructions here) .

2.   Measure out your hemp cord.  The rule of thumb is 8 times the length of your finished macrame piece.  In this case,  I wanted the macrame part of the bracelet to be the same as the leather so that would  be 14 inches.  I then multiplied 14 times 8 and got 9 feet 4 inches.  This piece will be folded in half and will be the working cords I tie the knots with.  For the center cords that I will make the knots around I will double the length which in this case would be 14 x 2 or 28 inches.  The core doesn't get used up much but I want to play it safe.

3.  Once you have your two cords, fold them each in half . Then insert them into the stringing hole on one of your strap tips and make a lark's head knot.  Then secure you bracelet by using a clip board or pinning it to a bead board through the stringing hole.  Keeping tight tension on the square knots as you tie them makes them come out nice and even.

                          Hemp cord attached to the strap end cap with a larks head knot


5.  Begin making the square knot sennets.  Decide how many knots you want between beads:  I used between 5 and 6.  I also set up a pattern of beads that I would use:  Humblebead, my disk bead, 4 copper seed beads, Humblebead, my round bead, 4 copper seed beads( I used size 6 antique copper beads from Fusion beads)-- and then repeat the sequence.   For a good directions on how to make the square knots view this video on You Tube.

6.  When you get to the first bead you want to add, slip the two center strands of the hemp through the bead and  and the other two strands around the bead.   Continue to tie your square knot. See examples in picture below.  If the bead is a thin disk bead, and has a good size hole you can fit all 4 strands through it and continue on making your square knots.

                          example of  how different beads are included in the square knots

7.  Once you get near to completion of your strand of square knots you will want to add  one half of the magnetic clasp to your macrame cord and the other half to the tip end you riveted to the leather.

      Magnetic clasp attached to metal tip end and macrame cord.

Attaching one half of the magnetic clasp to the macrame core:

 To do this you will string the the two working cords through the loop on the clasp.  See picture below:


stringing clasp on working cords

Then you will fold over the working cord towards the area you have been making the square knots


                                        working cords folded over towards square knots

Next you will resume tying the square knots and go over the working cords heading towards the clasp

Tying square knots over the working cord that attached the clasp


Working cords completely covered with square knots and clasp secured  
Finally you will tie 2 knots around the clasp.  Cut all the cords and apply clear nail polish or epoxy glue to the cord ends around the clasp.

Knots tied around clasp


  Yeah!! You are finished and now you have a festive bracelet wrap for the Spring and Summer season.


And your bracelet can double as a necklace:

Your bracelet is also a  necklace


Bracelet as a Choker


Art Beads, Macrame, and Leather Wrist Wrap by Mary Harding

Thanks so much for stopping by.
Mary