Friday, October 30, 2015

Inside the Studio :: Erin Prais-Hintz, Tesori Trovati

Each week one of our contributors gives you a sneak peek into their studio, creative process or inspirations. We ask a related question of our readers and hope you'll leave comments! As an incentive, we offer a prize each week to encourage you to use that keyboard and tell us what you think. The following week a winner is chosen at random from all eligible entries. And here are the results from last week!
Congratulations Pat Denning!
You have won a cute little pendant from swoondimples!

Contact Heather at swoondimples to claim your prize!
~~~~~~~~~~~~~~~~~~~~~~~~~~~~~~
Today we visit with Erin Prais-Hintz of Tesori Trovati.
Let's see what treasures she has in store for us... 


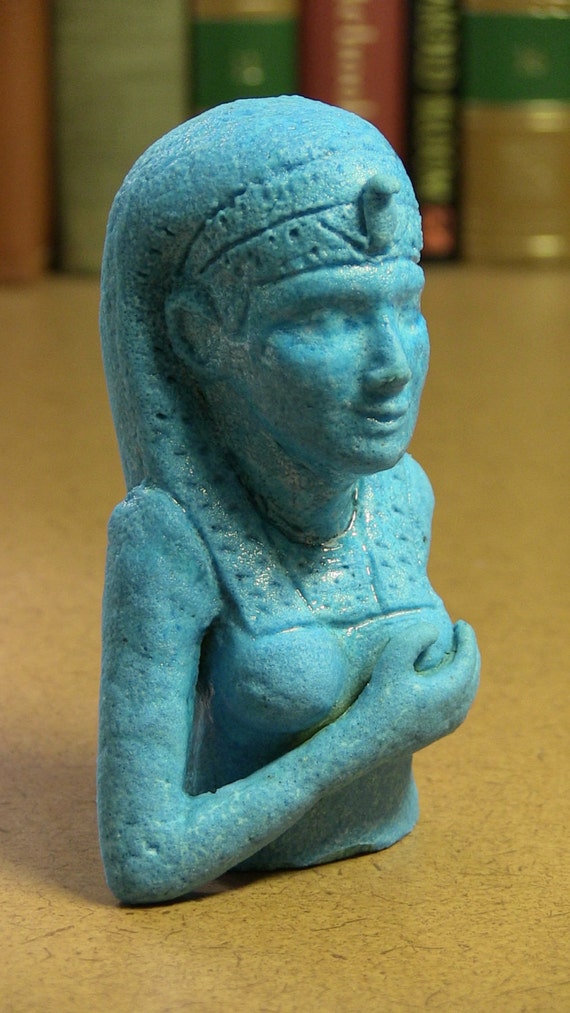
The ancient tomb of Queen Nefertari is rich with symbolism and color and is a great inspiration for October. This picture of the goddess Ma’at is part of the upper triangular shaped facing walls in the descent into the tomb. Each side of the sloped corridor are near mirror images. 

As far as tombs for Queens go, Nefertari’s tomb was extra special. The statues at the opening were made to the same scale as her husband Ramsses II and she was definitely the most highly cherished of all his many wives as evidenced by her style of dress and the titles that she was given. Her tomb is also one of the finest examples of preserved Egyptian art. I was struck in reading about it that it is only available to us in virtual tours, the actual tomb having been restored several times and ultimately closed off. The wall art is spectacular, but the ravages of time (and the moistness of our breath) have irreparably crumbled some of it. Still, the colors were very bright and there was no surface left unadorned.

Since the walls were the most fascinating to me, and they are made from this type of sandstone that has crystal in it that would expand and crumble, I set out to recreate what I thought might be a piece of that crumbling tomb wall.

Each month for my Simple Truths Sampler Club, I come up with a new design based on our art here. I also try to push myself and learn something new. What I decided to teach myself this month was a technique called ‘mokume gane’ (mo-KOO-may GAH-nay). This is actually an ancient Japanese technique for fusing metals and making a sort of moire pattern on decorative objects. It literally means ‘wood grain metal.’ But polymer clay artists are a clever lot, and they have transformed this technique through the great imitative qualities of polymer clay. This technique has always seemed so mysterious to me. I am very attracted to it when I see it. So that meant that I would need to do a little research in order to pull this off. I looked at some online tutorials, but ultimately came back to several books that I have on working with polymer clay, specifically, The Complete Book of Polymer Clay by Lisa Pavelka. This is a must have book if you are interested in working with polymer clay as so much is explained in great detail.


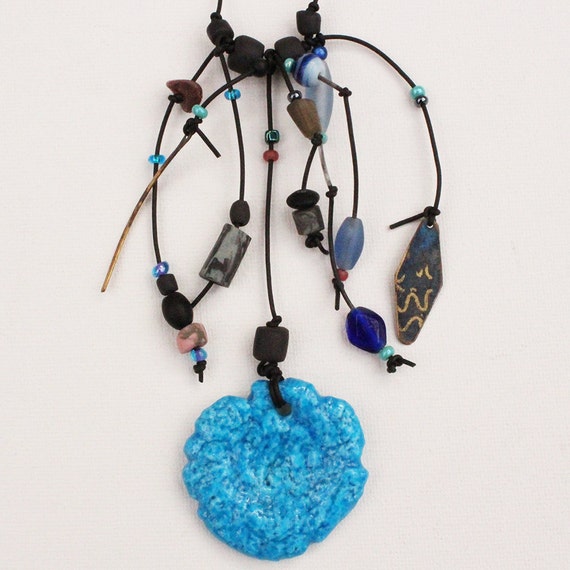
Essentially, thin sheets of clay are melded together, alternating with some translucent clay and thin sheets of metal leaf, distorted in some fashion (like by impressing a stamp into the top) and then slices are shaved off that result in the distinctive patterning. I actually took my colors from the image palette that Heather generated and used an Egyptian hieroglyphic stamp for the distortion (although it is hard to see the actual imagery). And it does look a lot like the Fordite that Miss Swoondimples is so in love with! Hmmmm...makes me think of some new applications for expanding this technique!

I found these great oval shaped bezels in my stash that really mimic the shape of the ancient cartouche, like you see in the image of the goddess. A cartouche is an oval with a horizontal line at one end, indicating that the text enclosed is a royal name. At one time only Pharaohs wore a cartouche as jewelry, being careful not to lose it, as they believed that whoever possessed the name had control over the person. The oval around the hieroglyphs was there to protect them from evil spirits in life and after death. This came to symbolize good luck and protection from evil. To an Egyptian, if you had your name recorded somewhere you did not disappear after death, so you will see these frequently inscribed on sarcophagi or on tomb walls.


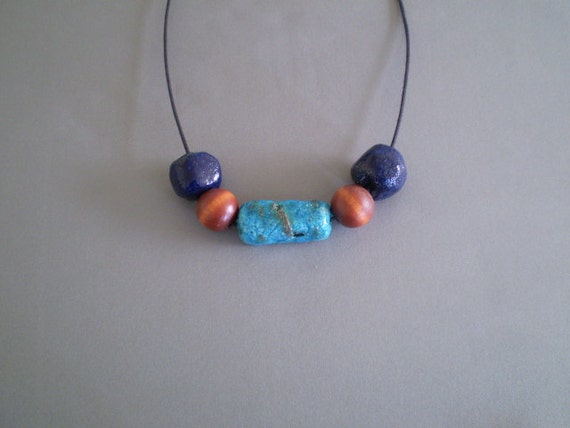
I used straight colors from the stack for the base - each one slightly different. Then I layered thin slices of the mokume gane on top, letting some of the base color show through. Since Nefertari was known as the “king’s great wife” I figured there should be touches of gold. Each pendant got a different gold touch with the application of... get ready for this... a temporary tattoo! Unfortunately, even after baking, the tattoos were a bit tacky (they are temporary, after all!).  So I decided to layer a coat of UV resin on top to seal the crumbles and gold applique. A bonus of resin is that it amplifies the beauty of whatever is underneath. Plus it is rock hard!

My tribute to the “mistress of charm, sweetness and love” is what I call Nefertari’s Tomb, and they are available in my webstore. I like to think that the Queen would approve!

Would you like to win one of your very own? I would love to make one just for you! So I am giving away a $25 gift certificate to my webstore www.tesoritrovati.com (which equals the price of the pendant... or whatever else you might like ;-) for an answer to this question:

What new technique would you like to learn  
AND 
what action are you taking to make that happen?
 
Share links if you have them!

Wednesday, October 28, 2015

Perfect Pairings :: Earthshine Designs


When I spotted this necklace I was struck by the pendant and had to get a closer look. Luckily for me, Linda of Earthshine Designs was having some fun with photography on her blog and tried a bunch of different backgrounds. I quite like the close up of the pendant, a glass headpin that she made. The shape is reminiscent of the wing of the goddess. I like the layers of details in this necklace, that keep my eye roving. The way the seed beads wind their way around the glass lentils is like the mighty Nile, the abundance of flowers are a funereal offering and the different textures and shapes and finishes make for a varied design. 

Featured Designer + Bead Artist :: Earthshine Designs

 
We are now using Pinterest! 
You can find more details in this post about the exciting new changes
,
including a board devoted to art beads inspired by the monthly challenge!
(Ooh! Look! More pretty beads to lust after!)

Pretty please make sure that you post a link in your Pinterest description so that I have someplace to attribute the picture! 
And don't forget to tell us about those art beads - providing links to bead makers is appreciated!

Deadline to get your pictures posted to the Pinterest boards for the creation of the
Monthly Challenge Recap post is October 29th - THAT'S TOMORROW!

TIP: If you upload your photo to pin it rather than pin it from your blog or shop, edit the pin (the little pencil button) and add your link as the source. Save your edits. This will allow us to click directly on your photo and go to your blog or shop to read more about your entry. 


Tuesday, October 27, 2015

Extending the Inspiration of this Month's Challenge: Faience and Amulets


Ma'at from Tomb of the Queen Nerfertari

1255BC

Valley of the Queens

This month's challenge art work, pictured above, got me thinking about Egyptian art and their very early use of glazed ceramic material which is known as Faience.   It was unique in its time as it was a self glazing kind of clay.  It was composed of chemicals that would drift to the surface of a piece while the clay dried and when fired would give the piece a glassy colored finish.  Egyptians thought the bright shiny faience glistened with a light symbolic of life, rebirth and immortality. According to my research, a very popular color at the time was a Lapis Lazuli blue.  I  recently tried making pieces with a modern version of the clay called Egyptian paste. (You can find this kind of paste clay from Laguna Clay or at  Seattle Pottery where they make it themselves.  It only comes in two colors from Laguna Clay:  White which you can add color to or Copper Blue  and many colors from Seattle Pottery.  The clay I used was from Amaco and has been discontinued.  Below is a picture of the package which assures you it is like "the real thing."

                                 Egyptian Paste in a commercial package.  Add water into the plastic bag and knead until fully absorbed and smooth. 

In the picture below you can see the pieces drying and crystals forming on the surface which will melt in the kiiln and become the "glaze."
                                 picture of crystals forming on the Egyptian paste

Once dry, I fired them in my kiln without any glaze or coloring.  I used some kiln paper that works with fused glass so they would not stick to my kiln shelf.  I think that they came out a lovely shade of blue that might be somewhat like what the Egyptians favored.

                    Small pendants and charms made with Egyptian Paste Blue color

About the same time I was thinking about Egyptian Paste,  I became aware that Andi Fasimpaur, ceramic artist and one of the co founders of the Beads of Clay, had hand carved a series of molds of Egyptian artifacts. Andi made these molds to share with her daughter's social studies class.  She has generously given me permission to use some of her photos for today's post.
                                       Push molds hand carved by Andi Fasimpaur
mold of the wedjet-eye --a powerful charm for protection against evil happenings-hand carved by Andi Fasimpaur


                             Ceramic push molds and artifacts made  by Andi Fasimpaur
                       Finished pieces made from Andi Fasimpaur's hand carved ceramic push                                 molds

All of these molds made by Andi Fasimpaur would be great to use with ceramic clay and with Egyptian paste. I found that the Egyptian paste is quite hard to work with.  It crumbles and breaks apart easily.  That is why push molds and stamps like Andi's are perfect for it.  When I went looking on Amazon for a book I once had on making egyptian amulets, I was quite fortunate to find that it is once again available.  It is called Fun with Amulets by Diana Craig Patch, published by the Metropolitan Museum of Art.  It is  not only a book but a kit which includes a mold with 24 different amulet forms.  Each one is modeled from an actual Egyptian amulet or amulet mold-- quite incredible!!  It comes with a small book that explains the function and meaning of each of the molds and  how they were used in their time and how they can be used in the present for amulets and charms as well.  The kit was originally designed as an education product for children and also comes with several blocks of polymer clay.

                                      photo of the cover of the book Fun With Amulets


                                                  photo of the silcon push molds of the amulets and charms

I had better luck using modern ceramic clay with these molds than the Egyptian paste.  Some of my results are pictured below.  The scarbs are made with the Eqyptian paste and the rest are made with a Terra Cotta ceramic clay.
                                       Several charms and amulets based on ancient Egyptian molds

To round out this tour of possible extentions of this month's challenge art, I did a search on Etsy to to find some modern art beads made from Egyptian paste and found the following:


Necklace from Hooked Wear on Etsy made with a handmade Egyptian Paste pendant

Faience or Egyptian Paste & Wood Beads 23-inch Necklace
Strung Egyptian paste and wood beads by Gaynells on Etsy


Custom Order, Egyptian artifact replica, Isis Figure, Egyptian Paste (fired ceramic).
Egyptian Artifact Isis Figure made from Egyptian Faience by Ceramicland on Etsy

I hope this look at Egyptian Faience and its present day applications will inspire you to continue on with the many aspects of Egyptian art that can inform our creations and our art beads.
Thanks so much for stopping by.
Mary

www.maryhardingjewelry.etsy.com
www.maryhardingjewelry.com


Monday, October 26, 2015

Amuse the Muse - Tree Beads - with Rebecca of Songbead

Hello all! I'm sneaking this in right at the end of the day today - sorry about that! I'm actually away on holiday, and we don't have the best of internet connections. Anyway, I still have some lovely finds to share with you!

Kicking things off with my usual art bead-laden jewellery - this time, it's not one of my own designs, but one from one of my favourite designer-makers, Keirsten Giles AKA The Cerebral Dilettante - and featuring one of our very own Heather Powers' gorgeous focals. Yes, it's a nest on a branch on a tree pendant - traditionally Spring, you might think - but the rustic setting, the purple/moss/walnut colours-scheme - pretty Autumnal too, don't you think? 


Heather creates this stunner in other colours too - can you resist turquoise? (I can't!)


And now onto the beads. Here are a few lovelies to round off October for you! 


And now for the BeadBlogger Links. Have a great week everyone! 


Rebecca is a Scottish jewellery designer; currently living in the capital city of Edinburgh. You can read more about her and her work at her blog, songbeads.blogspot.com and see more of her jewellery at songbead.etsy.com. She also has a supplies shop at thecuriousbeadshop.etsy.com.

Friday, October 23, 2015

What Exactly is a Trunk Show?

Have you ever heard an artist or jewelry designer say they are doing a trunk show?  Well what's so interesting about a trunk?  Why do you want to show it?  Every vehicle has one.....  Lol

Really I am not sure why trunk shows are called that, but I am going to say it's because you have all your merchandise loaded in your car, you show up at a store or gallery, sell for a day or short set time, and load everything back up into your trunk.

I have done trunk shows just like that....drive my ceramic beads and jewelry to a gallery for 2 days, set up a temporary display, the owner advertises that I will be there, I pay her an agreed upon percentage of sales, I pack up and drive home.  Simple, right?  Well, I like to do a make and take project while at the store with the customers for a small fee.  It gets there hands on my product and helps increase sales.  Plus, it's fun!  If I have hotel, gas, and other travel expenses, I negotiate a 30% commission that I pay the gallery for hosting me.  I am doing the selling.  Sometimes I check out the sales, other times the gallery collects the money and pays me.  But every sale gets written up so there is a record...one copy to the customer, one to the store, and one for me.

Mobile trunk shows are becoming more popular.  There is a big element of trust with this as you are shipping your product to a store states away from where you live.  I always negotiate all the trunk show terms before I ship, and I put it all into writing on an inventory sheet.  I pay to ship it there, and the store pays to return the unsold merchandise and my payment check to me.  A months time is pretty standard.  Most sales and events occur on the weekends, so you want to maximize that time element.  I pay 40% of the sales to stores that host a mobile trunk show for me.  They are doing all the selling and collecting of money.  They have to unpack the box and merchandise it.  I put my suggested retail price on the inventory sheet, but it's common for the store to price it according to their market.  This tray of beads is going to North Carolina next week.  There are 121 pendants here, and I am in the process of making 79 more...they asked for 200 pendants.  Whew!


I met the store owner at Bead Fest in Philadelphia in August.  So I have all her contact information and have already formed a friendship of trust.  That is where most of my trunk shows come from - contact at a show.  I have never had a problem being paid or having my merchandise returned.  I urge you to try this selling technique!

Inside the Studio with SWOONDIMPLES

Each week one of our contributors gives you a sneak peek into their studio, creative process or inspirations. We ask a related question of our readers and hope you'll leave comments! As an incentive, we offer a prize each week to encourage you to use that keyboard and tell us what you think. The following week a winner is chosen at random from all eligible entries. And here are the results from last week!

Congratulations to Alice Peterson...she was lucky number 1 as chosen by random.org. 
Alice is the winner of a lovely sea inspired ceramic piece created by Michelle McCarthy of Firefly Design Studio. Alice, please contact Michelle to claim your prize! 

My new studio is still in the works as we have just recently moved into a new home. I had stated before that my new space has luscious amounts of natural light and I am over the moon about this. Sadly, I am lacking adequate storage space and would like to invest in some new furniture pieces to help keep my work area tidy (insert belly laugh) I have plenty of shallow drawer space but would like to purchase some rolling carts to seperate shipping supplies and other things. I have been perusing Michaels.com and have a few ideas but I'm unsure if I want thinks 'hidden' or 'exposed'. We have a 5 year old in the house so I am leaning towards 'hidden' but it would certainly be more convenient and inspiring to actually see everything. Perhaps a wall unit would be best and more out of reach of little curious hands?

Here are a few pieces that I like. Please let me know your thoughts.


What are your favorite ways to organize your studio space?

Are your supplies displayed on wall units or hidden within drawers? 

Have you found second hand treasures or built DIY Pinterest pieces? 
If you answer yes to the latter, please send me ideas ;)

This is the current state of my space so please excuse the mess. 


So it's time for a giveaway......... 

The question I have for you is "What storage/organization containers or furniture pieces work best for you?Also, what does your Dream studio space look like? If you are anything like me, you will have a Pinterest board dedicated to this topic.

A winner will be chosen at random and will win this pendant, made by swoondimples
Good Luck!


Thursday, October 22, 2015

Motor agate & Detroit egg

If those words sound weird or unfamiliar, I am referrring to Fordite. For those of you who may not be familiar with this uncommon material used in bead and jewelry, it is now a rare find and is one of my foremost favorites. I have always been drawn to materials that seem quite ordinary but have been revived with new light and treasured for their peculiarity. 


I was introduced to Fordite by the fascinating lapidary rockhound, Gary Wilson, at the 2010 Bead & Button show in Milwaukee. This was a very memorable bead show for me as I was an exhibitor alongside my mom, and I was 8 months pregnant with my second child! 
I wobbled about the show in search of treasures and discoverd MANY at Gary Wilson's booth. Sadly, his website has very nil to offer so it's best to find him at a trade show.

So...a little bit about this fascinating substance.... *Fordite is a unique automotive enamel material with an interesting history. The original layered automotive paint slag "rough" was made incidentally, years ago, by the now extinct practice of hand spray-painting multiples of production cars in big automotive factories. 

The oversprayed paint in the painting bays gradually built up on the tracks and skids that the car frames were painted on. Over time, many colorful layers built up there. These layers were hardened repeatedly in the ovens that the car bodies went into to cure the paint. Some of these deeper layers were even baked 100 times.

Eventually, the paint build-up would become obstructing, or too thick and heavy, and had to be removed. As the story goes, some crafty workers with an eye for beauty realized that this unique byproduct was worth salvaging. Sadly, the techniques that produced this great rough years ago, are no longer in practice. Cars are now painted by way of an electrostatic process that essentially magnetizes the enamels to the car bodies. This leaves little, or no overspray.*

Fordite in its raw 'slag' form
Image taken from www.amusingplanet.com

I hope that you are just as intriqued by this material as I am. I may have an affinity for the material because it is quite reminiscent of the polymer clay technique of 'mokume gane'. I think it's simply magnificent and I have panic attacks thinking about it's rarity. I feel the need to purchase tons of slabs for safe keeping (a.k.a. hoarding)


Have you used Fordite pieces in your jewelry?

What rare material are you most fond of and why?

Please comment below as I would love to know :)


Here are a few pieces that I made a few years back with Fordite slices. If you ever come across these slices for sale, PLEASE email me!! Otherwise, I hope that you can get your hands on some.


Design by Heather Wynn Millican


*Fordite history excerpt  www.fordite.com


Wednesday, October 21, 2015

Perfect Pairings :: SJ Designs + Havana Beads


Earlier in the month you might recall that I posted a Perfect Pairings of different art beads and components that I thought might suit this month's challenge art. One of the motifs that I included were scarabs. Scarabs are popular amulets in Egyptian motifs, said to bring the wearer protection and as a symbol of rebirth and regeneration. Paired with the crusty goodness of these etched glass beads that lend an ancient flair to these earrings, I imagine that the wearer would be blessed with a renewed vitality for life.

Featured Designer :: SJ Designs
+
Featured Bead Artist :: Havana Beads

We are now using Pinterest! 
You can find more details in this post about the exciting new changes
,
including a board devoted to art beads inspired by the monthly challenge!
(Ooh! Look! More pretty beads to lust after!)

Pretty please make sure that you post a link in your Pinterest description so that I have someplace to attribute the picture! 
And don't forget to tell us about those art beads - providing links to bead makers is appreciated!

Deadline to get your pictures posted to the Pinterest boards for the creation of the
Monthly Challenge Recap post is October 29th

TIP: If you upload your photo to pin it rather than pin it from your blog or shop, edit the pin (the little pencil button) and add your link as the source. Save your edits. This will allow us to click directly on your photo and go to your blog or shop to read more about your entry.