

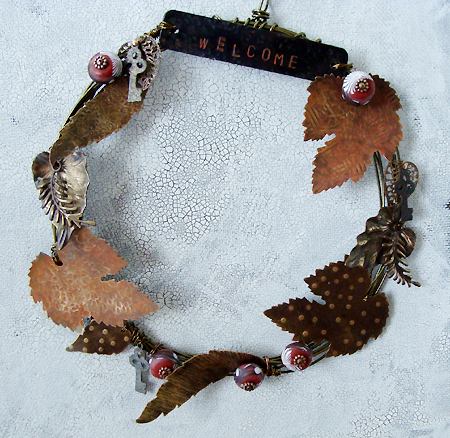
I created this wreath with wire, Vintaj components and art beads as a house-warming gift for a dear friend. You could create a similar one to welcome your guests during your fall celebrations or as a special gift. Another variation would be to stamp the family name of the recipient on the name plate instead of 'welcome' for a more personalized touch.
Supplies:
4.5" 18 gauge brass color wire
11 3" lengths of 24 gauge brass color wire
5 polymer clay disk beads
1 arte metal name plate
3 brass maple leaves
2 brass slender leaves
2 brass woodland leaf pendants
2 brass fern charms
2 brass filigree leaf charms
1 brass trailing leaf
3 arte metal keys
5 6mm flat copper spacers
5 3" copper headpins
2 1" copper headpins
8" silk ribbon
Acrylic Paint Dabber
Renaissance wax
Steel wool
Tools: bench block, letter stamps, ball peen hammer, rivet hammer, Phillips head screw driver, brass texture plates, round and flat nose pliers, wire cutters.

1. Create the wreath by wrapping the wire into a large loop, approximately 5 1/2" wide. Wrap the wire in into a large loop 9 times around. Create a wrapped loop at the top of the wreath and wrap the ends of the wire around several times for a secure finish.

2. Texture the leaves with the hammers, texture plates and screw driver. (Watch this video for several techniques.) Highlight the textures with the steel wool.

3. Stamp "welcome" into the arte metal name plate with the letter stamps. Use the ball peen hammer to texture the blank. Use the acrylic dabber to add paint, rub off the excess with a paper towel. After the paint has dried rub a light coat of wax to protect the color. Paint two of the large leaves in the same way.

4. Place the leaf pendant on the bench block and strike the center with the round end of the ball peen hammer to shape the leaf in the concave form. Repeat with the other leaf and the two filigree leaves.

5. Attach the welcome name plate to the wreath by wrapping it the 24 gauge wire.

6. Attach the leaves to the wreath by wrapping them with the 24 gauge wire, securing them to the wreath. I found that wrapping the wire criss-cross over itself helps the leaves stay in place on the wreath. Layer some of the leaves together for an interesting texture. There is no right or wrong way to the attach the elements, whatever holds them most secure when wrapping the wire around the wreath will work.
7. String a key and a filigree wreath onto a 1" headpin and from a loop. Attach to the wreath.

8. String a flat spacer and polymer clay disk bead unto a 3" headpin. Attach the headpin to the wreath by wrapping it around the wire several times.

9. Add the ribbon to the top loop on the wreath, tie a simple knot at the top of the ribbon.
Resources: Disk Beads, Humblebeads. All brass and wire from Vintaj - retail at Bello Modo. Silk Cord, Angela Brittain. Copper findings, Rings & Things.
7 comments:
Oh wow! I really love this wreath! Some lucky person is going to be happy when they receive this.
Very creative mind! My vintage jewelry phoenix team will surely like this! Thanks for sharing your crafts with us.
I have got to add metal work to the repertoire! Beautiful... I could see some stained glass in there too...
Wow! Beautiful beautiful.
All I can say is wow. very very gorgeous and love all the mix of mediums. Gorgeous work and so inspiring. Perfect for this time of year. Thank you for sharing the tutorial. Hugs
Um WOW, seriously I would probably drop dead if someone presented me with this amazing house warming gift! This is so beautiful, Heather! You are so creative and such an amazing artist! xo Genea
Yes, I could see something like that hanging from our door.
Post a Comment