Saturday, December 31, 2011

Studio Saturday: Book Review - "The Art of Resin Clay" by Sherri Haab

Welcome to Studio Saturday! Each week one of our contributors gives you a sneak peek into their studio, creative process or inspirations. We ask a related question of our readers and hope you'll leave comments! As an incentive we offer a free prize each week to bribe you to use that keyboard. The following week we choose a random winner.

Congrats to Alice who is the winner of two Earthenwood pendants. Please email Melanie with your mailing address so she can send your new pendants out to you!


This week we have guest blogger Lori Anderson bringing us a fun book review.


I was thrilled when Potter Craft sent me a copy of Sherri Haab's latest book, "The Art of Resin Clay".  I'd never heard of these techniques before and was immediately intrigued.

This 144 page book contains five chapters:

* Resin Clay Essentials 

* Imitative Techniques, which covers faux scrimshaw, raku, coral, and metallic effects.

* Creating Bezels for rings and pendants

* Mixing Resin Clay with Other Mediums, such as embedding beads, using colored pencils, etc.

*Molding and Sculpting Techinques, such as repairing and redesigning vintage jewelry and creating beads over cores.


All of Sherri's books are eye candy.  If you never make a single project, you'll still get inspired just by flipping through the book.  But you'll want to try these projects out, because she breaks things down in such a way that ANYONE can do it.

Sherri thoroughly covers the basics, so when you start the projects, you'll feel comfortable.  There are tons of step-by-step photos to lead you along, and the contributor gallery shots are amazing, showing you just how far you can take this new medium


And now, I'm giving it to one of you!

So the question this week - what has been your favorite bead book of 2011?  Leave a comment and be sure there's a way to contact you.  

Then visit my blog, Pretty Things, and learn about the upcoming Bead Soup Blog Party!  It's one of the largest bead swap blog hops you'll come across, and wouldn't it be cool to use your new resin clay techniques for the Party?
Photobucket
Lori Anderson creates jewelry for her web site, Lori Anderson Designs, and wrote the blog An Artist's Year Off.  She is the creator of the Bead Soup Blog Party.

Friday, December 30, 2011

December Monthly Blog Tour

"Architecture is a visual art, and the buildings speak for themselves."
~ Julia Morgan, architect, best known for her work on the Hearst Castle

There are buildings that just speak for themselves. The Chrysler Building in New York City is at the top of the list. The classic art deco style and the strong geometric patterns are so beautiful and iconic.

This month's challenge brought out the inner-architect in each of you. Building a stunning structure with plays on pattern and color, you wow us with your ability to translate the inspiration art each month and morph it into something completely unique and one-of-a-kind-you!


First up, Miss Shannon Chomanczuk of For My Sweet Daughter (above) turned a lovely button with an architectural fluted flair into a stunning pendant. I never would have thought to do that! And the grays with flashes of blue really play up the steel cladding on the Chrysler.

Mary Ellen of Bee Tree by m.e. really had to challenge herself and make a piece that was more geometric than free-form and no flowers! But what a stunning collar desing you made! This will be perfect to ring in the new year as it looks just like the Chrysler building crown all lit up.

Playing up the brilliant blue sky are the lampwork glass beads that Katherine of Catherine's Dreams. These beads with the classic combination of turquoise and black really work with the silver chain and accents.


Jill Palumbo (above) is learning to speak Spanish, so her tutorial on how she made this beautiful polymer clay pendant and matching earrings is written entirely in Spanish! The steps she went through to make the details is outstanding. Now that is what I call talented multi-tasking!

Miss Molly Alexander of Beautifully Broken Me got her inner steampunk Diva on with a unique design of metalwork echoing the terraced windows on the structure. Molly stamped and patina-ed and etched and soldered and wire wrapped her creation. The detail in this piece is amazing.
Bringing to life the hood ornament gargoyles on the building, Pamela of Klassy Jools made those details come to life with her stunning pendant design.


I love versatility. Cece Cormier (above), aka The Beading Yogini, has created a clever necklace with lovely blue gear shapes that she created herself from borosilicate glass (when can I buy some of these, Miss Cece?). This necklace can be worn several ways making it a truly functional piece of art.

Representing a classic American icon was no trouble at all for Miss Lynda the SCDiva. She used the filigree setting and the cathedral beads with their silver caps to mimic the art deco lines of the structure. And nothing is more American than Uncle Sam, right?


~~~~~~~~~~~~~~~~~~~~~~~~~~~~~~~~~~~~~~~~~~~~~~~~~~~~~~~~~~~~~~~~~~
From all the ABS Editors, I would like to take this opportunity to thank each and every one of you.

The reason that we do this is to inspire others to find the joy of self-expression in creating, to share our passion for working with art beads, to bring together creative souls in a like-minded community.

But you give us so much more.

You show us innovation and inventiveness.
You exhibit an awesome attention to detail.
You introduce us to new products and talented art bead artists.
You show us how one little spark of inspiration can be turned into as many varied ideas as there are people reading this blog.

For this, we thank you.

If you have joined us for a challenge this year, you know how creatively freeing it can be. We invite you back to join us in sharing your talents. If you haven't yet jumped in to join the challenges, we sincerely hope that you might join us in 2012. There will be many wonderful sparks to your creativity to come. We wish you the most creatively inspired new year!

Thursday, December 29, 2011

On the 11th Day of Christmas: Willow Leaf Pendant

This was a fun project to design.  I needed to add a series of pendants for a gallery show last month and found myself drawn to the simplicity of monochromatic color palettes, letting the textures and shapes of the beads shine though.  I had fun mixing metals using copper, gunmetal and steel.  The copper became an accent color and added warmth to the darker metals.

These are quick and easy. I used a pre-made chain to finish the pendants.  I simply cut a chain in half and attached it to the end of my design. 

Supplies:
Willow Leaf Pendant
Czech glass leaf
6 glass beads
15mm Arte Metal jump ring
8mm copper jump ring
2 4mm copper jump rings
8 links from a chain (make sure your chain links can open and close.)
1" copper headpin
6 1" copper eyepins
18" gunmetal chain
3" 21 gauge steel wire

Pendant length: 22"

Directions:
1. With the steel wire create a loop through the pendant and wrap the wire twice, from a smaller loop and continue wrapping the wire under the small loop to create the bail.
2. String the glass leave on the headpin and create a simple loop.
3. Attach the pendant, glass leaf and large copper jump ring to the Arte Metal jump ring.
4. String one glass bead on an eyepin and create a simple loop. Repeat five more times creating six beaded links.
5. Attach three beaded links together with a chain links. Attach the links to the large copper jump ring with a chain link.  Attach a chain link to the top bead.  Cut the 18" chain in half and attach one side to the top of the beaded links with a small copper jump ring.  Repeat on the other side.

Resources:
Pendant: Humblebeads.  Czech leaves: Dream Girl Beads. Glass beads: various sources, check out Beads by C. Art Metal jump ring, chain and findings: Hobby Lobby.  Copper jump rings: Rings & Things.

Special bonus: As a year end gift, I'm offering 20% off my Etsy shop now through Monday.  Use discount NewYear when you check out.

Wednesday, December 28, 2011

On the 10th Day of Christmas: Tree Top Necklace

Have you noticed all our projects that use up orphan beads?  Here is another design to help clean out the bead box!  A nest pendant is paired with a series of beads that reflect the color palette and balanced by a long branch connector.

Supplies:
Nest pendant
Branch connector
10x14mm lotus pod seed
10mm faceted Czech glass beads
8mm firepolish glass bead
8mm smoky quartz bead
8mm Czech glass flower
6 gunmetal 5mm jump rings
7.5mm gunmetal jump ring
1" gunmetal headpin
Gunmetal lobster clay clasp
13"  gunmetal chain (cut in two lengths of 6.5")
10" 24 gauge sterling silver wire (cut in five 2" pieces)

1. Wire wrap a bail with the sterling silver wire around the pendant by forming a large loop through the pendant and create a wrapped loop at the top, wrap the extra wire around the top loop several times.

2. String the glass flower on the headpin and create a wrapped loop.

3. Wire-wrap the other 4 beads with the pieces of sterling silver wire, create 4 beaded chain links.  Before closing the loops, slip the next link on the loop.

4. Attach the pendant and beaded chain links together with a jump ring.  Repeat to attach the branch connector to the pendant.  Attach the flower dangle before closing the jump ring with the connector.

5. Attach the chain to the end of the beaded links and connector with jump rings.

6. Attach the clasp with the small jump rings.  On the other end of the chain attach the large jump ring with the smaller jump ring.


Whip up a pair of coordinating earrings with Branch Disk beads and nest charms from Green Girl Studios.  Use a little bit of 24 gauge steel wire to create the wrapped loops.

Resources: Polymer clay nest pendant and disk beads: Humblebeads. Czech glass: Raven's Journey. Branch Connector: Bello Modo. Gunmetal findings and silver wire: Hobby Lobby.  Steel Wire: Ace Hardware. Lotus pod: Sorry - they were a Bead & Button Show find and I can't find the source any longer.

Monday, December 26, 2011

Featured Designer of the Week: Molly Alexander

Each Monday the Art Bead Scene features a Designer of the Week.
One of our editors picks her favorite from the Monthly Challenge entries.
This week's featured designer is....
Here is what ABS editor Heather Powers said about Molly's necklace:

"I love that Molly was inspired by the repetition of the building this month and that is what she translated into her necklace with the herringbone-wrapped beads. The copper is such a departure from the cool color palette and I like that she added in those silvers and blues with tiny bead clusters.  She was able to make something that fit her design style but found it's inspiration in our challenge."

You still have a few days to enter to participate in our blog hop and win fab prizes from this month's sponsors!  Visit here for complete challenge details.

We are finishing up this week with the last three 12 Days of Christmas projects and our blog tour on Friday.

Saturday, December 24, 2011

On the 9th Day of Christmas: Kissing Balls


A kiss can be a comma, a question mark or an exclamation point.  That's basic spelling that every woman ought to know.  ~Mistinguett (Jeanne Bourgeois), Theatre Arts, December 1955

The evergreen kissing ball is a romantic tradition dating back to 18th-century England. As the charming custom goes, a young lady stands beneath the ball and receives a kiss, removing a berry, until all the berries (and kisses) were gone.


Create these mock kissing ball earrings in just three easy steps.

Materials:
Enamel balls - Barbara Lewis, PaintingWithFireArtwear.com
Brass and gold plated bead caps
Swarovski crystals
Vintaj brass ear wires
Vintaj eyepins

Instructions:
1:: Gather your materials. Find some round beads, like these emerald green fluted enameled balls from Barbara Lewis of Painting with Fire fame. Sting onto brass eyepins.

2:: Pile on an assortment of bead caps with various looks. Stacking your bead caps is an instant way to add texture and interest. Try stacking bead caps of differing metals, like brass with silver or gunmetal with gold.

3:: Add some sparkle with Swarovski crystals to catch the light and draw his eye. Attach to ear wires of your choice, I prefer these long swingy ones from Vintaj.

{Kissing Balls - available on Etsy}

Put these modern-day kissing balls on your ears and be prepared for some smooches!

Thursday, December 22, 2011

On the 8th Day of Christmas: What to do with Christmas Leftovers

Leftovers in their less visible form are called memories. Stored in the refrigerator of the mind and the cupboard of the heart.
~Thomas Fuller

Do you ever have leftovers after the holidays and just don't know what to do with them? I actually hate eating leftovers, but I love BEADING leftovers. After making all the ornaments and necklaces and earrings and bookmarks and other beaded goodies, I ended up with a lot of leftovers and a great idea... make a potluck! A potluck Wrist Garland, that's what!

I started with some 'simple truths' initials in red and green to spell out L-O-V-E and J-O-Y. I have been making these as sweet little initial pendants and bookmarks for my family and friends so I hade bunch left over. Why not spell out a message for the New Year? I picked those two words because they are more than just holiday words, but ones that work all year long. I kept the colors fairly traditional in red and green, but you could mix it up and combine colors or use other ones like blue or purple if that is your thing. The key is to use up your leftovers, so see what is in your prodigious stash and let that color be your guide. If you don't have some 'simple truths' lying around, how about an assortment of other art beads in the same color family?


Next, find a sturdy bit of chain in your left over bin. You don't have leftovers bins? Just wait... you will! Fish out a jump ring or round link to add to the chain and a trigger clasp. If you want to get even more fancy, check out the tutorial I posted on dressing up your plain clasps.

Then I went to the bowls and containers that cover my desk filled with the leftover bits and pieces from the past six years. I am notorious for not cleaning up after myself, so every once in awhile I just dump all the pieces that didn't make it into bowls. I keep buying more pottery bowls for my table. I have them for pieces of chain, art beads that I didn't use, and all manner of beads. If I were smart I would sort them into colors, but that would be thinking ahead too much!

Sort through your leftovers and pick out beads that suit your color scheme. Then just wire wrap them all on headpins and start attaching them to the links in the chain. I prefer to wire wrap them directly to the chain (this is where a ChainSta would come in handy for me!) or you can just make the wrapped head pins and then add them all at once with jump rings. Your call.

Et voila!


I thought these looked like little garlands you might hang on your tree but are instead for dressing up your wrist. Wrist Garlands! Enjoy using up your leftovers. ;-)

Wishing you JOY and LOVE in abundance in the New Year!

P.S. Psssst! I am giving away one of these bracelets! Just hop on over to my blog Treasures Found :: Inspiration is Everywhere and leave a comment! Winner will be chosen from comments on my blog only and announced on December 27th! Merry Christmas!

Wednesday, December 21, 2011

On the 7th Day of Christmas: Holiday Pendant Project


Holly Pendant

Supplies:
Ceramic Holly Pendant
4 assorted red and green accent beads
2 brass 2 inch headpins
1 10mm brass jump ring
1 brass chain necklace

Instructions:
1. String a red and a green bead onto a headpin. Just above the bead make a simple wire loop, trim excess wire and set aside.
2. Repeat step one to make a second beaded dangle.
3. Open up the jump ring and string the pendant, the two beaded dangles, and the chain on. Close the jump ring.

Tuesday, December 20, 2011

On the 6th Day of Christmas: Season's Greetings Card Display

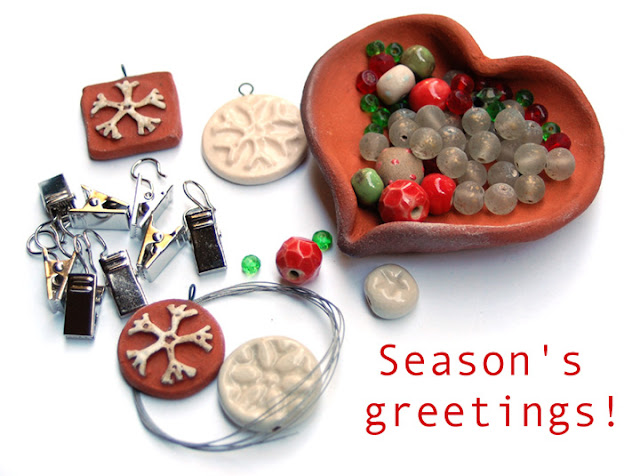
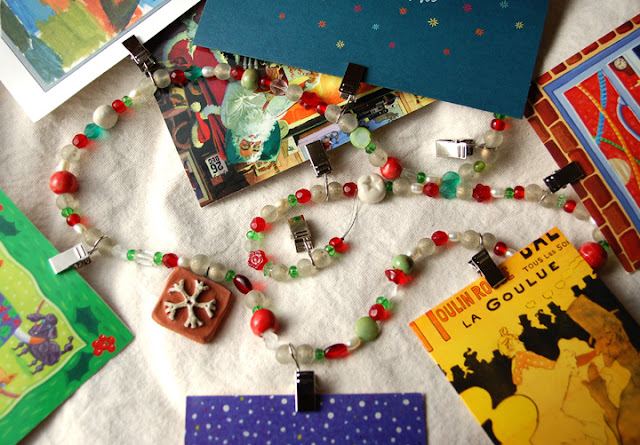
One of my favorite memories of the holidays was visiting my grandparents in Northern California. My grandma and grandpa moved around quite a bit in their time and had gathered many friends, far and wide. As the family and their circle of friends grew so did the season's greetings they would receive each year. Grandma Betty would hang a wide silk ribbon on each doorway and pin each card up as it arrived. This Season's Greetings Card Garland is in remembrance of those lovely times together. All of the beads used were gathered from around the studio, which makes it great for orphans beads and left overs! This project can be as simple or elaborate as you like!

Supplies:
4 feet heavy stringing wire. (you could also use 22 gauge copper wire in a pinch!)
several hundred loose beads.
1 gingerbread ceramic snowflake
8 to 10 hanging clips (available at Michael's. OH! And checkout the fantastic Michael's coupon app for your smart phone! Coupons with out the clipping!)
15 to 20 art beads
crimp beads

Tools:
Round nose  pliers
Wire cutters

1. Layout your beads in a pattern with the snowflake pendant in the middle.
2. Loop one end and close with a crimp bead.
3. String beads and add hanging clips at 5 to 6 inch lengths. Make sure to pinch closed the clips hanging ring.
4. Loop end and crimp.
5. Run to the mail box!
6. Hang and enjoy!

Book shelf.

 Table edge.

Monday, December 19, 2011

On the 5th Day of Christmas: Lampwork Bangle Free Tutorial

Hello from the UK, and welcome to the 5th day of Christmas! It's getting pretty near to the big day now, so I thought I'd show you how to make a really quick and easy last minute present. It's a great little project for using a pretty lampwork orphan or focal that hasn't found quite the right home yet.

Lampwork focal by HelenJewellery, another Scottish artist.
Ingredients:

Vintaj Creative Hoop
Lampork focal or two
Co-ordinating beads
Antique brass jump rings
Antique brass headpins
20g antique brass wire


1. I start with my lampwork focal. I have a huuuuge stash of lampwork, and it can be hard knowing where to use some of them; they can be just too pretty to put with lots of other beads. They seem to want to be the solo star. So for this project, I like to pick one which I have perhaps had for a while; one that I've not been quite sure what to do with for a while.

2. Take it on a little trip round your bead stash, picking a pile of co-ordinating beads. Don't worry about how many, you just want to get a little co-ordinating pile of bead soup going.

3. Pick some beads from this bead soup, and turn them into bead dangles using headpins and wrapped loops. You could also might add in a little charm or connector at this stage - like a little TierraCast bird. All of the dangles now go onto jump rings so they are ready to slip onto the bangle.

4. Cut a 20cm piece of 20g wire and coil it around the hoop as in step 4, passing it through one of the pierced ends.

To finish, slip on the dangles at this point, before closing the bangle by sliding on the lampwork focal onto the wire, and passing it through the other pierced end of the hoop, coiling once again to close. And there you have it, a pretty, quick to make bangle, finished in a matter of minutes. A simple design that you can personalise so easily, depending on the lampwork (or any art bead) that you select. And that bead soup you have left over can easily be turned into more jewellery - a simple knotted bracelet, a pair of earrings with clusters of bead dangles....there are so many possibilities. Another great thing about choosing a bead soup in this way is that you can end up putting together colours that work, but that you might not have considered combining otherwise. 

Lampwork beads from top left clockwise: HelenJewellery, MoMoBeads, Moogin and PixieWillow. Lampwork headpin GardanneBeads. Czech glass and brass stampings from YashmaCreations and ArteBellaSurplus.


Rebecca is a Scottish jewellery designer and singer, currently living in Manchester, England. You can read more about beads and singing at her blog, songbeads.blogspot.com and see more of her jewellery at songbead.etsy.com.

Featured Designer of the Week: Klassy Joolz

ABS December 2011 Challenge
Each Monday the Art Bead Scene features a Designer of the Week.
One of our editors picks her favorite from the Monthly Challenge entries.
This week's featured designer is....

Here is what ABS editor Heather Powers said about Pam's pendant:

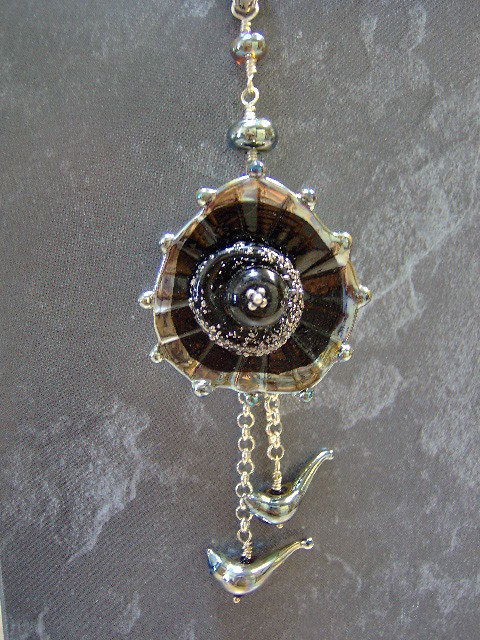
"I love the bead that Pamela used for her pendant - it captures the architectural feeling of our inspiration painting, yet it's a little unexpected.  The sense of story with the birds flying underneath add whimsical charm and narrative to the design.  I also enjoy the unusual construction of the pendant, it's a great way to use a large disk bead."

Sunday, December 18, 2011

Link Library with Melanie

 Did you know that the Art Bead Scene has been doing a 12 Days of Christmas blog series of free projects for several years?  If you follow the blog tag 12 Days of Christmas, you can see tons of projects from the last few years!

Here is the latest news from some of our beady friends:

  A Bead A Day
Share your holiday jewelry on A Bead A Day blog. Just leave a comment or send an email to get your work featured!

About.com Jewelry Making
No time to make beaded ornaments? This is so not true when you have this super fast and inexpensive tutorial to help you.

Art Bead Scene
Jennifer decks the halls with a super colorful, Jangles styled bead garland, and her free tutorial will show you how to make one too!

Beading Arts
Every new year should bring a new challenge. How about getting inspired by the Ring A Day challenge...and maybe win a copy of the book?

Carmi's Art/Life World
This week I made a beautiful component even better!

Snap out of it, Jean! There's beading to be done!
Jean has fun being a new designer blogger for Nina Designs! Come and see what she made!

The Writing and Art of Andrew Thornton
Andrew shares a couple of magazines that he was recently published in.  

Melanie Brooks is the ceramic beadmaker behind Earthenwood Studio, who blogs from her Metro Detroit, Michigan home.

Friday, December 16, 2011

On the 4th Day of Christmas: Embellished Clasps Free Tutorial


"Excellence is in the details.
 Give attention to the details and excellence will come. "
~ Perry Paxton

Obviously, we love using art beads around here. And when you are using art beads in your designs, you want something a bit more special for the closure. This tutorial shows you three ways that I like to add that special touch to my designs.

I purchase a lot of generic looking findings wherever I can get them. I love toggle clasps and hooks as they are like a blank canvas waiting for me to embellish them. They are like the work horses of my design studio. These humble little toggles can be dressed up to complement the color and style of the art bead that you are using.

To add that special touch, all you need are some simple toggles and large jump rings, wire and beads.


Top Row:
Take a pretty egg bead from Kelley Wenzel of Kelleysbeads in a lovely midnight blue with gorgeous frit. Pair that with a rope twist copper plated toggle, vintage bronze wire, and some navy seed pearls. Wrap one end tightly around the base of the toggle. String one pearl and then two wraps in between. Repeat until the end, tucking the wire into the toggle.

Middle Row:
I love word beads from Diane Hawkey. This red color is so bright and cheery and will make a perfect gift for my Tiny Dancer's dance instructor (and red happens to be her favorite color!). Sometimes I wander into different aisles at the craft store just to see what I can find. I think I had read about this on a blog once years ago (I wish I could remember where) that there was an embroidery floss that was wired. I happened upon the thread aisle at Michaels and discovered the DMC Color Infusions Memory Thread. This copper wire wrapped in embroidery thread adds a soft touch to your design and was perfect for embellishing a plain jump ring to make a pretty toggle to go with the 'dance' bead. Just wrap tightly around the ring, making sure that the opening to the ring is inside the coil and then tie a tight knot.

Bottom Row:
My favorite embellished clasp uses this hook from Vintaj. I use the vintage bronze colored wire to wrap the end of the hook tightly then add beads along the outer edge of the hook, in this case I used seed beads. Then just wire around the curve of the hook for a nice detail. Works well with the affirmation rings from Vintaj.

Another great look is to find some larger holed beads that can slip over the hook, like I did with this bracelet design (which happened to be my May 2009 ABS challenge entry, "Song of the Golden Lotus"). Just wrap the wire tightly between the beads for a charming variation.


I believe that the true strength of a design is in the details, and having a simple clasp on a stunning piece created with beautiful art beads is just not good enough. Have fun spicing up your designs with these simple touches.
 

Thursday, December 15, 2011

On the 3rd Day of Christmas: Art Bead Bookmark

Books, books, books! Who doesn't love books? No one around here, that's for sure. This beaded and braided bookmark is my holiday gift for family and friends this year. What a perfect time to share my project with you! 

Handmade bookmarks make quick and easy gifts for just about any reason or season. I made this one in less than 30 minutes. They look great holding your place in your favorite novel OR even better, your favorite beading book!

Materials:
1 daisy ceramic lentil bead
1 blue/green “mermaid” ceramic bead
120 yellow transparent size 8 seed beads
11’ of orange 4-ply Irish waxed linen cord

Tools:
Scissors
Ruler
Macramé board and T-pin

Tip: Pin your work to a Macramé board to keep even tension on the cords as you braid.

Directions:
1: Cut the linen cord into six 22” pieces.
2: Form an overhand knot at the end of 1 cord. String 20 seed beads. Repeat step for the remaining 5 cords.
3: Bring all six cords together and form an overhand knot after the seed beads. Use all six cords to string the daisy lentil bead; form an overhand knot after the bead.
4: Pin the last knot to the top of the macramé board with the T-pin. Separate the cords on the board so that you have 2 cords on the left, 2 cords in the middle and 2 cords on the right. Braid the cords for about 11" and remove from the board.
5: Use all six cords to form an overhand knot. Use all six cords to string the mermaid ceramic bead and form an overhand knot. Trim ends to ½” and fray.

Resources:
Daisy lentil: Golem Studio. Mermaid bead: Gaea. Linen cord: Ornamentea. Seed beads: LBS.

Wednesday, December 14, 2011

On the 2nd Day of Christmas: Holiday Tree Garland


Materials Needed:
1.5cm-2cm felt balls in assorted colors
1.5cm-2cm wood beads in assorted colors
Size 6 seed beads in assorted colors
Upholstery thread
Needle
12" 18 gauge craft wire

Instructions:
1. Cut the craft wire in to two 6 inch pieces.  Make two wire scrolls with a pair of needle nose pliers.These     will be the hooks to attach the garland to the tree. Once made, set them aside.
2. Leaving your thread on the spool, thread the needle and pull about 12" of excess thread through the hole.
3. Begin by stringing a felt ball onto the thread. Next string approximately 7 inches of seed beads.
4. Continue by string a wood bead, follow with another seven inches of seed beads, and then a felt ball.
5. As the thread fills up with beads, unroll a little more thread and slide the beads further down the thread. Follow the previous pattern to string as long of a garland as you would like.
6. Tie the needle end of the thread to the end of a wire scroll. Slide the strung beads up so they are snug against the wire. Tie the remaining end of the garland to the second scroll. Trim any lose threads.


Enjoy!
Jennifer Jangles

Tuesday, December 13, 2011

On the 1st Day of Christmas: Cardinal Pendant

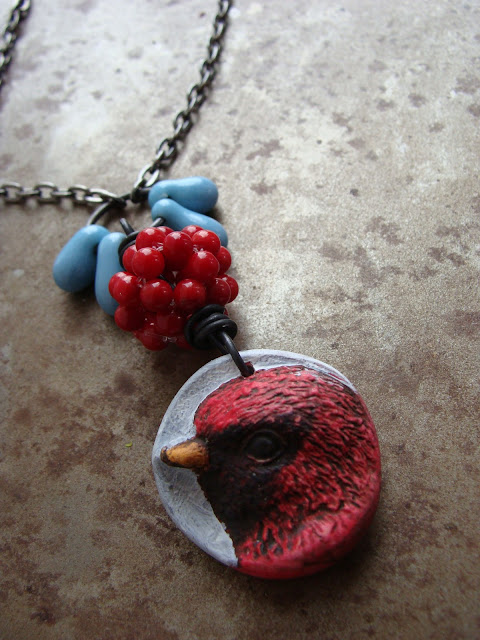
I love seeing a little flash of a red cardinal on snow covered branches in the middle of winter.  I created this winter inspired bird pendant as a reminder of those bird-watching memories as I wait for the snow to fall here in Michigan!

This pendant is so simple and easy, you can whip it up in 10 minutes or less thanks to a purchased beaded bead that adds in the wow factor without all the learning to follow a bead pattern.

Supplies:
Cardinal pendant
Red beaded bead
4 glass drops
15mm arte metal jump ring
6" of 19 gauge steel wire
26" oval cable chain

Directions:

1. In the center of the wire create a large loop, open and slide the pendant through.  Close the loop and wire wrap the tail of the wire above the loop.

2. String on the red beaded bead and create another wire-wrapped loop with the rest of the wire.

3. Open the jump ring, string on the pendant, the 4 glass drops and the ends of the chain.  Use two pliers to close the jump ring.

4. Yep, pour yourself a glass of egg nog - you just finished a Christmas present!

Use any large bird pendant and beaded bead combo to change up the look.  I've done some great ones with a turquoise bird and a large nut bead too.  If you have some large interesting textured lucite beads that would work well too.

Resources:
Pendant: Humblebeads.  Glass Beads: YukiDesigns.  Beaded Bead: Michael's.  Wire: Ace Hardware. Jump Ring & Chain: Hobby Lobby. 

12 Days of Christmas - 2011 Edition!


The contributors of the Art Bead Scene would like to thank our readers for another year of support! Thank you for joining in our monthly challenges, sharing your thoughtful comments on Studio Saturdays and following along with us every day as we celebrate art beads and inspire those who use them.

As a thank you, we present to you the Art Bead Scene's 12 Days of Christmas. We have a new batch of free projects from our contributors to offer over the next few weeks.

So no matter what holiday you celebrate this season, we hope you do it in style - adorned with art beads!

Sunday, December 11, 2011

Link Library with Melanie

  I am taking a break this week from looking in the archives, because I wanted to remind you all of the Ornament Blog Hop that took place this past week!  Lots of links to inspiring ideas for the holidays, including the Humblebeads Deck the Halls Ornament above!  Check out the whole list of Ornament Blog Hop posts that we posted here earlier this week!


And now, even more links from our beady friends!
 
A Bead A Day
If you are looking for some fabulous giveaways by a wide variety of artists and crafters, Lisa is linking you up!

About.com Jewelry Making
Time and money are items many of us don't have much of right now, but not to worry. These simple projects are just what you need to inexpensively spread some holiday jewelry love.

Art Bead Scene
Erin provides an inspiring treasury of architecture inspired jewelry compontents to give us some ideas for the Art Bead Scene December challenge! 

Beading Arts
Wanna learn to work with chains in your jewelry designs? Cyndi has a copy of "Chains Chains Chains" up for grabs!


  Beads & Books
Michelle turns an inexpensive printer's tray from a craft store into a beautiful display for a jewelry show.

Carmi's Art/Life World
Carmi has a series of bezels filled with last year's Christmas cards to share this week.

Snap out of it, Jean! There's beading to be done!
Jean hosts a very lovely giveaway from the sublime bead and jewelry store in Florence, Italy, Beaded Lily!

The Writing and Art of Andrew Thornton
Andrew creates a piece to be silently auctioned off to help a fellow artist out! Bid on his necklace to win and check out all the other fantastic auctions going on!  

Melanie Brooks is the ceramic beadmaker behind Earthenwood Studio, who blogs from her Metro Detroit, Michigan home.

Friday, December 9, 2011

Studio Saturday with Melanie Brooks

Welcome to Studio Saturday! Each week one of our contributors gives you a sneak peek into their studio, creative process or inspirations. We ask a related question of our readers and hope you'll leave comments! As an incentive we offer a free prize each week to bribe you to use that keyboard. The following week we choose a random winner.

Congrats to EmandaJ who is the winner of last week's Simple Truths Ornament made by Erin Prais-Hintz!  Please email Erin at enjoytheday@tesoritrovati.com with your mailing address so she can get your holiday goodie out to you!


I have been getting ready for the holidays lately, helping to make lots of holiday presents for my customers on the weekends at Rust Belt Market. While I don't have a lot of holiday specific designs, I did make one design that reminds me of Christmas.. this Candy Swirl pendant.  These pendants start out as black and white drawings that I scan and Photoshop to make a very graphic jpeg file. After getting the file done, I upload it to RubberStamps.net, who then sends me a rubber stamp that I can use on my porcelain clay!  I love this process, because I can draw up anything I can imagine and have it easily transformed into a clay pendant, and it is quick and easy to build up a big library of designs.
Here is an example of the sort of Story Necklace that we make at the Rust Belt.  It's a mixed media collage of metal keys, charms, and gears with recycled sari silk ribbon.  Holiday inspired, but also recycled and a little industrial...festive and funky but not too sweet.
This week, you can win this pair of Earthenwood Studio ceramic pendants: one Candy Swirl and one Holiday Peace pendant.

To enter to win, comment here on this post and tell me about your favorite holiday sweets! 

Melanie Brooks is the ceramic beadmaker behind Earthenwood Studio, who blogs from her Metro Detroit, Michigan home.

Aritists Helping Artists Auction

A single leaf working alone provides no shade. ~Chuck Page


Artists Helping Artists
We need your help.
 
Artists from around the blog community come together to help a fellow artist in need. There have been a lot of hops and challenges lately, and they are a lot of fun and stretch your creativity. But this is a hop with a cause: giving help where it is needed most.
 
What is it? Artists Helping Artists is a group of bloggers who has made something special offered up for the auction. All proceeds will be directed where they are needed most to help out our fellow artist in need. All you need to do is leave a comment on each blog in the hop with your bid amount. The auction will run through Sunday, December 11 and winning bids will be sent a PayPal invoice. Come back and bid againa and again!
 
What do you get? A beautiful hand- and heart- made piece by a talented artist. Christmas ornaments, beads and components, rings, earrings, bracelets and necklaces. These are all very beautiful pieces that are just perfect for that special someone on your Christmas list, or a treat for yourself.
 
Here are just a few of the pieces available in this auction:
  
{New Growth-New Directions necklace offered by Erin Prais-Hintz}


{Strength of Spirit earrings offered by MaryJane Dodd}
 
{Ceramic bracelet offered by Nan Emmetts of Spirit Rattles}
 
{Glass bouquet bead necklace offered by Kerry Bogert}
 
{Ammonite bowl filled with components offered by Kristi Bowman}
 
{Necklace offered by Rebecca Anderson}
 
{Cute birdie ornmanet offered by Erin Fickert-Rowland}
 Please consider supporting this auction by visiting the entire list of participants below:
 
Marie Cramp and Lori Anderson http://skyejewels.blogspot.com/ 
Barbara Bechtel and Staci Louise Smith  http://secondsurf.com/ 
Erin Fickert-Rowland http://elysianstudiosart.com/ 
Keirsten Giles and Susan Fincher http://www.cerebraldilettante.blogspot.com/ 
Amanda Cargill Austin http://www.seashoreglassgirl.com/

We have built a caring and committed community of artists, designers and bloggers the world over. And when someone in our midst has needed it, we have come together to show our support and love and friendship. That is what makes this beading community so very special. Thank you.

"Every day may not be good, but there is something good in every day." ~ Author Unknown

This is definitely a 'something good' today!