Friday, December 31, 2010

Monthly Challenge Blog Tour

Thank you for joining us for our first Monthly Challenge blog tour!  Our participants created jewelry inspired by our Monthly Challenge painting and blogged about their creation.  Visit the links below for a look into their creative processes and inspiration.  Check out the awesome prizes that YOU can win at the bottom of this post.
Paulmbo Polymer Jewelry created three versions of her entry and you can get a peek into the creative process where she shows how she made the mold for her pendantHere is the second take of her pendant paired with vintage jewelry components. And the third time is a charm, it's amazing to see how using different colors for her focal bead can completely change it's look. 

Mad Maggie Designs shares what happens when her muse strikes.  I love the beaded toggle clasp, it's a beautiful detail.

Zenith Jade Creations was in inspired to pair her polymer clay focal beads with gemstones in two fairy themed designs: 1st entry & 2nd entry

Kristi Bowman Designs pulled out a de-stashed treasure and lampwork beads for her necklace.

Beautifully Broken Me takes her cues from Fitzgerald's use of color in her necklace.  I love the copper and resin bezel paired with the Picasso glass beads in a warm red.

For My Sweet Daughter alters Vintaj findings with alcohol inks in her woodland pendant.

Birgitta Lejonklous was inspired to create a wearable storm with her porcelain pendant.  She created two pieces of jewelry mixing art beads and fibers for this challenge and ended up with a whole series of pendants for more fairy inspired jewelry.

Subversive Bead Surprises rose to the challenge with seed beads and resin this month.

Too Aquarius created a drool worthy necklace of polymer clay floral components with glass accents.

Makin-Art paired a collection of seed bead leaves with a beautiful glass lampwork bead in her unique necklace.

Klassy Joolz found a perfectly whimsical focal bead for her lampwork bracelet.

Ex Post Facto carved out some time at the last minute during the busy holiday season to whip us this robin inspired creation. 

********************************
And now for the goodies!  We have three special blog tour sponsors.  The first two prizes will go to one of our blog participants.  The other 4 prizes will go to 4 lucky readers.  To enter in the reader giveaway leave a comment.  I will randomly draw our 5 winners on Monday.
One of our bloggers will win a copy of Cynthia Thornton's Enchanted Adorments thanks to Andrew Thornton for sending us copy.  This lucky blogger will also receive a pair of ceramic pendants from Spirited Earth.
Now for 3 of our lucky readers, I have three beadmaking books from Lark Books: Ceramic Bead Jewelry by our own Jennifer Heynen, Making Metal Beads by Pauline Warg and The Complete Book of Glass Beadmaking by Kimberely Adams.

One of our readers will also win this charming pair of ceramic pendants from Spirited Earth.

To enter to win the books and pendants let us know in the comments below if you plan on our entering the monthly challenges in 2011 and what would make you more likely to enter.  (Noting that I can not help with adding extras hours into days.) Do you want to know the challenges ahead of time?  Are you tired of art inspired challenges? Let me know your thoughts for 2011! Blog participants you can enter the reader giveaway too.  You can leave a comment until Sunday at midnight to enter.

You still have until Midnight tonight to enter our monthly challenge and win beads from Gaea and Fired Up Ladies.

Have a Happy New Year!

Thursday, December 30, 2010

The Year in Review

I hope you have found our monthly challenges inspiring over the last 12 months.  I love seeing everyone's creations and I'm astounded by what our creative readers submitted.  Here is a review of 2010 with my favorite picks from each month.  I'm looking forward to seeing more of your wonderful art bead jewelry designs in 2011! 

Join us tomorrow for a blog tour of this month's submissions and don't forget to blog about your creation and leave a link at this post. (Click on the link.)

 
January - Magpie by Claude Monet

 
February - Luna Park by Vestie Davis

 
March - Almond Blossoms by Vincent Van Gogh


April - Insula Dulcamara by Paul Klee

 
May - The Juggler by Marc Chagall


June - Marcelle Lender Dancing the Bolero by Henri de Toulouse-Lautrec

 
July - Blue Feather by Alexander Calder

 
August - Sunrise by John "Jack" Savitsky


September - Persia by George Barbier

 
October - Drama Medallion by Hildreth Meiere

 November - Tree of Life by Gustav Klimt

 
December - The Storm by John Anster Fitzgerald

Check out all of the submissions for our monthly challenges on the Art Bead Scene's Flickr Group.

Wednesday, December 29, 2010

Mobile Blogging

It's an on the go world and I'm finally catching up.  I was gifted an Ipod for Christmas and found some fun apps I wanted to share with you.  While you couldn't use a mobile device to capture photos that were good enough for product shots for selling online, you can definitely create some visually appealing photos that are great for blogging or sharing a work in progress.

First up my favorite app - the Instagram.  You can alter your photos to look like hip old photos.  This is the original photo and above is with the Instagram filter 'lomo fi'. 
Another filter and yes it does the rounded corners and borders automatically - sweet!
 
You can also download a free Photoshop Express App that does cropping, filters, borders and effects too.  Above is a photo using the vignette blur effect.

Now to blog directly from your mobile device check out this tutorial from Beverly Herman of No Easy Beads.

A few other apps I can see as being super handy for small businesses:

Dropbox - store your photos and files securely, there is a subscription service.  I back up all of my work on Dropbox and it has saved me from a recent computer crash disaster.  You can add your mobile files to your Dropbox account.

Evernote - keep track of all your good ideas and leads for blogging stories.  You can download this for your pc too and sync with your mobile device.

Todo Lite - who doesn't love checking off items on a to-do list?

Dragon Dictation - speak and it types for you.  Hmm, can I make beads and 'write' a blog post at the same time - we shall see.

What app do you love?  And please don't even mention Angry Birds.

Tuesday, December 28, 2010

A Garden Memory Necklace

First up, our Vintaj Arte Metal and Brass charm winner is Kade. Please email Heather (me) your address and I will send this awesome prize pack out to you!
I created another gift for my daughter that she wore to her holiday concert this year. It's a lovely garden inspired piece layered with charms and pendants. I will walk you through my design tips for this necklace. Again, the Arte Metal from Vintaj can be find exclusively at Hobby Lobby and they do have an online shop.
The first part of the pendant starts with a patina pendant from Miss Fickle Media. Use a large jump ring on the disk pendant to attach the smaller jump rings. Using jump rings I attached a Vintaj Skeleton Key and a dangle of a Czech glass flower.
Next up, to relate to the patina pendant I took a two leaf dangle and used an acrylic paint dabber in a light green to give it a faux patina. After it dried I put a protective layer of Renaissance wax. This pendant and a bird were also attached on jump rings.
Another glass flower was added to the charm cluster.
To accent the pendant component of the necklace I used gunmetal chain, job's tear seed beads in light white/pink hue, polymer clay disk beads, rhinestone rondelles and fire-polished glass. I choose the job's tear beads for frosty hue and that they relate to the garden being seeds themselves.
The complete necklace with asymmetrical placement of the seeds and polymer clay links. A simple lobster claw clasp ends the design.

Monday, December 27, 2010

Designer of the Week-Create with Moxie

Each Monday the Art Bead Scene features the Designer of the Week. One of our editors picks her favorite from the Monthly Challenge entries. This week's featured designer is...Create with Moxie
"The Enchanted Garden" by Cory of Create with Moxie.

Here's what Art Bead Scene editor Tari Sasser had to say about Cory's piece...
"This necklace is just beautiful, from the intricate details of the different sized flowers to dangling beads.
It has a wow factor like no other."

See more of Create with Moxie on her blog and on Etsy.

Only 3 days left to enter  our monthly challenge !  Submit your entry and you have a chance to win the monthly prizes.

Sunday, December 26, 2010

Cindy's Favorites and Linky Love

This week's favorite is the mix of glass pearls from Auntie's Beads I'm giving away on my blog. Make sure you hop on over there to enter!


A weekly favorite are the bead bloggers. Let's check out their links this week and see what's going on.....

About.com Jewelry Making
Tammy looks at least year's resolutions and thinks about 2011. Share your resolutions or lack of them.

Art Bead Scene
Come make a sleigh bell bracelet with ABS for the 6th Day of the annual 12 Days of free projects!

Beading Arts
Come enjoy some insider information on the fabulous fiber and bead artist, Joan Babcock!  

Beading & Books
Michelle shares a handmade polymer clay ornament by Diva Designs and her favorite chocolate candy recipe. (You'll need to keep up your strength if you're going to bead over the holidays!)

Carmi's Art/Life World
Carmi starts to work with resin cubes she made earlier in the year. 

Cindy Gimbrone aka Lampwork Diva
Cindy shares the key to her designs. 

Earthenwood Studio Chronicles
Melanie gets in the Christmas spirit with a holiday song to inspire three fun projects.

Lorelei's Blog: Inside the Studio
Come on over and get the shopping list for the next Blog Reader Challenge!  

Snap out of it, Jean! There's beading to be done!
Jean makes some holiday themed jewelry for Rings & Things! The time flew by as she made these pretty creations!

The Writing and Art of Andrew Thornton
Sue Kennedy of SueBeads offers up a really beautiful assortment of goodies in this week's Thursday Giveaway! Find out how you can win them!

Saturday, December 25, 2010

Studio Saturday: Merry Christmas + One More Day of Christmas

Merry Christmas to everyone!
One more day of Christmas, I didn't make it in time for the 12 days of Christmas.
I am still trying to incorporate or use recycled items. 
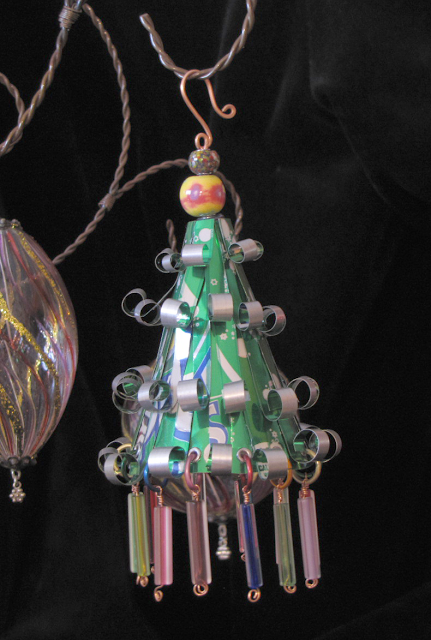
Remember the aluminum Christmas trees growing up? My grandparents had one. Not only aluminum but it spun in its base! When you are little that is a major Ooo and Ahhh + Pretty Shiny.
On a smaller scale using aluminum cans, here is my rendition. 
Aluminum soda cans aren't any thicker than index stock, just a different material that behaves in it's own way. It will rip, fold and get indentations on it the same way as paper but with aluminums reflective nature it's far more noticeable.

Materials:
3 Aluminum Cans, I used Green Sprite Cans
Anodized Aluminum Jump Rings
Glass Beads
24 Gauge Copper wire
18 Gauge Copper Wire
Art Bead
Metal Eyelets, found in the scrapbooking section

Tools:
Sharp Scissors
Mini Anvil
Ball Pein Hammer
1/8" Paper Punch
Eyelet Punch Tool
Round and Chain Nose Pliers
Sharpie Marker
Ruler
Paper Pattern
Tape
Glue Dots
Any other tool that helps!

Directions:
1. Cut the top and bottom off of your cans as straight and cleanly as possible. After cutting so many cans you will find a technique that works for you. You may want to practice on a can that you do not intend on using for this project. 


My method: find the side of the can with the UPC code. Take a knife and carefully push/cut through the can at the top and bottom, making a slit. Holding the top of the can in your left hand put the tip of your scissors into the slit and begin cutting. Holding tightly onto can try to keep your scissors straight and pointing upwards, turning the can as you cut. The tension will be forcing you to cut downwards. After you have successfully cut off the top, cut the can from top to bottom to the other slit. This cut helps to ease the tension of cutting the bottom off. Hold the bottom of the can with your left hand, insert your scissors and start cutting. Even up the edges.


2. Make your pattern. I used a scrap piece of paper. Trace your pattern onto the can and cut out.
3. Roll your half circle can into a cone shape. Tape it in place. At this point you will need to punch your first hole for the eyelet. Measure up from the bottom the can. Calculate the size of your jump rings and space from the edge. Mine measure 1/4" from the bottom. Place your eyelet, using the eyelet tool and hammer strike the eyelet to spread and form. I put in 2 more eyelets above the bottom one and it's a challenge. You can choose to use glue, glue gun or glue dots to hold down the seam. If necessary trim the bottom.
4. Measure on the curve edge where you are going to punch holes for the dangling beads. Mine are 1/4" up and spaced 1/2" apart.  Punch the holes and dap in the eyelets.
5. Measure 6" of 18 gauge copper wire for the hanger. Form loop or curly cue then slide a bead that will prevent the wire from coming out the top and help the aluminum keep it's shape.
6. Place your art bead in the wire on top of the cone. Place a glass bead on top of the art bead.
Helpful hint: I used the eyelets in the large holes of the beads for a more attractive look and keep them from flopping side to side.
7. Bend the wire 90º, then wrap the wire around your round nose pliers to form a loop. Use a paintbrush handle or dowel to form the hook. With your round nose pliers form a loop on the tip of the hook .
8. Cut the top and bottom off of the 2 remaining cans. Flatten out and measure in quarter inch increments  to cut strips for the curly branches. Cut the cans into strips. 
9. Using a popsicle stick or other item you like better, curl the can as you would ribbon. Color side up, place your stick approximately an inch up, scrape the stick quickly to create the curl. This may take a couple times to make the curl. They can be rolled up and adjusted by hand later after they are attached.
10. Starting at the bottom and in between to eyelets, place the first row of curly strips. My glue dots are singles so I cut them in half to glue the top and bottom of the curl strip to the cone base. Place the nexxt row 3/4" to 1" up and between the first row. Repeat for the remainder of the rows.
11. For the 1" dangling beads cut 2.5" of 24 gauge copper wire. Make a curly cue on the end of the wire then bend 90º and slide bead on. Bend wire at top of bead 90º, make a loop with your round nose pliers and wrap wire. 
12. Attach the dangling beads with anodized aluminum jump rings alternating colors.

I promised I would show my Ornament of the year while I was participating in the blog hop. 
I had to abandon the original design. Here is the new design.
Funky Snowman

My question this Studio Saturday is:

"If you could have one bead artist fill up your stocking, who would you pick?"

Leave your answer to the question and you could win 

Thanks to Heather for this giveaway. I want to win it!

Have a wonderful holiday
may you have peace within.

Friday, December 24, 2010

On the 12th Day of Christmas: Flaking Out

"Oh the weather outside is frightful
but the fire is so delightful
and since we've no place to go
let it snow, let it snow, let it snow..."
 
I have to confess: I was inspired by this post on the Vintaj blog that shows a filigree snowflake necklace created with the six-petaled filigree they offer. I love working with Vintaj products but have a hard time with the filigrees because I always think that I have to wrap them around something. This picture tutorial slideshow will have you exploring the possibilities of filigree in ways that don't involve wrapping something. Grab a cup of cocoa {with extra marshmallows!} and enjoy!

Materials:
Filigree - 6 petaled flower
assorted beads, caps, head pins, jump rings, chain, clasps

Tools:
pliers, heat tool, oil pastels, screw hole punch, Renaissance Wax
{HINT: Maximize the Smilebox to full screen for best viewing. And turn on your speakers!}
Click to play this Smilebox slideshow
Create your own slideshow - Powered by Smilebox
This free slideshow design personalized with Smilebox

Erin Prais-Hintz writes about all things that inspire her at Treasures Found::Inspiration Is Everywhere. Her jewelry designs are one-of-a-kind made one-at-a-time. She collects quotes and dust and invites you to send her your favorite (quote - not dust!) to enjoytheday@tesoritrovati.com. Check out her brand spankin' new website at Tesori Trovati

Thursday, December 23, 2010

On the 11th Day Of Christmas: All Season Beauty


This season, I've had it on my mind to find ways to create designs that can be ornaments, home decor and wearables, depending on their setting. 

Here's one of those designs, inspired by the Christmas Tree with all its lights and decorations.


I used one of my large cast crosses, and combined it with an ornate crown medallion.

I wanted it to be very luxurious looking, so I added faceted glass baubles with wire wrapping, to let it have movement and a lot of bling.

Here is is hanging on the door of an antique desk, and when the holidays are over I think I'll put it there instead of packing it away with all the other holiday decorations. 

I'd love seeing it hanging there every day.


Here is is nestled into the holiday tree, very festive and ornamental. But if I slip a chain through the hanging loop at the top, I can wear it as jewelry, too. Multi-purpose!


So as you're designing this season, you might consider putting things together that can be worn as a personal adornment, as a holiday decoration and also used to decorate or ornament your home decor.

Get out those art beads, combine them with your favorite copper or brass wire, and let them show their beauty all year long and not be hidden away in their down time! 

Think outside the JEWELRY box ...