Saturday, January 30, 2016

January Monthly Challenge Recap


What a way to kick off the new year creatively! There was an abundance of awesome entries this month....some inspired by the colors....others by the stars or the landscape....all with a great reference to the art by Henri-Edmund Cross. Doesn't it just pulsate and shimmer like the night sky?


January 2016 Art Bead Scene Monthly Challenge - Kizoa Online Movie Maker

Now it is your turn! Add your link to the InLinkz code below and be entered to win some great prizes! Thank you for lending your talents to this wonderful world-wide party!


An InLinkz Link-up

Get the InLinkz code for your blog!
get the InLinkz code

Friday, January 29, 2016

Inside the Studio with Claire Lockwood

Each week one of our contributors gives you a sneak peek into their studio, creative process or inspirations. We ask a related question of our readers and hope you'll leave comments! As an incentive, we offer a prize each week to encourage you to use that keyboard and tell us what you think. The following week a winner is chosen at random from all eligible entries. And here are the results from last week!


This week's winner is Lynda of Fresh Baked Designs. Congratulations! You have won a $25 gift certificate for Swoondimples! Please contact Heather to claim your prize!

********

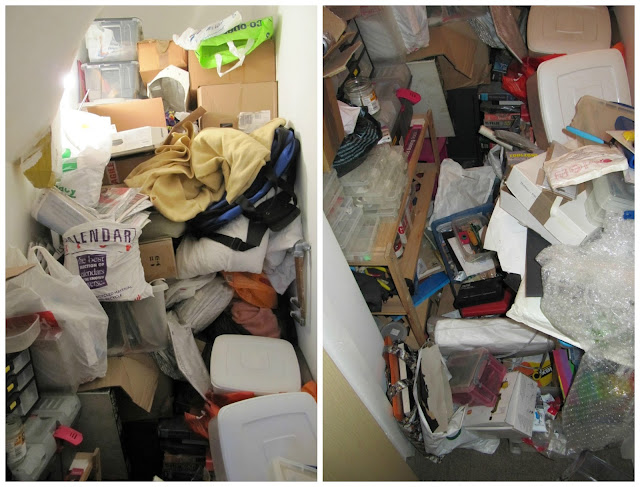
Is it a little late to be wishing you all a happy new year? I hope you're all contending with the potential gloominess of January. I last shared an Inside the Studio post with you back in early November. Perhaps you'll remember: I have recently taken up metalwork and I had plans of converting my under-the-stairs cupboard - aka the naughty hole - into a little work space.  There was a problem, however. Five years of accumulated junk and mess.


Well, it certainly seemed like a mammoth task. I was shocked just now, revisiting these pictures. A chance turn of events lead to me actually taking it on. I was telling a friend about my plans, a friend who actively likes sorting and tidying (I know?!), and she said, 'Right, we're going to do it'. I can't thank her enough. It took two long afternoons-into-evenings-into-the-small-hours to sort it all, and it was pretty tough going and stressful at points: so many things to have to decide to throw away; so many, sometimes painful, memories unearthed. (Some of the stuff at the back had been dumped in there when I moved into the flat and that wasn't the best time of my life.) But we did it! Can you see the little pixie door? Where the metal working pixies live?


Open wide and what's inside....


I hope you'll agree, it's a pretty remarkable transformation! This is going to be the tidiest it will ever look, I reckon!  I'm so chuffed; I've only just got to the point where I've stopped going in and turning on the light and just thinking, 'Eeeeeeeeeee!' One thing I hadn't remembered was that the naughty hole was actually an airing cupboard.


My first thought on seeing this beast (which actually serves all the flats in the damn building) was: 'Oh, thank goodness! That's several square foot of stuff I'm not going to have to drag out of here and and re-locate!' Once this relief had worn off I was a bit disappointed that it was lurking in there taking up precious space. Still, I reckon I'll live with it well enough.

So, it's now time to pick up the torch/saw/file/hammer, etc.  My classes started again last night. I'm making bezels for stones. I was working on my first one again this morning. I got to the stage where I had it looking all neatly trimmed and thought, 'Oooo, look, that looks like what it should look like! Will the stone fit nicely? Yes, it fits very nicely!' Hot on the heels of that thought came, 'Oooooo, look, is it? Yes, look, it is... it's.... stuck...'. I've tried finding something thin enough to lever it out, but nothing is thin enough. I've tried running water into it. I've tried tapping it on the back. I've tried tapping it on the back with a hammer. I've tried holding it in a pair of tweezers and hitting it on the back with a hammer. I've tried holding it in a pair of tweezers and hitting it on the back even harder with a heavier hammer. No joy. It's only a small, inexpensive, piece of moss agate but if anyone has any suggestions, do share!

I would have got going on the metalwork earlier in the month but there was other stuff to do in the studio, like glazing a big batch of beads.


I'll be listing all of these in the bead shop some time at the start of February - just in time for pay day! I also had a heap of beady makes planned that I wanted to make real. It ended up being quite a make-athon. Here's a small selection.


Art beads by Something to do Beads


Art beads by 4 Ophelia and Lucy Haslam

These and many more can be found in my jewellery shop.  

So, it's time for this week's giveaway! The prize will be - again! - a


There are two questions this week. First, the general one: What are your big - or not so big! - plans for your work in 2016? Do you want to learn a new skill, like me? Are you hoping to get your work out there in the world, in some galleries or shops? Perhaps you've been meaning to set up an online shop but have kept putting it off? Is now the time? Or maybe you just want to make a dent in your art bead collection and incorporate some of them in some great new designs? Will this be the year you finally make something with that awesome piece of treasure you've been hoarding? 

And a second question: do you have a trick or tip that might help me free my cabochon from its bezel? (See above!) If anyone comes up with a suggestion that actually works, they'll receive a little beady parcel too!

Thursday, January 28, 2016

a walk in the woods - with Julie of Uglibeads!

I was reading an old blog post of mine yesterday, about a series of beads inspired by the wilderness. And I got to thinking about inspiration and evolution, and how all the twists and turns in our lives ultimately lead us to something much greater than we could ever have imagined.

Follow Your Path bracelet bar by Erin Prais-Hintz

It's a bit like walking deep in the forest. You put one foot in front of the other, maybe watching out for fallen branches or holes so you don't twist your ankle. But until you reach a clearing, or a beautiful vantage point, you're not really sure where it is you're going.

Fall leaf pendant by Michelle McCarthy

I'm in a bit of a wistful mood these days. The end of 2015 and the beginning of 2016 brought me to some deep reflective places about my work, my goals, and where I want to focus my energy this coming year. I find myself struggling to keep up with all that goes into making a living as an art bead maker. You know - loving what I do, appreciating what I do, feeling grateful for what I do - while knowing that things could be better. Smoother. More peaceful. 

It's funny - when things get busy, the actual making of things is the first to go. Especially the new, exciting, experimental, untested, really creative things. Maybe if I'd had this guy in my pocket I'd have done a bit better - he looks like he has some magic to spare ;)

Fantastic Mr. Fox bead by Heather Powers

One of the things I've learned in life is that it's ok to pick things up, find beauty and meaning in them, hold on for a while, and ultimately let go. Objects, experiences, places, and people all weave themselves into our lives in complicated ways.

Beachcomber pendant by Mary Harding

There are times when you look down and find your hands full. Holding onto things. A lot of things. And you begin to feel the need to let go, to release, to make room for something new. I'm there, in that place. I need to put some things down before I can pick anything else up. And there are things within reach; new ideas, new directions I'm aching to explore, new skills to learn.

It's not easy to protect your creative time, but we all know that sometimes you have to make tough choices. Like letting go of good things (or great things!) to make way for unknown things. 

Scary, right?

Scored Sgraffito Focal Rice beads by Claire Lockwood

I try to be a very go-with-the-flow person. So when I get to a place in life that forces me to sit for a spell and think more seriously about what I'm doing and where I'm going, it's not comfortable. But I read the following quote (from astrology writer Rob Brezny) yesterday -

"As long as I live, I vow to die and be reborn, die and be reborn, over and over again, forever reinventing myself."

And I thought... YES. Because that's just the thing about creativity, isn't it? We create things, but in doing so, we also create ourselves.

I spent much of last year trying (sometimes not all that gracefully) to keep up with the wild branches growing every which way out of my creative practice. Cutting leaves off here and there. Tying the spindly shoots that were drooping to some makeshift support. But that approach is not sustainable, of course. Nor is it beautiful. It lacks vision and purpose.

So here we go - are you with me? 

This year it's deep work, pruning some BIG branches, in order to make space for all that's yet to come.

Branch Button by Tari Sasser

I'm ready. I'm excited. I'm wide open to freedom. Joy. Open to seeing the teeniest tiniest spots of color and wonder, wherever they are. And they are everywhere!

Crimson Picasso handwoven beads by Rebecca Anderson

In the spirit of making space for new experiences, this will be my last post as part of the ABS editorial team. The women who've created this blog have built something special here. It's a meeting place; a point of connection for people who love all things art beads. A celebration of creative community. So of course, deciding to move on wasn't easy - but it does help to know that I can still be an avid fan and reader, continuing to soak up all the beautiful inspiration. And I promise I'll try to remember to leave a comment more often - I know how good it feels to be appreciated and encouraged!!

As for what's next... once the pruning process calms down, I'll be feeling excited about all the possibilities! Sitting at my jeweler's bench practicing my new metalsmithing skills... making lots of new beads to keep my Uglipeeps happy, writing and sharing stuff in my Uglibeads Facebook group.. and following that path through the woods, wherever it leads. One step at a time.

I'll keep my eyes open, my feet moving, my heart happy and my spirit loving... And I have no doubt that the rest will fall into place, as it's meant to happen, when it's meant to happen.

 great love charm by Heather Millican

Henry David Thoreau said, "I took a walk in the woods and came out taller than the trees." And reflecting back on the time I've spent being inspired by the amazingly talented people who make this corner of the art bead world what it is... I think I know what he means.

Vivid Wilderness beads by Julie Wong Sontag

So as I sign off, may I offer an enormous thank you to the Art Bead Scene team - Heather P., Rebecca, Claire, Erin, Mary, Tari, Heather M. and Michelle. And to you, the lovely ABS readers. It's been a real pleasure.

I hope our paths continue to cross.

xo

Julie

<<  >> --- << >>


Julie is a glass beadmaker with a passion for building community and inspiring conversation around her writing. Her best work comes from that magical place where nature meets creative flow. She is fascinated by all things weird and wonderful. You will find her hanging out most days in her Uglibeads Facebook group or on Instagram, and you're invited to join in the adventure by signing up for her weekly email newsletter.

Wednesday, January 27, 2016

An Interview with Artist, Raida Disbrow from Havana Beads by Michelle McCarthy


I am lucky to have met Raida Disbrow from Havana Beads, at the Intergalactic Bead Shows Pompano Beach show, quite a few years ago.  I fell in love with her lamp work headpins for earrings, but really....I love everything she creates!  Raida is triple talented...lamp work, ceramic and jewelry designer.  I enjoyed interviewing her and this is what I found out.

How long have you been an artist? And how did you get started?


I’ve been on a creative path my entire life. In 2002 I started to make jewelry at a local bead store. There I discovered lamp work beads and knew I had to make them and incorporate them in my jewelry designs. By 2005 I was making lots of lamp work beads and making jewelry I sold at local art shows. In 2007 I opened Havana Beads on Etsy and the rest is history.


What are your favorite mediums?


My first love is lamp working. I love to work with wire and metals and also love to come up with unusual ceramic pieces and enameling.


What would you consider your designer style?


I consider my style “Earthy”.


Do you prefer making beads or designing jewelry?


I couldn’t possibly pick one or the other. Both are so important to my style.


Do you have a signature bead?


I think if you ask my customers they would probably say crusty beads and headpins. I love to make beads that are earthy in nature. My studio is located on the Manatee Pocket in Port Salerno, FL so I get a lot of inspiration from nature.


What is your favorite color combination?


Anything earthy! I love blues, browns, turquoise, greens, etc.


Where can we find your work?


You can find my work at havanabeads.etsy.com. I also have some jewelry listed at gentlewinddesigns.etsy.com. Most of my jewelry and beads can be found at my studio, which is open to the public, in Port Salerno, Florida. The address there is: 4745 Desoto Avenue, Port Salerno, FL 34997.


Thank you, Raida, for your wonderful beads and jewelry!  I am looking forward to seeing you in Pompano Beach again next month!


Perfect Pairings :: Legally Boho + Marsha Neal + Elukka + Grubbi + Gaea

 
There is an awful lot of beady goodness here!
This asymmetrical necklace is well balanced, which I love. I know it is hard to do that well and definitely takes practice! Clearly, Miss Niki is well versed in making each bead stand out on its own, while also contributing to the whole. My eye roves around this, stopping here and there, like stepping stones in a magical garden. There is an earthy softness to this necklace that will carry you right into spring and beyond.

Featured Designer: Legally Boho
Featured Bead Artists ::  

We are now using Pinterest! 
You can find more details in this post about the exciting new changes
,
including a board devoted to art beads inspired by the monthly challenge!
(Ooh! Look! More pretty beads to lust after!)

Pretty please make sure that you post a link in your Pinterest description so that I have someplace to attribute the picture! 
And don't forget to tell us about those art beads - providing links to bead makers is appreciated!

Deadline January 28th  - that's tomorrow! - to get your pictures posted to the Pinterest boards for the creation of the
Monthly Challenge Recap post for January 30th.

TIP: If you upload your photo to pin it rather than pin it from your blog or shop, edit the pin (the little pencil button) and add your link as the source. Save your edits. This will allow us to click directly on your photo and go to your blog or shop to read more about your entry. 

Monday, January 25, 2016

Amuse the Muse - Rose Quartz and Serenity - with Rebecca of Songbead

Hello everyone! Another week, another Amuse the Muse. It's the last week of Rose Quartz and Serenity, and I must say I have found a bumper selection for you this week! I hope you'll find something in this selection to inspire you - I must admit to still not being totally sold on these colours as being the standout 'colours of the year' as a duo, but I am much more sold on them than I was back in December when they were announced. You can check out my Pinterest board on these two colours here for more inspiration. 

Ok, now for the beads!


I hope you've enjoyed this month of exploring these two colours, and seeing what beautiful beads and components there are out there to work with. And, happily, these colours are also perfect for working into this month's challenge! There's still time to join us. 

And now for the BeadBlogger Links. Have a great week everyone!


Rebecca is a Scottish jewellery designer; currently living in the capital city of Edinburgh. You can read more about her and her work at her blog, songbeads.blogspot.com and see more of her jewellery at songbead.etsy.com. She also has a supplies shop at thecuriousbeadshop.etsy.com.

Saturday, January 23, 2016

Handmade Thank You Cards

January is the time of year that I restock my shipping supplies.  This year I am out of business cards, bubble mailers, boxes and thank you cards.  I can order all of these items on the Internet, which I have just done, except for the thank you cards.  Those I like to make myself .  In today's post I will share some ideas for a fun and fairly fast way of making up a batch of unique handmade cards.

I will be using my Gelli Arts Mono printing plate.  This product is easy to use and easy to care for. It is used with acrylic paints and soft tipped tools like Q tips and sponges.  It can be cleaned up with baby wipes or warm water and soap.  The plate comes in a clam shell case which it should be stored in.

There is lots of info on the Gelli Arts Website to help you get started with this wonderful versatile tool.
Supplies
Gelli Arts Gel Printing Plate (Amazon.com,  GelliArts.com)
Acrylic paints in tubes and 2 ounce bottles inexpensive ones are the best (Walmart, Michaels, JoAnns) Do not use oil paints
Soft point Q-tips ( cosmetic supply shop)
Baby wipes for cleaning the brayer and the Gelli pad
Stencils (any craft store like Michales, Hobby Lobby, JoAnns)
Paper cutter or trimmer
Thank You rubber stamp  (JoAnns or Hobby Lobby or Michaels)
Textures like lace, netting, sponges etc.

a mixed media paper  (Walmart, Michaels)

Brayer (amazon.com or art supply store)

A selection of the acrylic paints that I use, with some sponges and the Q tips I use that have a good point for drawing into the paint.  I get them from a cosmetic supply store

The Process for making your cards:


 Squirt some paint onto your gelli pad


Use the brayer to spread the paint over the pad 


draw  a design or image into the paint with the Q-tip then cover you image with a piece of paper and rub all over it so the paint will transfer


Your transferred image. It can often be a little bare or disappointing looking.  So now it the time to overlay another color or texture to your mono print.  Best to use a light color at this point. Or you could have started with a dark color and used a light overlay afterwards. You can also wait until your print has dried and do some hand coloring.  
More examples:


Put some color on a stencil resting on top of the gelli pad and roll it in with the brayer.  There is some gold color already on the pad from another print and it will add some nice nuances.  Often a good idea to not clean your pad between prints.

In this example I added the red color to the drawing directly from the paint tube with one of the Q tips.  


I added the extra purple color with a sponge


The picture on the left happened when I cleaned the stencil with a baby wipe and it colored all those empty spaces and made a print.


some examples drying--  they look a bit messy at this point but once the excess paper is cut off they will look fine

Stencil overlayed with other colors to give a more complex and colorful look


To Make the cards


Once you have let your pictures dry, trim off all the extra white paper and then cut each picture into 4 pieces.   That will make them fit nicely into your packaging box


Then stamp the individual pieces with a Thank You stamp and permanent ink

 Thank you card in a Kraft box that will got out to one of my customers.  I have hand written a note of thanks on the back of the card.

 I hope you have been inspired by this tutorial today to try your hand at making your own thank you cards.  It  is a fun, relaxing activity that should let you roam free with the paints and try out your wildest art dreams.  Have a good time!!!  Your customers will enjoy receiving your unique creations.
Thanks so for stopping by .
Mary